How to Configure Nginx as an HTTPS Reverse Proxy (Easily)

27 Revisions
")
Nginx is hands down the most popular web server among beginners and professionals. With the handy proxy_pass directive, you can easily build a reverse proxy in a few lines of configuration.
In this step-by-step guide, we’ll show you how to set up a reserve proxy with Nginx.
Table of contents
Why do you need a reverse proxy
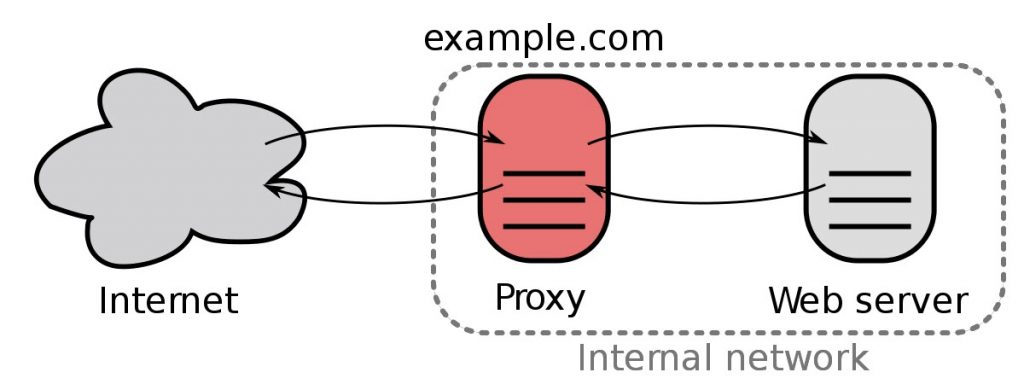
A reverse proxy acts as a portal between users and the real service, which is a common practice in deploying CDNs (Content delivery network). It’ll make your application scalable and resilient, as you can now control and monitor traffic with Nginx. And you can easily hide your backend API and avoid regional censorship with TLS.
Here’s some common use cases for reverse proxies:
- Load balancing to route incoming requests
- Monitor, redirect and log traffic
- Expose/Protect your backend services (HTTPS to HTTP)
- Accelerate web speed in other continents
And next we’ll show you how to set up a reverse proxy in just a few minutes.
How to set up an HTTPS reverse proxy with Nginx
Here’s an quick example of how to configure Nginx as an HTTPS reverse proxy. Although the tutorial targets Linux users, if you’re on Windows, you can just jump to the configuration part.
Prerequisites:
- Access to a Linux server (Debian/Ubuntu/CentOS) with a
sudouser (You can create a new server on Bluehost in just seconds) - A SSL certificate (Let’s Encrypt is free, but a business cert saves a lot of troubles and makes your site more credible)
- A domain (Grab one from GoDaddy or Namecheap)
Step 1: Install Nginx
First, you need to have Nginx installed on your server. To make it quick, we’ll be installing from the official repository of your Linux distribution. You can also get the latest build from the Nginx repo, or build from source if you need enhanced features or third-party modules.
Debian 9 or later & Ubuntu 18.04 or later:
sudo apt-get update
sudo apt-get install nginx -y
CentOS 7:
sudo yum install epel-release -y
sudo yum install nginx -y
CentOS 8:
sudo dnf install nginx -yStep 2: Edit the configuration
Next you can create a new one configuration for your domain:
Debian & Ubuntu:
sudo nano /etc/nginx/sites-enabled/demo.confCentOS 7:
sudo vim /etc/nginx/sites-enabled/demo.confCentOS 8 :
sudo vim /etc/nginx/conf.d/demo.confHere’s a quick example of a working reverse proxy configuration. (Note that you should replace the domain and the location of certificate with the ones of your own.)
server {
   listen 80;
   server_name example.yourdomain.com;
   return 301 https://example.yourdomain.com$request_uri;
 }

server {
   listen 443 ssl;
   server_name example.yourdomain.com;
   ssl_certificate  /path/to/your/certificate;
   ssl_certificate_key  /path/to/your/certificate/key;
   ssl_prefer_server_ciphers on;

   location / {
        proxy_pass http://localhost:8080;

        proxy_set_header        Host $host;
        proxy_set_header        X-Real-IP $remote_addr;
        proxy_set_header        X-Forwarded-For $proxy_add_x_forwarded_for;
        proxy_set_header        X-Forwarded-Proto $scheme;
}
In the example above, we assume you have a backend service running at the 8080 port. If you find this config doesn’t work for you, check if your backend service needs additional configurations.
Common pitfalls and solutions
If the reverse proxy doesn’t work as expected, you should first take a look at the error log:
less /var/log/nginx/error.logBut sometimes there’ll be no error at all. Maybe it’s the wrong configuration, or maybe it’s your backend. Either way, you can start troubleshooting by checking the common mistakes below.
1. 502 Bad Gateway caused by wrong upstreams
Wrong configuration:
upstream backend {
        server 111.111.111.111; # Use your own IP address
}
server {
...
location /{
  proxy_pass https://backend;
    }
}
Cause:
In this example, the configuration contains the proxy_pass directive and the upstream module. A 502 Bad Gateway error was raised due to the misconfiguration of server address in upstream.
Here’s the Nginx documentation for the server block:
Defines the
addressand otherparametersof a server. The address can be specified as a domain name or IP address, with an optional port, or as a UNIX-domain socket path specified after the “unix:” prefix. If a port is not specified, the port 80 is used. A domain name that resolves to several IP addresses defines multiple servers at once.
Solution:
Specify the port number in the upstream block:
upstream backend {
        server 111.111.111.111:443; # User your own IP address
}
server {
...
location /{
  proxy_pass https://backend;
    }
}
Then reload the config with sudo nginx -s reload.
2. 502 Bad Gateway due to wrong certificates
If you’re hosting multiple domains on one IP address, you’ll need to configure SNI (Server Name Indication) manually. SNI is an extension to the TLS protocol that allows a server to have multiple certificates on the same IP address and TCP port number.
When a client establishes a connection to a server, it refers to a specific IP address. You don’t need SNI for HTTP sites, but since the TLS handshake doesn’t allow clients to indicate which domain they’re requesting, SNI then becomes necessary. (This is especially the case if you’re on CDN.)
Example 1: Configure SNI without the upstream directive
Wrong:
server {
    ...
    location /{
        proxy_pass https://your-backend.com;
      }
}
Correct:
server {
    ...
    location /{
        proxy_pass https://your-backend.com;
        proxy_ssl_server_name on;
        #proxy_ssl_name $proxy_host;
    }
}
The proxy_ssl_server_name directive enables passing of the server name through TLS Server Name Indication extension (SNI). If there’s no upstream, setting proxy_pass as your-backend.com gives $proxy_host the same value. Enabling proxy_ssl_server_name passes your-backend.com to the upstream server. (proxy_ssl_name $proxy_host is the default setting.)
Example 2: Configure SNI with the upstream directive
Wrong:
upstream backend {
        server 111.111.111.111:443; # Use Your own IP address
}

server {
    ...
    location /{
        proxy_pass https://backend;
        proxy_ssl_server_name on;
    }
}
Correct:
upstream backend {
        server 111.111.111.111:443; # Use Your own IP address
}

server {
    ...
    location /{
        proxy_pass https://backend;
        proxy_ssl_server_name on;
        proxy_ssl_name your-domain.com;
        proxy_set_header Host $host;
    }
}upstream is: the upstream directive defines a group of servers that can be referenced by the proxy_pass directive.During a TLS handshake, you need to specify the domain with the proxy_ssl_name directive, whose value is now set to a variable named backend as upstream is defined. Additionally, for the upstream directive to work, you need to pass the $host variable to the proxied server with the proxy_set_header directive.
| Directive | Default |
proxy_set_header | Host $proxy_host; |
3. 400 Bad Request
This usually happens when plain HTTP requests were sent to an HTTPS port. In that case, change the proxy_pass variable to an HTTPS address.
Wrong:
upstream backend {
        server 111.111.111.111:443; # Use your own IP address
}
server {
...
location /{
    proxy_pass http://backend;
    }
}
Correct:
upstream backend {
        server 111.111.111.111:443; # Use your own IP address
}
server {
...
location /{
    proxy_pass https://backend;
    }
}


. Easily!")

![MacBook Pro Not Connecting to WiFi [FIXED]](https://www.supereasy.com/wp-content/uploads/2019/08/apple-1846277_1920-768x512.jpg "MacBook Pro Not Connecting to WiFi [FIXED]")
")
")
")

 in 2024")
")