What is Other on iPhone Storage?

15 Revisions

Have no idea of Other on your iPhone Storage? Don’t worry. You’ll learn what Other exactly is here in this post. And more importantly, you’ll know how how to clear Other.
When having been using your new iPhone for several months or one year, you may find your iPhone is running slower. Then you check the the storage on your iPhone in Settings and see that besides Apps, Audio, Photos, Media, there is one category called Other taking up a lot of your iPhone storage. You might wondering what Other exactly is and how to clear it.
Here’s the right place you get in then. You’ll find the answers for Other in this post.
Q1: What is Other on iPhone Storage?
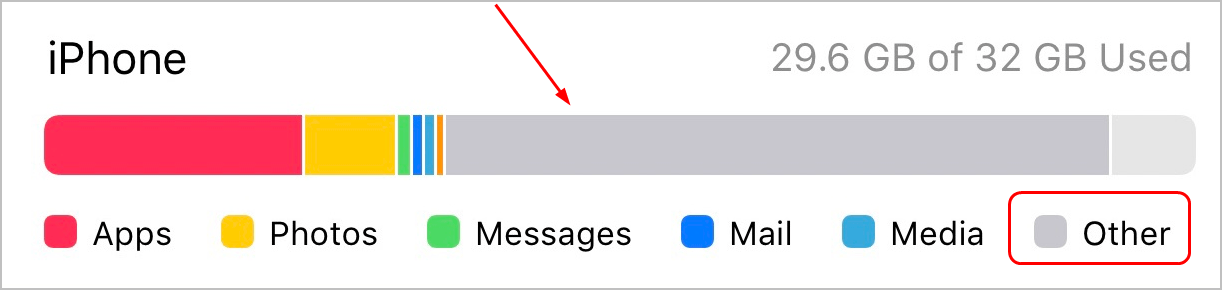
In your iPhone Storage, you see Audio, Video, Photos, Apps, Books, Documents & Data, which you can easily tell what they are. But Other? What’s that? And why does it takes that much storage space?
Don’t worry. You’re not alone to have this problem. Here’s the answer: iPhone keeps your Settings, Siri voices, system data and cached files in Other. From your iPhone has been used, the storage space Other takes up gets larger and larger. If you don’t clear them, you iPhone storage would become full soon especially if you’re using an 8G or 16G iPhone.
Q2: How do I check Other on my iPhone Storage?
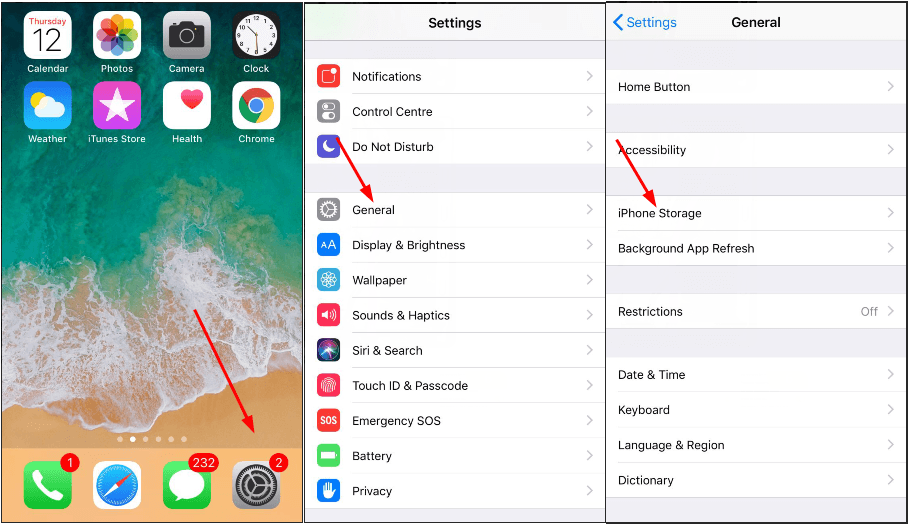
You can check Other on iPhone Storage through these small taps:
On your iPhone, tap Settings > General > iPhone Storage. Wait a minute for your system to calculate the category size, you’ll then see Other:
Move on to the next part to learn to clear the Other section on your iPhone.
Q3: How can I clear Other storage on my iPhone?
Below you’ll learn several simple methods to clear Other storage on your iPhone. You could try some or even all of them to free up your iPhone space. Besides, you’ll learn two bonus tip to keep your iPhone clean.
Let’s start.
Method 1: Clear your browser caches
There’s a good chance that you’ve never clear your browser caches on your iPhone. And I bet you’d be surprised when you check the storage space these caches take up after your heavy browsing.
Follow to clear your browser caches:
If you’re using Safari:
1) On your iPhone, go to Settings > Safari > Clear History and Website Data.
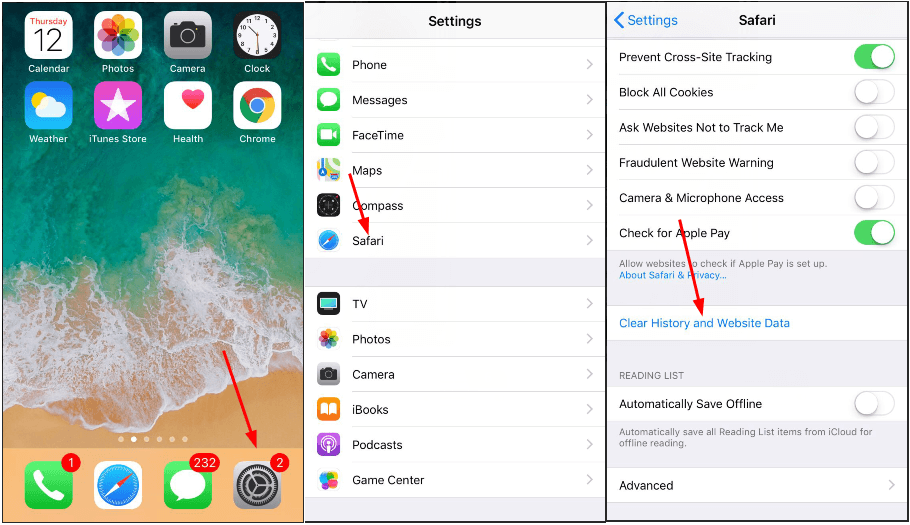
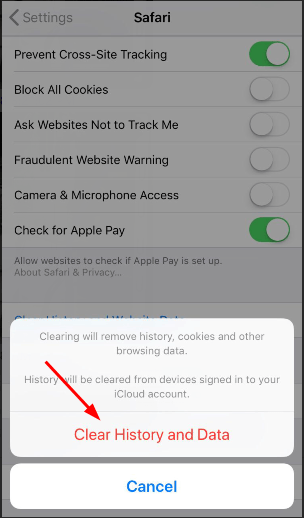
2) Tap Clear History and Data to confirm.
If you’re using Chrome:
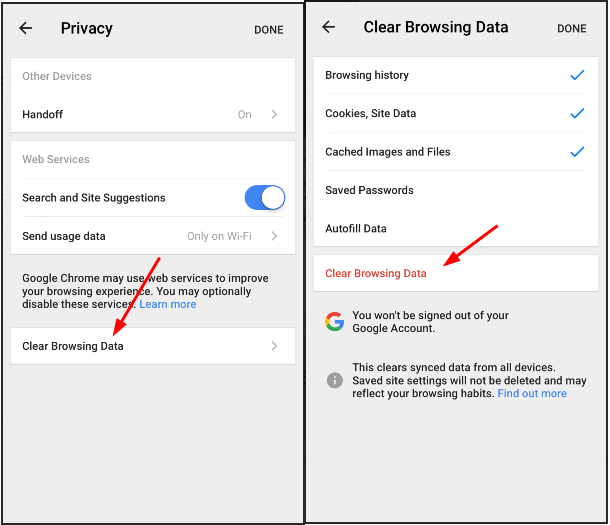
1) On your iPhone, tap Chrome > More Options > Settings > Privacy.
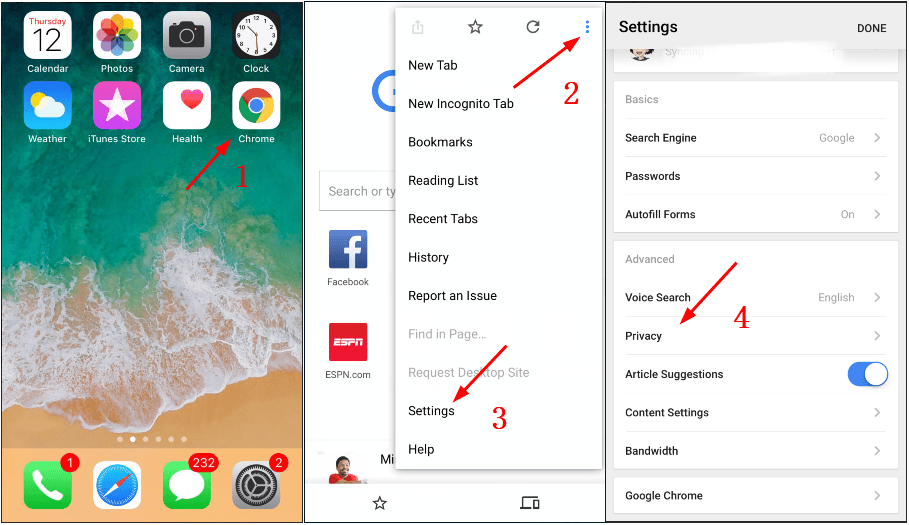
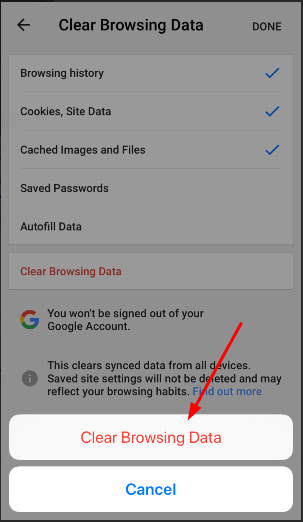
2) Tap Clear Browsing Data. You can then select which contents you want to clear. Then tap Clear Browsing Data.
3) Tap Clear Browsing Data to confirm.
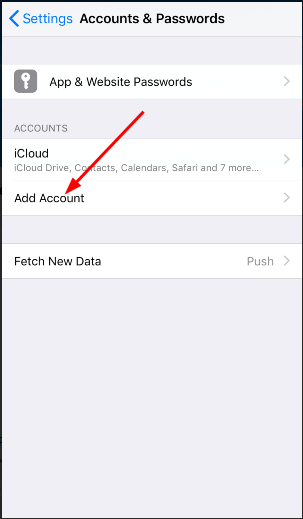
Method 2: Clear your Mail caches
Except the browser caches, your Mail caches may also capture a very large amount of Other storage. You can clear your Mail caches quickly through these steps:
1) On your iPhone, tap Settings > Accounts & Passwords > your Email account
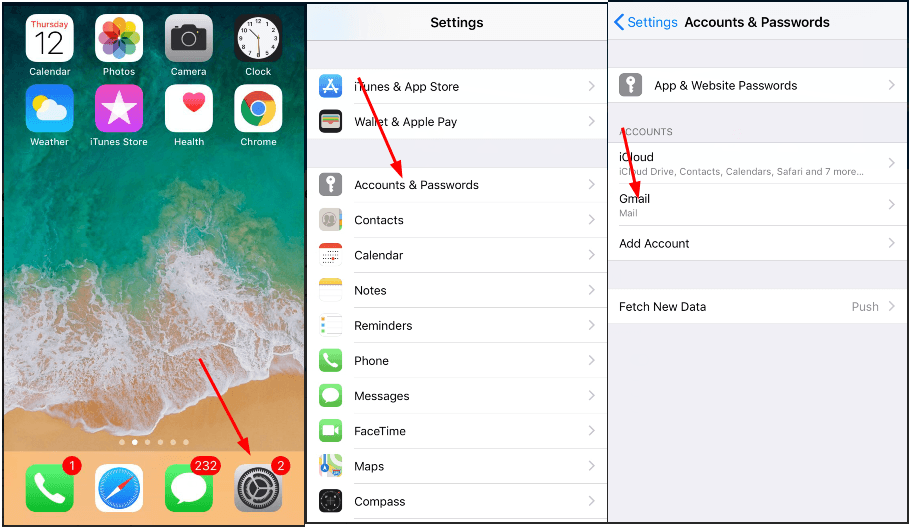
2) Tap on Delete Account, then tap Delete Account again to confirm.
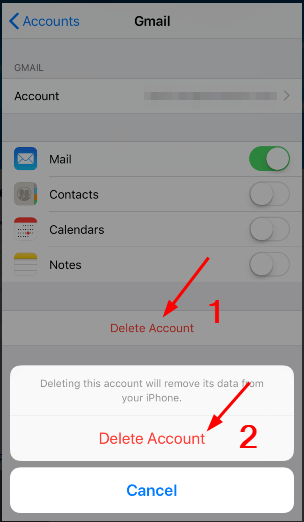
3) Tap the back icon and then Add Account by following the on-screen instructions.
Method 3: Reinstall your apps that have large caches
There could be other apps on your iPhone that have large caches. You can reinstall them to clear caches.
Important: The steps below may delete your app and all related data, please choose the app you didn’t save any important data or backup your data before reinstalling your app.
1) On your iPhone, tap Settings > General > iPhone Storage.
2) Tap the app you decide to reinstall.
3) Tap Delete APP, then tap Delete App again to confirm.
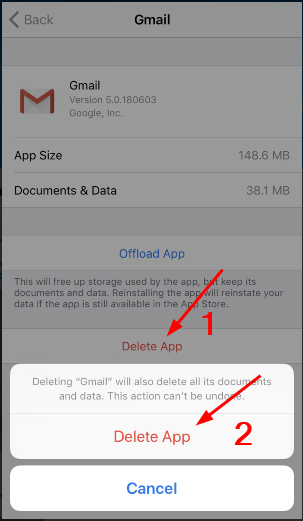
4) Go to App Store to download the app you just delete.
Method 4: Offload those apps you aren’t using
There’re some apps you don’t use any longer or not that often on your iPhone. In this case, you can offload these apps on your iPhone to earn more storage. The Offload App feature on iPhone can free up storage used by the app, but keep its documents and data. When you reinstall the app, your data will be reinstated at the same time.
Follow to offload those apps you don’t use.
1) On your iPhone, tap Settings > General > iPhone Storage.
2) Tap the app you don’t use.
3) Tap Offload App.
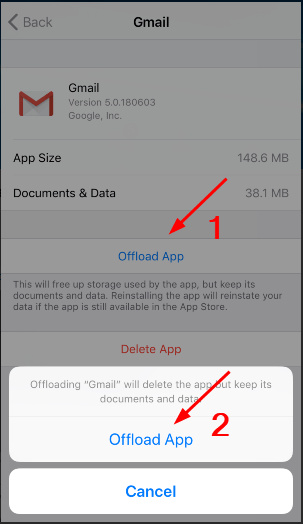
4) Whenever you want to use the app again, go to App Store to reinstall it as long as the app is still available.
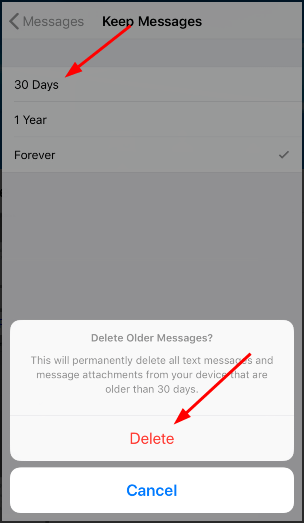
Method 5: Set Keep Messages to 30 Days
The messages you send and receive would be stored on your iPhone forever by default. Your older messages can also takes up storage as Other. So follow to delete the older messaged on your iPhone and set Keep Messages to 30 days.
1) On your iPhone, tap Settings > Messages > Keep Messages.
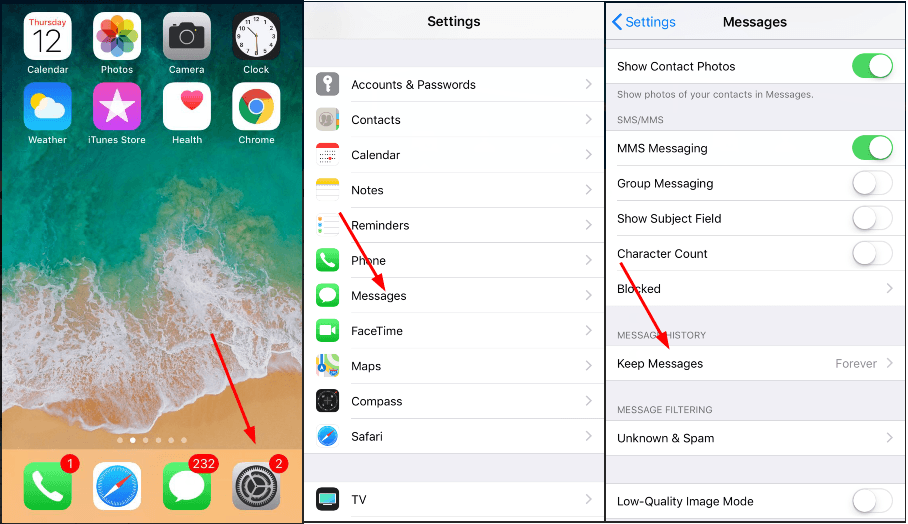
2) Select 30 Days. You’ll then be asked to confirm Delete Older Messages, tap Delete.
Method 6: Erase all your Voicemail messages
If you’ve been used Voicemail, and didn’t delete any older messages before, the Voicemail messages can also takes up your iPhone storage as Other.
See how to clear your Voicemail messages:
1) On your iPhone, tap Phone > Voicemail.
2) Tap Edit and then select all the Voicemail messages you want to delete.
3) Tap Delete.
4) Go to the Deleted Messaged folder and tap Clear All.
Method 7: Delete Siri voices you no longer needed
If you use Siri a lot, like the Speak Screen feature, there would be a lot of Siri voices stored on your iPhone. Just delete Siri voices you no longer needed to free up your iPhone storage.
Follow these steps:
1) On your iPhone, tap Settings > General > Accessibility.
2) Proceed to tap Voiceover > Speech.
3) On the voice you want to delete, swipe from right to left. Then tap the delete icon.
Bonus Tip:
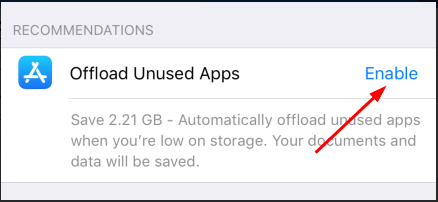
Tip 1: Using the built-in Recommendations
If your iPhone is runing iOS11 onwards, you may see the built-in Recommendations just below where you see Other on your iPhone.
You can enable those recommendations to free up your iPhone Storage.
See how to do that:
On your iPhone, tap Settings > General > iPhone Storage.
You’ll then see one or More Recommendations there. Tap Enable.
Tip 2: Using a trusted third-party tool
If you don’t have that much time to perform each methods one by one manually, you can, instead, select a trusted third-party tool to help you clean your iPhone. But please keep in mind that you should select a green and trusted tool to keep you iPhone safe when you connect your iPhone to the tool.
Tada! There’s all there is to it. Hopefully this helps you free up much of your iPhone storage. Feel free to comment below with your own experiences, and to share it with your friends who also use iPhone.
![There was a problem downloading the software for the iPhone [SOLVED]](https://www.supereasy.com/wp-content/uploads/2018/09/img_5baf46fe2d81a.png "There was a problem downloading the software for the iPhone [SOLVED]")
![[Fixed] iTunes could not restore the iPhone because the iPhone disconnected](https://www.supereasy.com/wp-content/uploads/2018/10/Snap29-768x251.jpg "[Fixed] iTunes could not restore the iPhone because the iPhone disconnected")
![How to Back up iPhone to iCloud Easily [with Pictures]](https://www.supereasy.com/wp-content/uploads/2018/06/ICLOUD-768x403.png "How to Back up iPhone to iCloud Easily [with Pictures]")
![How to Fix “Share My Location Unavailable” [With Pictures]](https://www.supereasy.com/wp-content/uploads/2018/09/img_5b924a89f168b.png "How to Fix “Share My Location Unavailable” [With Pictures]")
![How to record the screen on iPhone [SOLVED]](https://www.supereasy.com/wp-content/uploads/2018/10/internet-3113279-768x512.jpg "How to record the screen on iPhone [SOLVED]")

")
")
")

 in 2024")
")