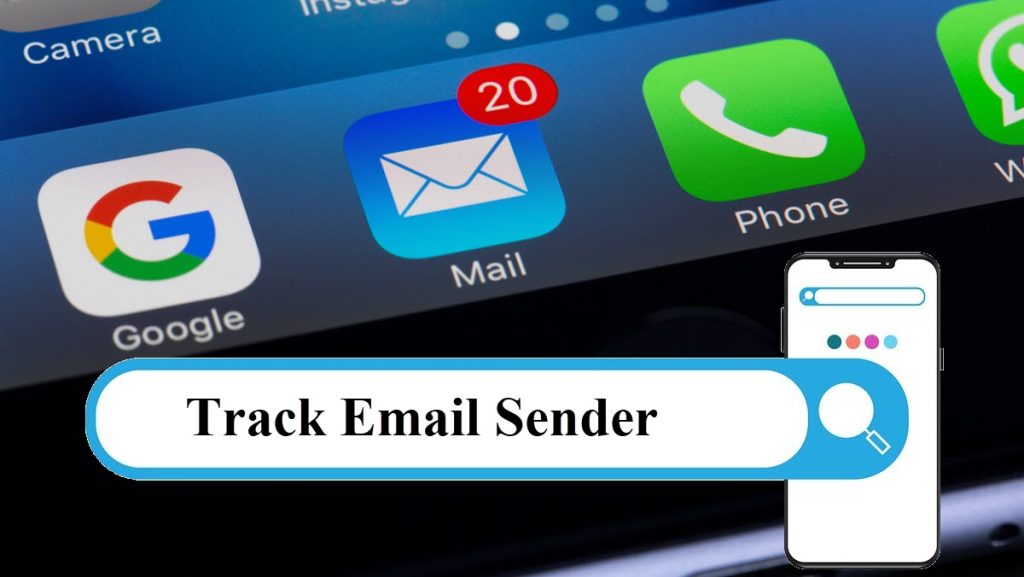
We use email addresses frequently in our lives — signing up for a new account, filling out a form, or even sharing it on social profiles. Unsurprisingly, we receive emails from unknown senders from time to time. If you’re haunted by mysterious emails repeatedly, you’re in the right place. This post will show you how to track an email sender and hide your real email address online.
How to track an email sender?
There are 3 methods to track down email senders — find the IP address, use people search engine, and search on Google and social media.
Method 1 Track email IP
Well, actually you can’t get the real IP addresses of the email sender, at least not in Gmail. Growing concerns about sensitive information put established email service providers hide their user’s IP addresses. When you send an email, it will be processed by the provider’s server before reaching the receiver. Therefore, the IP address you find probably belongs to the provider.
However, it doesn’t mean you find no luck in this trick. You can still trace IP address from emails.
- Open your email client or website.
- Open the email you’re curious about.
- Click the three dots icon on the right and choose Show original.
- Copy the IP address on SPF (sender policy framework).

- Browse a free IP address lookup tool to get more details about the IP location.

You can get a rough location of the IP instead of a specific street. This may not meet your need to reveal the real identity of the email owner. But don’t worry, check the next method below.
Method 2 Email sender lookup with BeenVerified
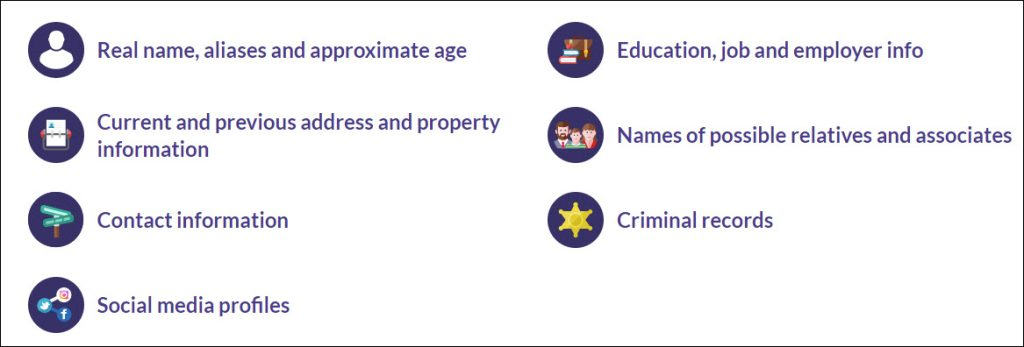
BeenVerified is your go-to option to search for someone with limited info. Its 7-in-one people search tool helps people spot spam, reconnect with family, and avoid financial loss. It collects, sorts, and stores billions of public records so as to provide valuable and helpful reports when people enter a name, phone, email, address, username, or vehicle to run a search.
What you may find in this confidential report? Here is a list. (Information may differ based on the people you search.)
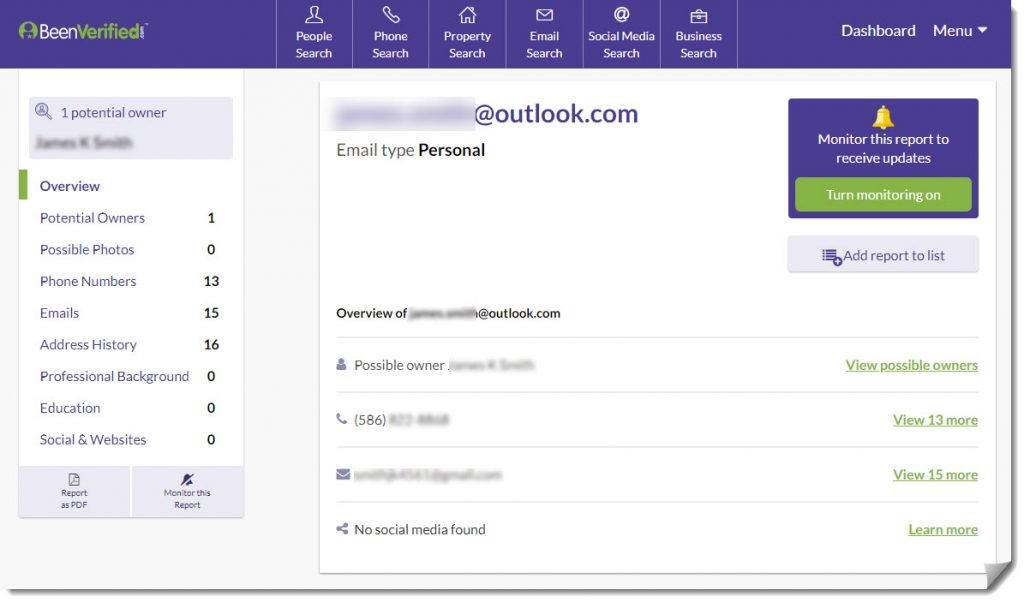
With BeenVerified, you can simply reveal more information about the email sender. So just fill in the email address on search page, you’ll be redirected to its report page which will be ready in minutes.
Purchase a member account and scroll down the report to find what interests you most — name, contact info, possible photos, address history, education, social media, etc.
Method 3 Use search engines or social media
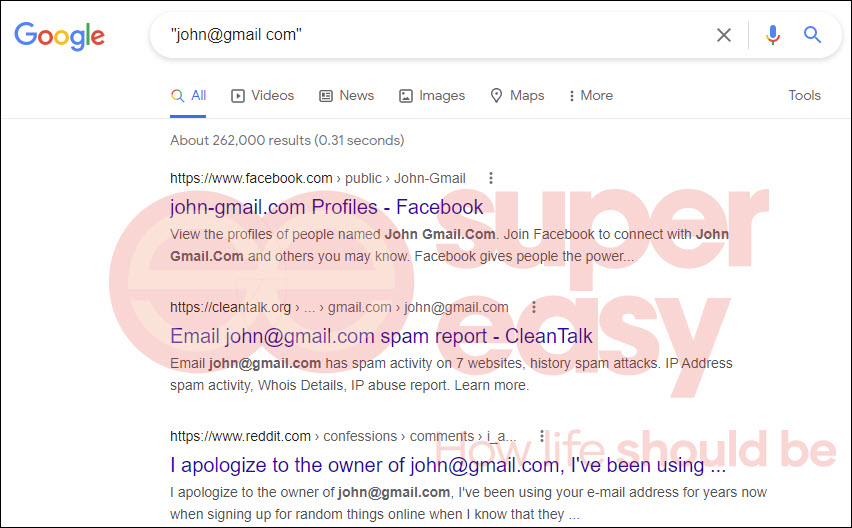
If the email address you’re looking for happens to connect with a company, or if someone has posted it on forums, you may obtain useful information when searching it on Google or Bing. In addition, using quotation marks can ensure that you get the result pages exactly matching your search.
Apart from that, social platforms also serve as useful information providers since some require an email address to sign up for an account. The email address you’re researching may be linked to a specific account or appear on one’s profile. Hence, try to enter the email address on the search bar of social networks (eg. Facebook, Twitter) and glance over the result.
How to hide real email addresses?
If you find it hard to track an email sender, this section may give you some hints.
With these tips, you can hide your real email on some websites that churn out promotion emails frequently and make your inbox overwhelmed. Meanwhile, you can still check these emails using just one email account.

1. Create email alias
An email alias makes your email address look different from your original one, but they’re actually the same. You can create task-specific email addresses with your current email, improving your effectiveness.
For example, if you’re using Gmail tery@solar.com, you can just add a plus sign (+) and any word before the @ symbol to create your email alias. You can:
- Sign up for newsletters with tery+newsletters@solar.com;
- Let clients contact tery+work@solar.com;
- Contact your friends at tery+life@solar.com.
All the messages sent to the above addresses can be received by account tery@solar.com. Then you can create labels to sort these emails so that filters will work for all incoming messages. For instance, you can create a News label for all emails sent to tery+newsletters@solar.com. When you’re ready to read them, click News in your list of labels to find them.
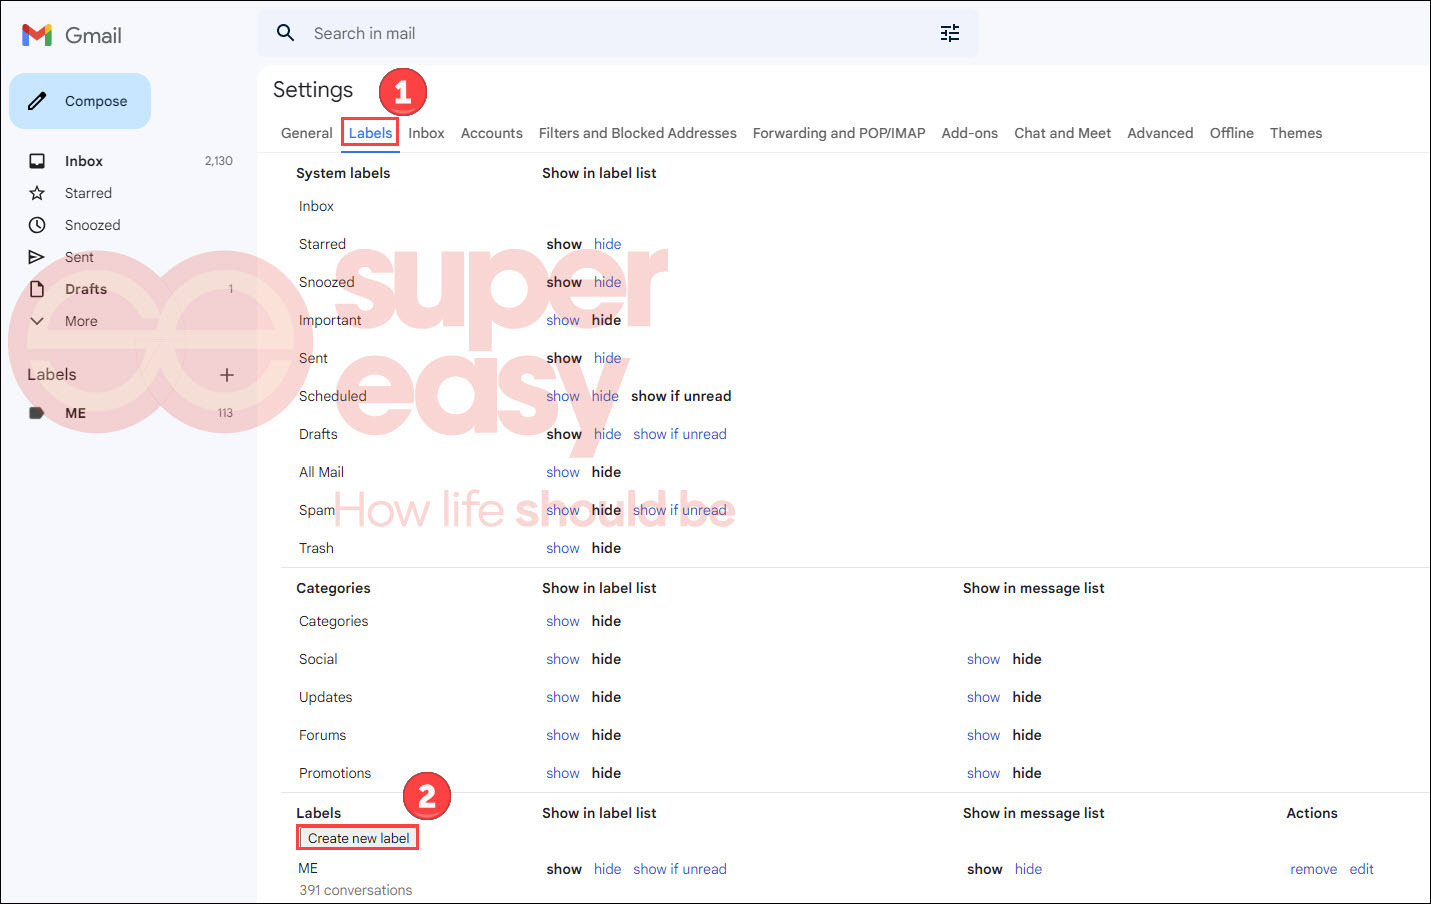
Here is how to create a label and filter:
- Open Gmail on the web and click the gear icon to open Quick settings. Then click See all settings.

- Choose the Labels tab and click Create new label.
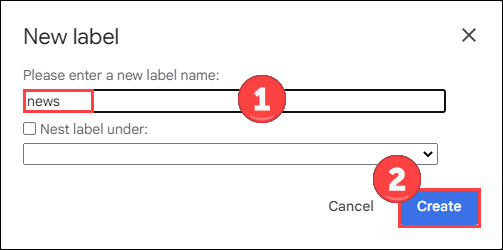
- Fill in the name of your new label (eg. news) and click Create.
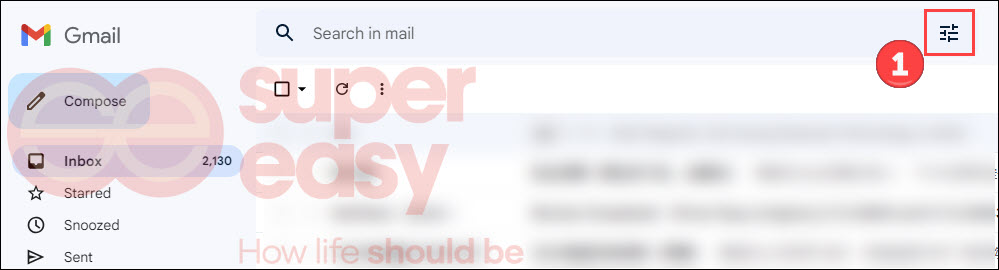
- Click the icon on the right of the search bar.
- Enter your email alias address into the To field in the dropdown menu. Then click Create filter.
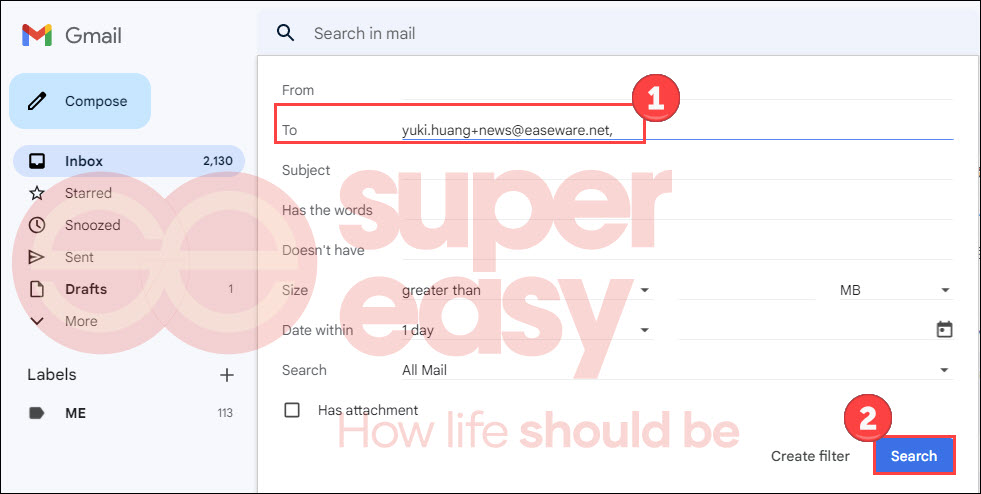
- Check Apply the label: and choose your new label’s name. Click Create filter.

Next time you can leave this alias email on Newsletters and read emails sent to this address by clicking the news label on the left.
In addition, you can add dots to create a Gmail alias, but it only works with emails ending with @gmail.com. If your email is yukihuang@gmail.com, you own all dotted versions of your address:
- yuki.huang@gmail.com;
- y.u.ki.hua.ng@gmail.com;
- y.u.k.i.h.u.a.n.g@gmail.com
You can receive all emails sent to the above addresses.
However, if you’re using other email services like Outlook or Yahoo, click for their official guideline on using an email alias.
2. Use anonymous emails
Burner email accounts enable you to send and receive emails anonymously. Most services are provided free without creating an account. Therefore, if you just need an email account for a period, these burner emails may be your best choice because they expire and destroy themselves regularly.
If you only need a temporary send-only email, try AnonymouseMail. If a receive-only inbox is what you want, you can use Mailinator or TrashMail. When it comes to sending and receiving emails anonymously, ProtonMail or Tempmail may fulfill your need.

Hide IP Address with VPN
Send anonymous emails;
5500+ servers in 60 countries;
30-day free trial.
Read more: How to Hide My IP Address
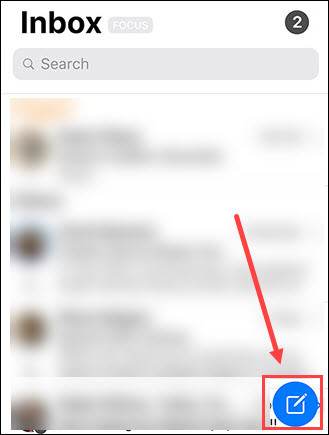
3. Use Hide My Email on iPhone
iCloud+ subscriber? Then you can generate unique, random email addresses while keeping your real one private. Here’s how:
- Open the Mail app on your iPhone and tap the icon on the bottom right.
- Add a recipient and subject as you normally do.
- Tap the From field, tap it again, then tap Hide My Email.
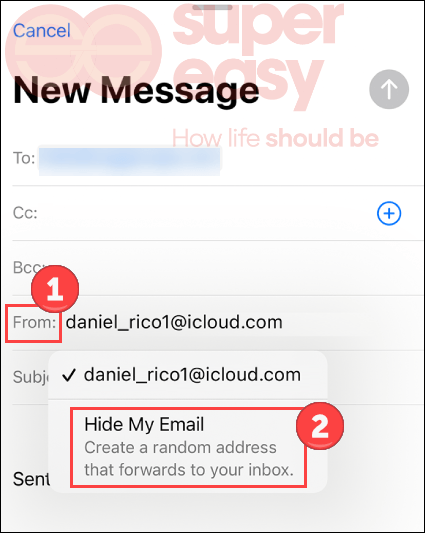
Using Hide My Email, you can only send a message to one recipient at a time. But their reply is forwarded to your real email address and you can reply using the same fake email address. Check Apple guidelines for more details.
That’s all. Hope you find this post helpful in tracking an email sender and hiding your real email address. If you have any questions or suggestions, please feel free to leave a word below.
About this article
![]() 39 Revisions
39 Revisions
![]() Reviewed by BeenVerified
Reviewed by BeenVerified

Contributors
Customer Experience Director
About this article
![]() 39 Revisions
39 Revisions
![]() Reviewed by BeenVerified
Reviewed by BeenVerified
Contributors
Customer Experience Director


")


")
")
")
")

 in 2024")
")