[SOLVED] How to use VPN on Nintendo Switch

73 Revisions
![[SOLVED] How to use VPN on Nintendo Switch](https://www.supereasy.com/wp-content/uploads/2021/06/How-to-set-up-VPN-on-Nintendo-Switch-1.jpg "[SOLVED] How to use VPN on Nintendo Switch")
If your Nintendo Switch takes forever to download a game from the Nintendo eShop in other regions, or if you were constantly suffering from in-game delay / lag in multiplayer online games, don’t worry, you’re not alone. Thousands of Nintendo Switch players have reported the same issue. The good news is such issues can be fixed by using a VPN. With a VPN, you’ll enjoy a faster download speed and get an advantage over other players in online gaming.
In fact, the benefits of using a VPN on your Nintendo Switch go far beyond this. Here’re just a few good reasons why you need a VPN on your Nintendo Switch:
- Download & update games at lightning speed
- Reduce lag and in-game delay
- Get exclusive game deals in other regions
- Avoid ISP bandwidth throttling
- Protect your online identity
- Protect your device from DDoS attacks
In this article, you’ll learn how to how to set up VPN on Nintendo Switch. After reading it, you’ll enjoy secure gaming with VPN.
How to set up VPN on Nintendo Switch
Unlike smartphones, Nintendo Switch doesn’t support the installation of VPN apps. Fortunately, there are 3 solutions to fix it. In this article, you’ll find step-by-step instructions for each fix.
Try these fixes:
Fix 1: Use a hotspot
You just need to install a VPN application on your laptop, smartphone, or tablet and connect to a VPN server. Then set up a mobile hotspot and connect your Nintendo Switch to it. That’s it!
Step 1: Connect your laptop, smartphone, or tablet to a VPN server
If you don’t have a VPN server, or if you don’t have time, patience or computer skills to configure a VPN server on your own, you may want to choose a mature VPN solution on the market.
A paid and reliable VPN usually delivers a better and more stable performance during peak hours, so it guarantees your smooth gaming experience while playing online games on Nintendo Switch.
If you’re not sure which VPN you should choose, here we recommend: NordVPN. With NordVPN, you can optimize your gaming, risk-free.
Enjoy secure gaming with NordVPN!
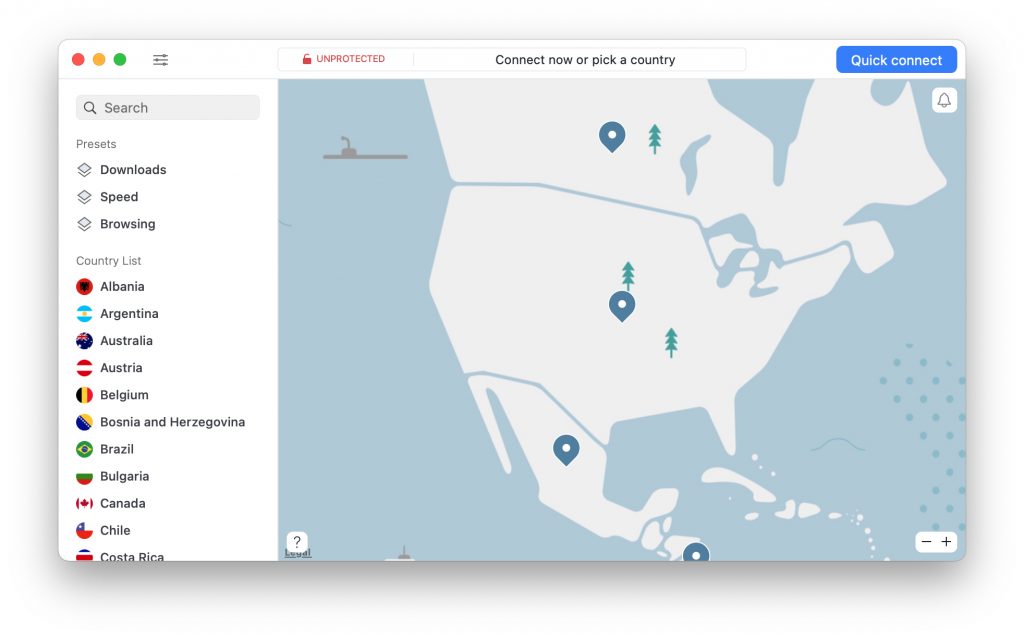
After you installed NordVPN on your device, launch it and log in with your Nord Account.
Then click Quick connect to let the NordVPN app find the best VPN server for you. If you want to connect your device to a VPN server in a particular country, just click on that country pin or scroll down the server list and pick the country you want to connect to.
Step 2: set up a mobile hotspot
Next, you need to set up a mobile hotspot on the device that has connected to NordVPN server.
The steps to turn on mobile hotspot vary depending on the device you’re using. Select the device you’re using to jump to the step-by-step instructions:
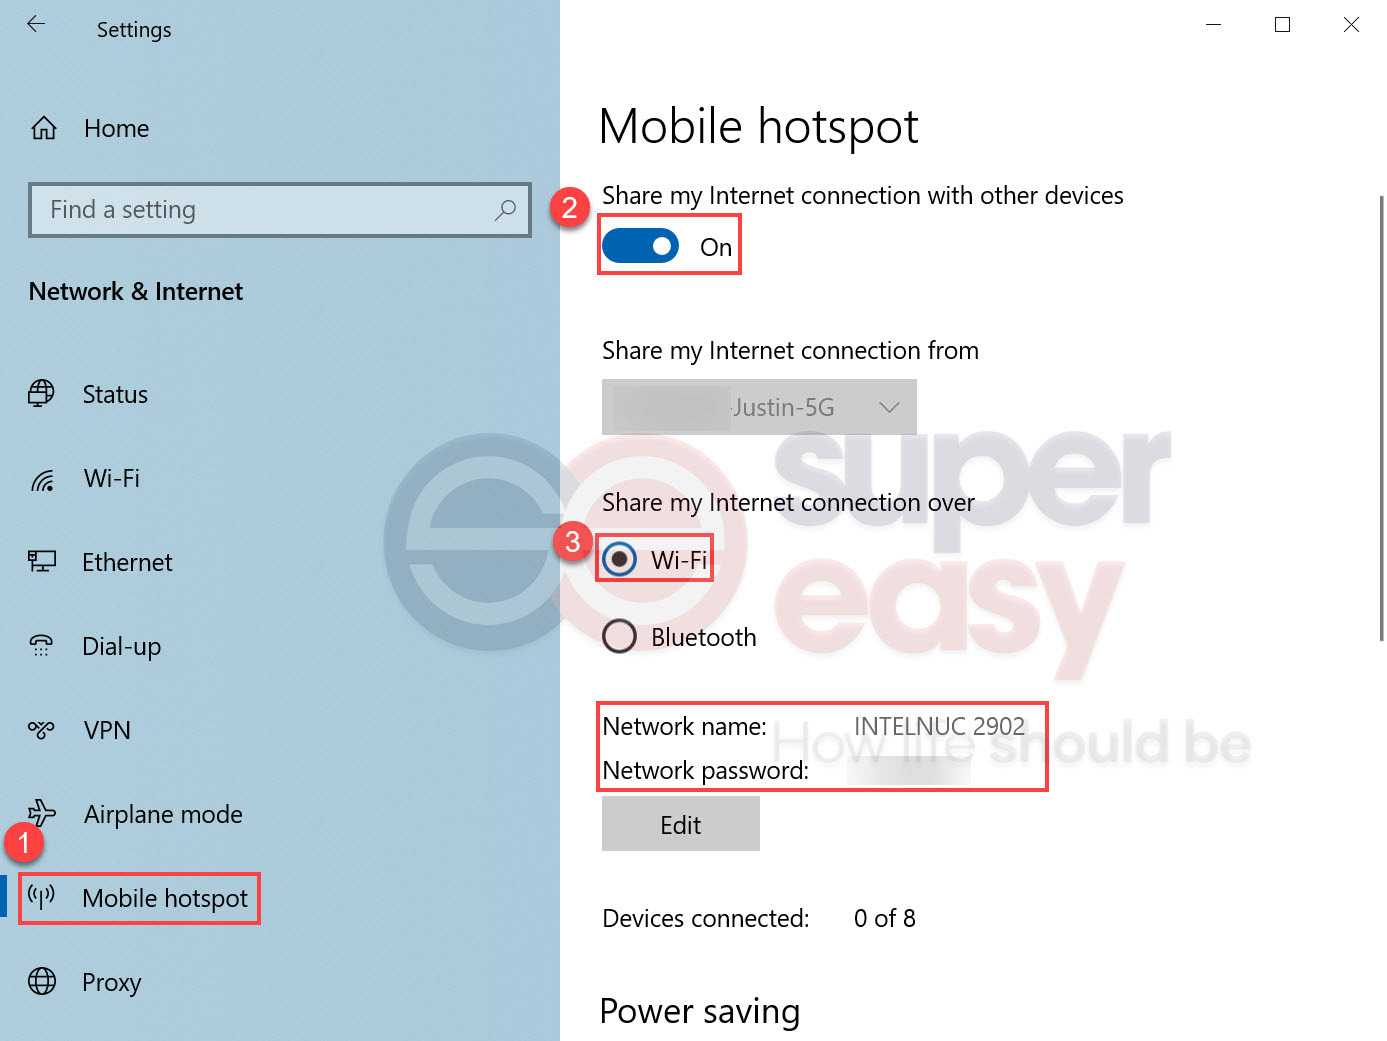
Windows 10 device:
- On your keyboard, press the Windows logo key and I at the same time to open Windows Settings. Go to Network & Internet > Mobile hotspot.
- Turn on the toggle under Share my Internet connection with other devices. Make sure you share your Internet connection over Wi-Fi.
Mac:
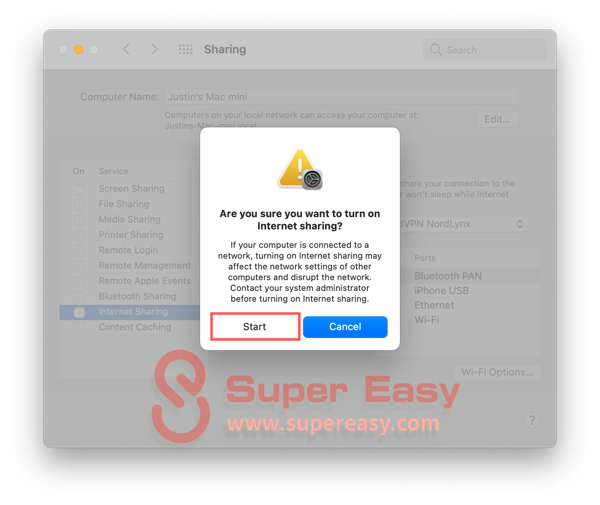
- Go to System Preferences > Sharing, then select Internet Sharing but not check the box next to it.
- In the Share your connection from: part, select NordVPN NordLynx. Then check the box net to Wi-Fi in the To computers using: part.
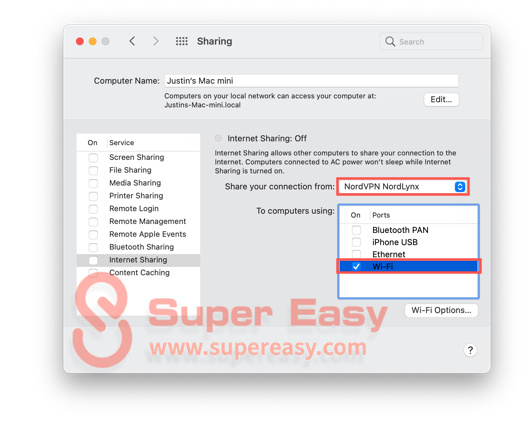
- check the box next to Internet Sharing.
- In the window that pops up, enter the name and password of the network you want to configure. In the channel section, channel 1 or 11 are recommended as these channels generally experience the less amount of wireless interference.
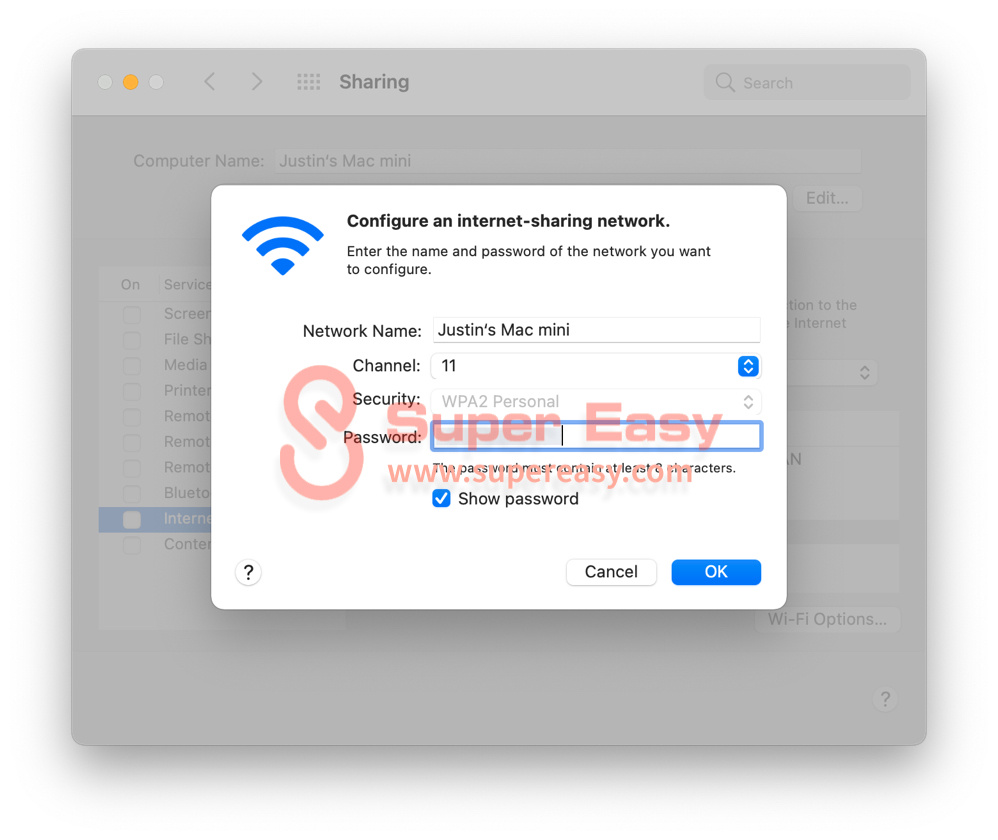
- Click Start to turn on Internet sharing.
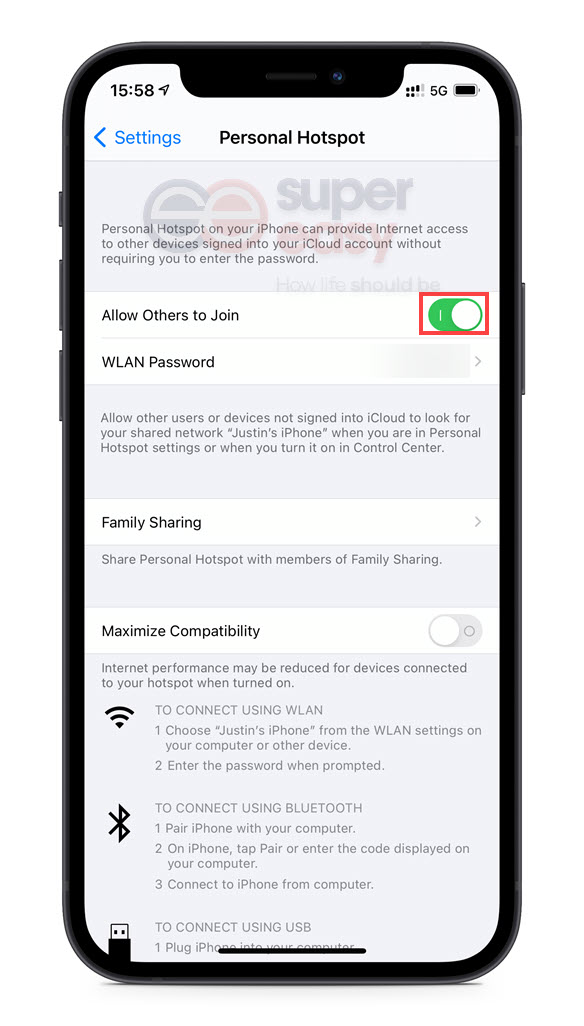
iOS device:
- Unlock your iOS device and go to Settings > Personal Hotspot.
- Turn on the toggle next to Allow Others to Join.
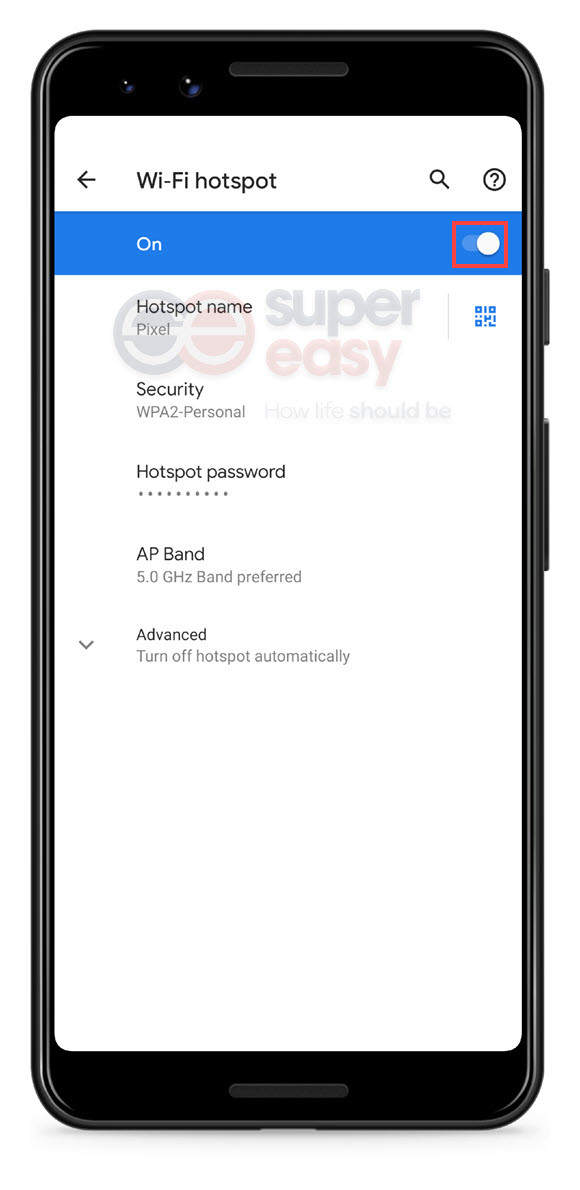
Android device:
Here I’ll take Google Pixel 3 as an example to show you how to turn on mobile hotspot on your Android device:
- Unlock your Android device and go to Settings > Network & internet > Hotspot & tethering > Wi-Fi hotspot.
- Tap the toggle to turn on Wi-Fi hotspot.
Step 3: Connect your Nintendo Switch to mobile hotspot
After you created a mobile hotspot, it’s time to connect your Nintendo Switch to the mobile hotspot. Here’s how to do it:
- On your Nintendo Switch, go to System Settings > Internet > Internet Settings.
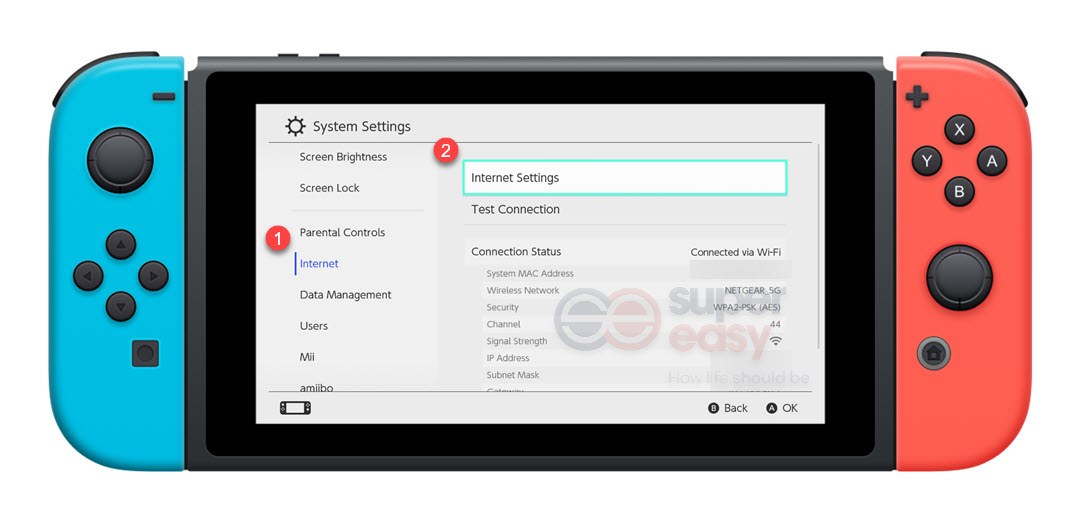
- Find the mobile hotspot from the Networks Found list and connect your Nintendo Switch to that mobile hotspot.
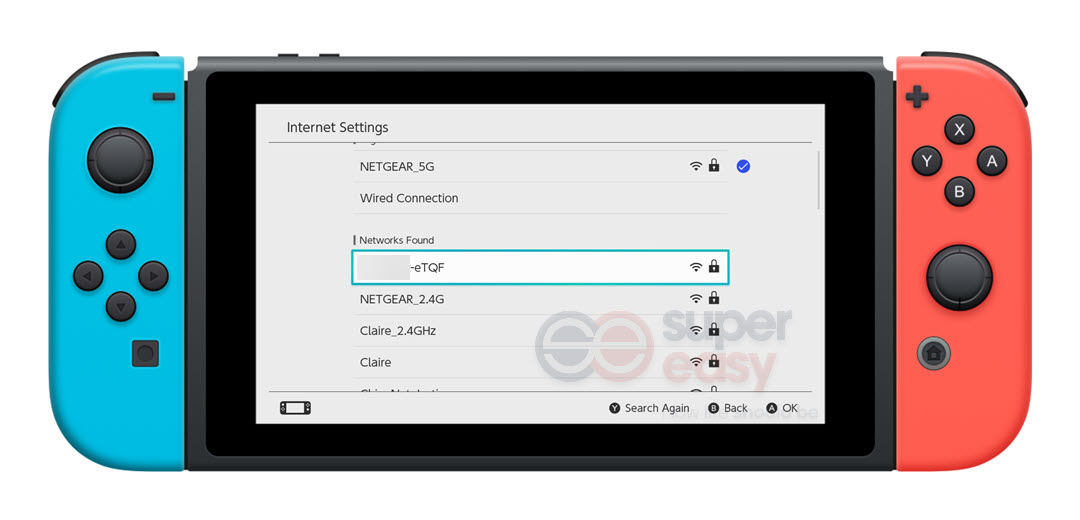
That’s it! After you connected your Nintendo Switch to the mobile hotspot shared from other devices, all data traveling to and from your Nintendo will be encrypted.
Fix 2: Set up SmartDNS on Nintendo Switch
VPN is not the only solution to unblock geo-restricted content. If you don’t want to mask your real IP address, you just need to set up SmartDNS on your Nintendo Switch.
What is SmartDNS
SmartDNS (and other similar DNS proxy services) is a technology based on using DNS to unblock geo-restricted sites and services. Unlike VPN, SmartDNS doesn’t change your real IP address. Instead, SmartDNS only directs the DNS queries to its servers, so you still can use the content in your region while accessing geo-blocked sites and services.
SmartDNS is helpful if you need to:
- access geo-blocked sites and services (e.g. online streaming channels)
- reduce lags
You may also need SmartDNS if your device doesn’t support VPNs.
Which SmartDNS to choose
In order to unblock geo-blocked content in different regions, SmartDNS service providers need to deploy servers in different locations. It’s always a good idea to check a service provider’s library to see if it can unblock the geo-restricted content you need to access before opting for its services.
If you don’t know which SmartDNS service to choose, we recommend NordVPN. NordVPN boosts over 5300 servers in 59 countries, and it also offers SmartDNS services with its subscription.
Enjoy fast and stable connection anywhere!
How to set up SmartDNS on your Nintendo Switch
With that said, here I’ll take NrodVPN as an example to show you how to set up SmartDNS on your Nintendo Switch:
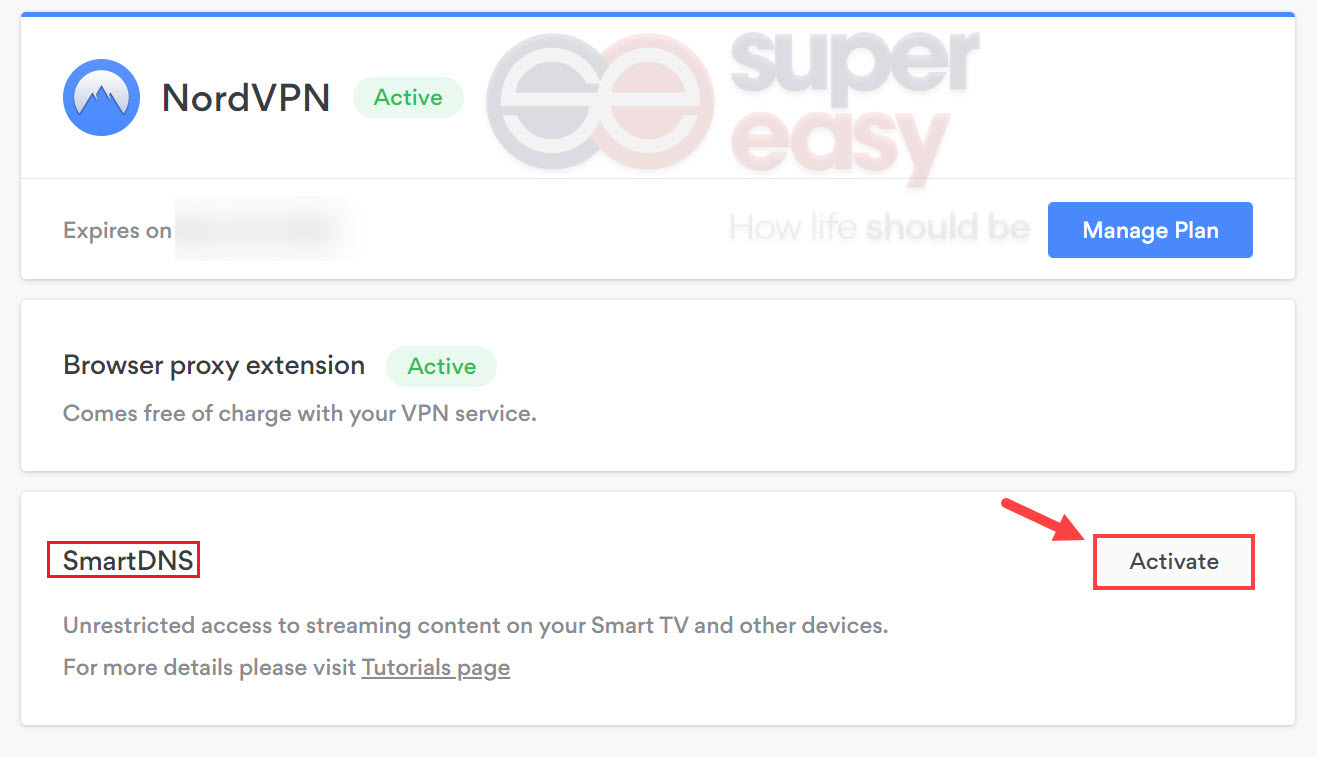
- Go to your Nord Account page.
- After you logged in, find the SmartDNS section and click the Activate button.
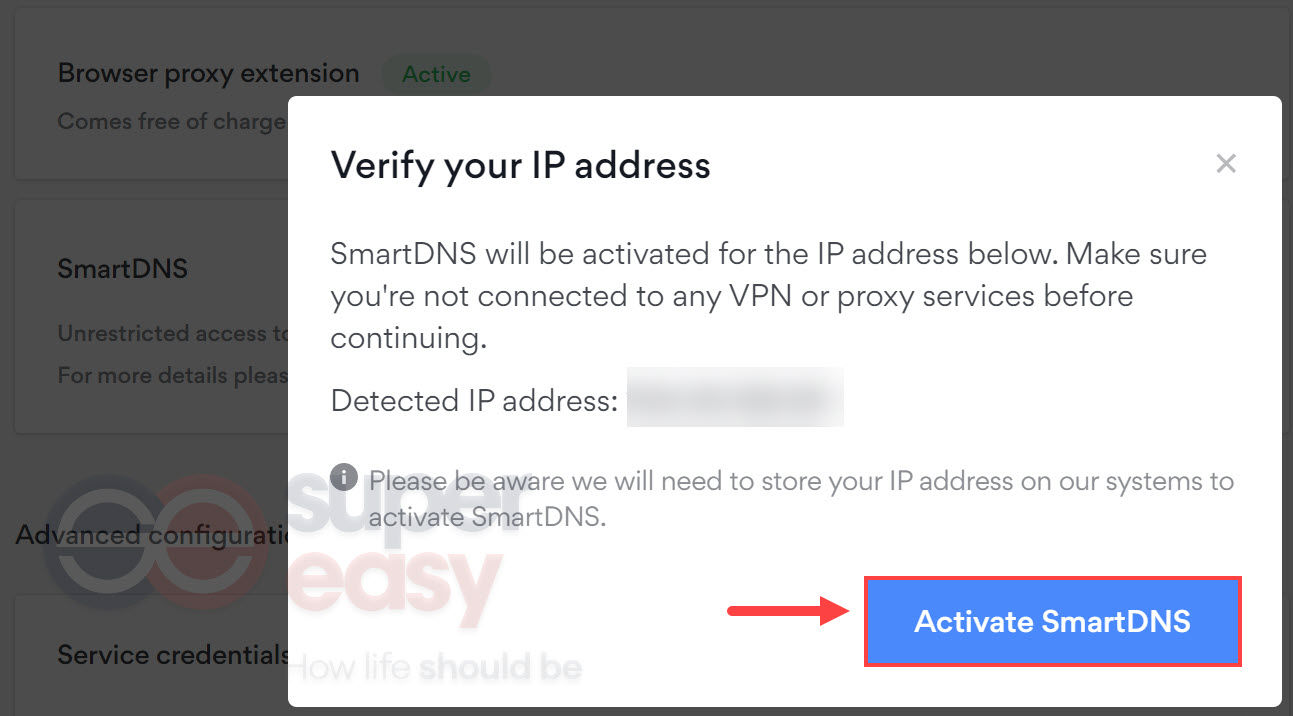
- In the small window that pops up, click Activate SmartDNS.
- On your Nintendo Switch, go to System Settings > Internet > Internet Settings. Select the Wi-Fi network your Nintendo Switch is connected to and select Change Settings.
- Tap DNS Settings and set it to Manual. Then use the following DNS servers:
Primary: 103.86.96.103
Secondary: 103.86.99.103
Tap Save to apply the changes you made.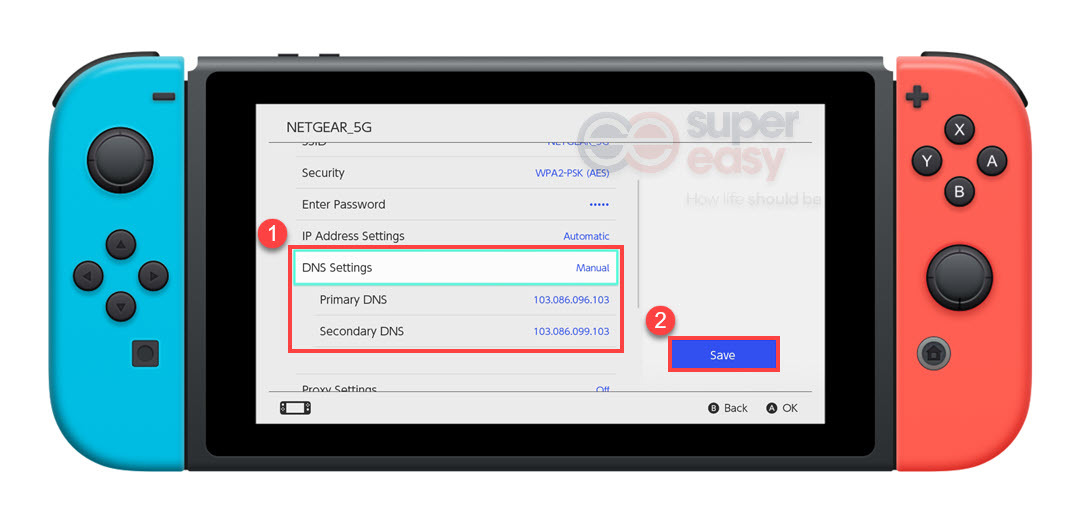
Now, you’ve configured SmartDNS on your Nintendo Switch! If you’re still having trouble, just contact NordVPN support team via Email.
Fix 3: Set up VPN on wireless router
Installing a VPN on your router may be a little bit complicated, but it is easier than you think. After you installed a VPN on your router, all connected devices will be granted the benefits of VPN protection and you’ll be able to access geo-blocked content on your devices without any configration on the the device side.
You can just follow the instruction below to set up VPN on your router.
Step 1: make sure your router is VPN compatible
Before going further, you need to check if your router is VPN compatible. Most ISP routers and modems don’t support a VPN connection. To get a VPN to work, you can combine an ISP modem with a VPN-supported router, like ASUS gaming routers.
Step 2: Configure your router
Once you’ve prepared a VPN-compatible router, you can start configuring your router. The steps to configure your router will totally depend on the router’s firmware. Here I’ll take the ASUS router as an example to show you how to set up an OpenVPN connection with NordVPN:
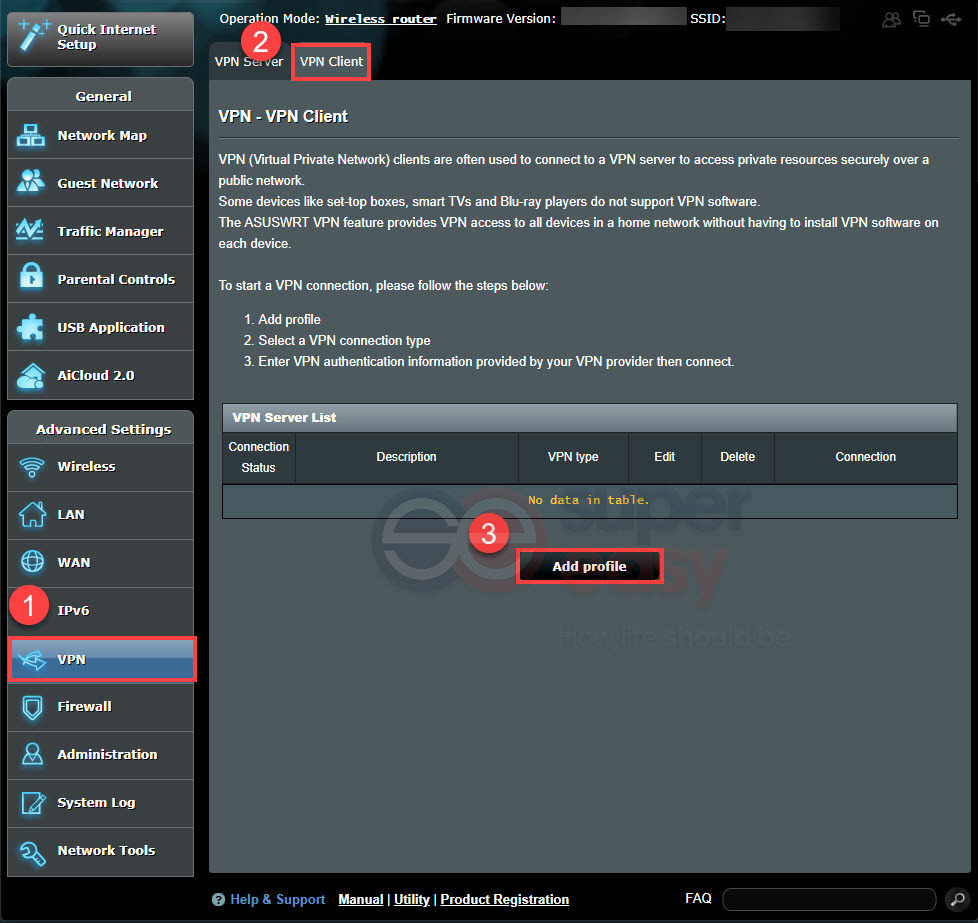
- Log in to the control panel of yout ASUS router. To do so, just open your browser and type 192.168.1.1 in the address bar and press Enter. Then enter your username and password to log in. Unless you’ve modify your credentials, the default username is admin, and the default password is admin (or no password).
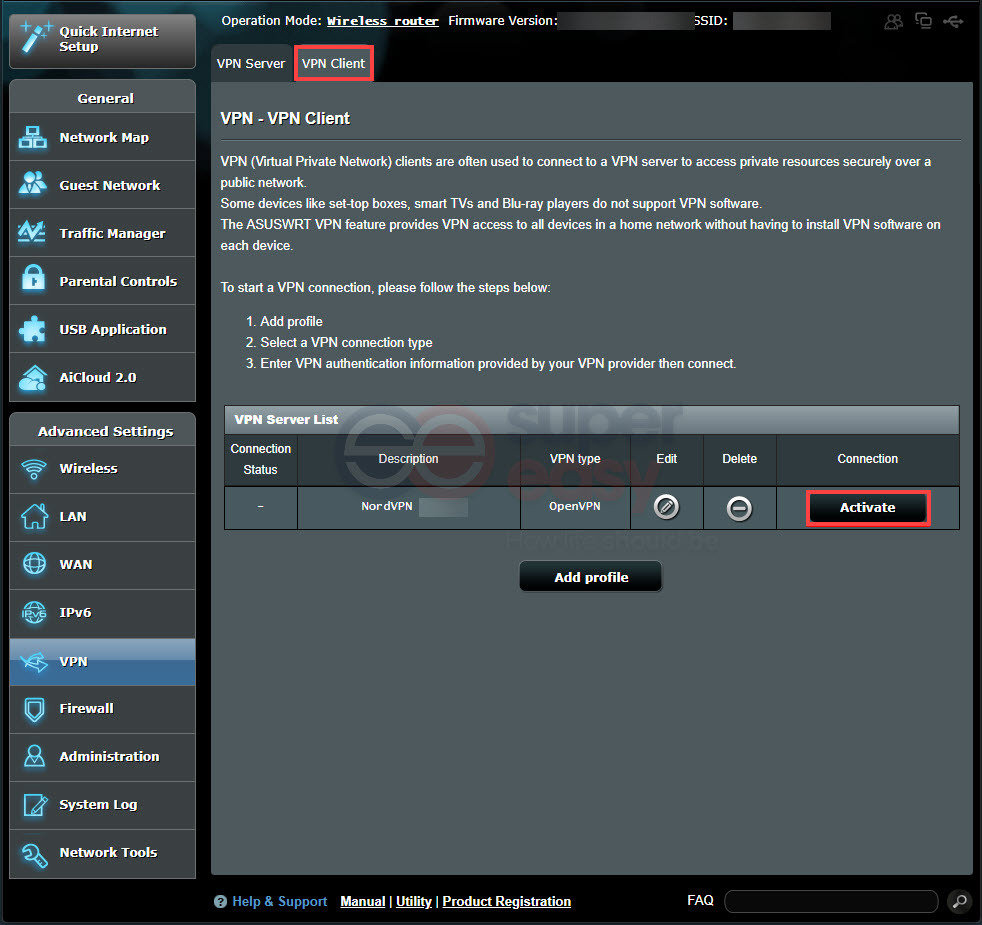
- Once you logged in, select VPN in the Adleft sidebar menu and then click on the VPN Client tab at the top. Click Add profile to continue.
- In the window that pops up, select the OpenVPN tab and fill in the following fields:
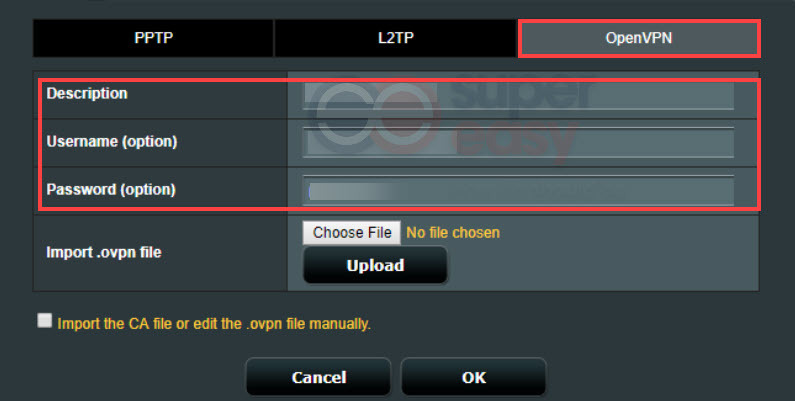
Description: give the connection a name
Username: your NordVPN service username
Password: your NordVPN service username
You can find your NordVPN username and password in your Nord Account dashboard.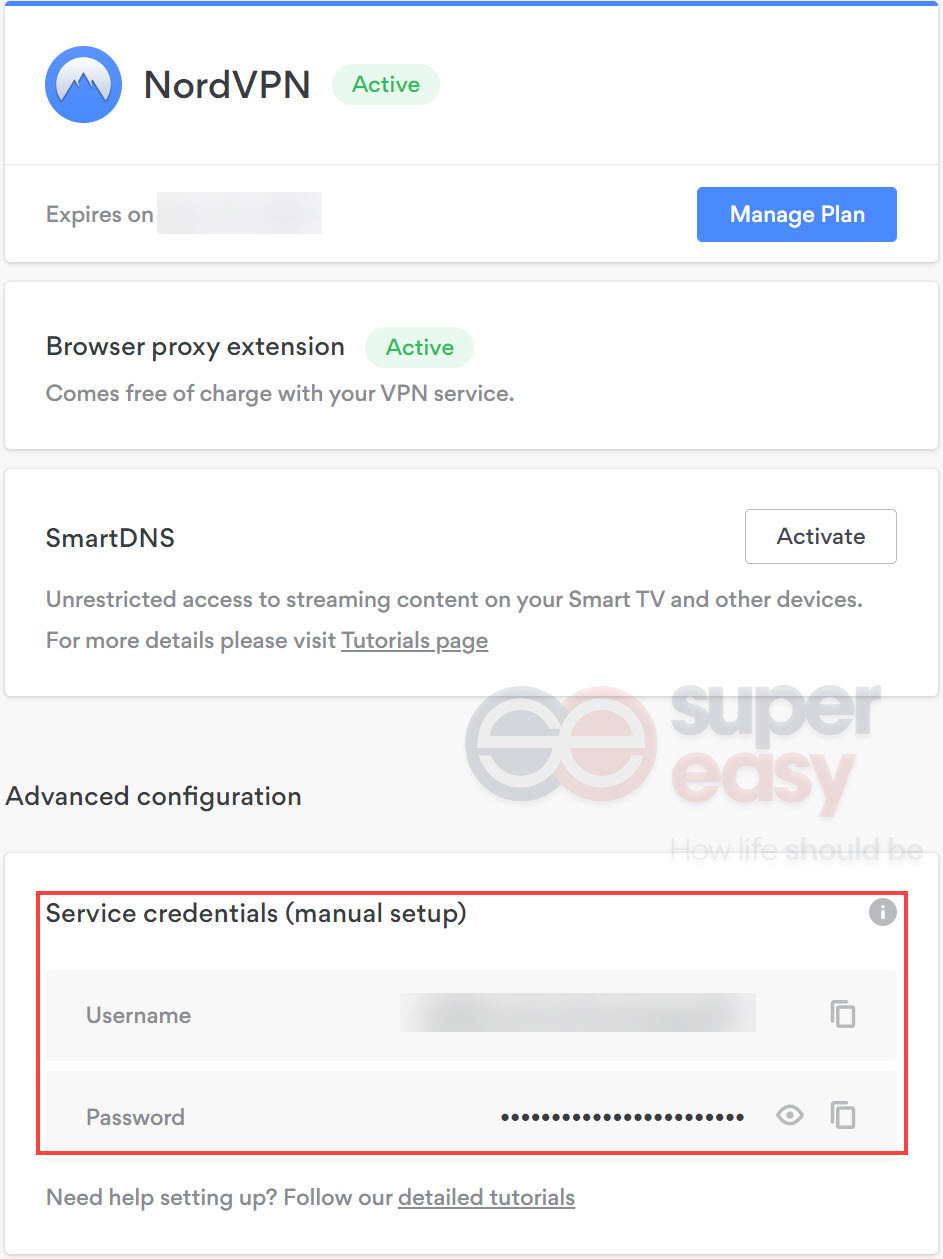
- download the OpenVPN client configuration files from NordVPN server utility.
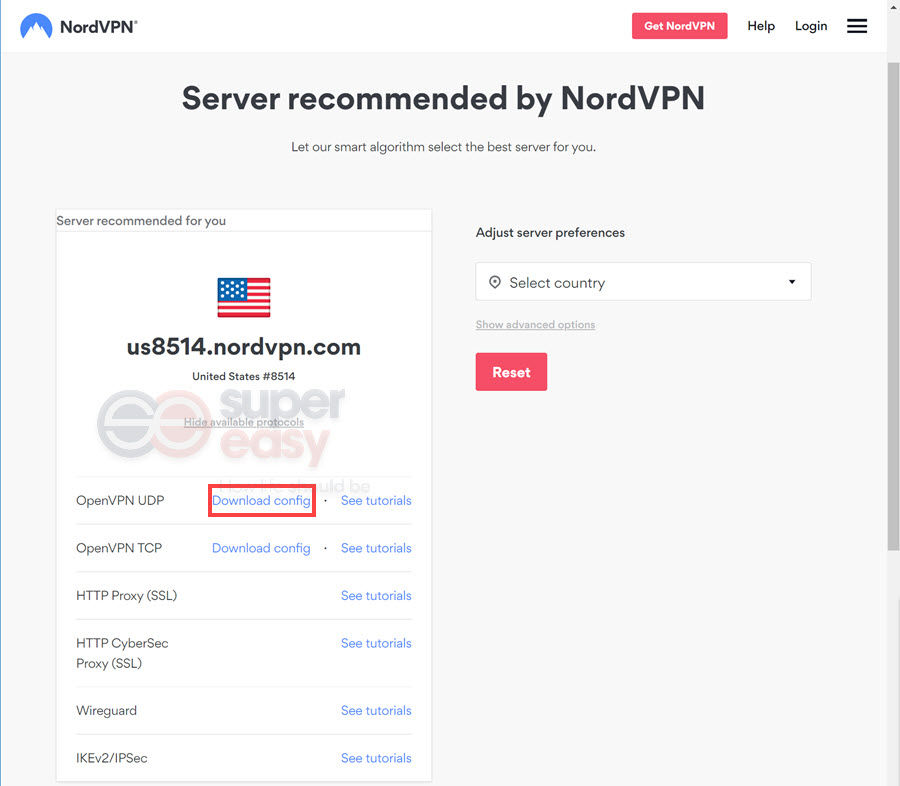
- Once you downloaded the config file, go back to the control panel of your ASUS router. Click Choose File.
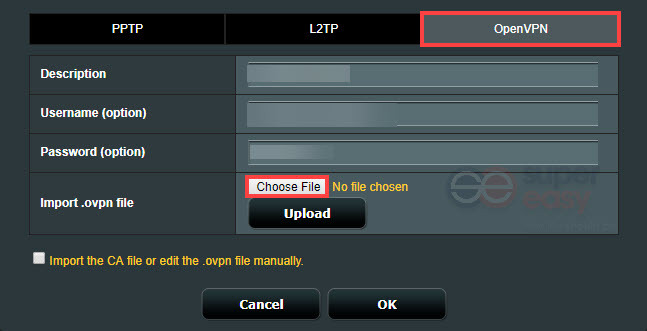
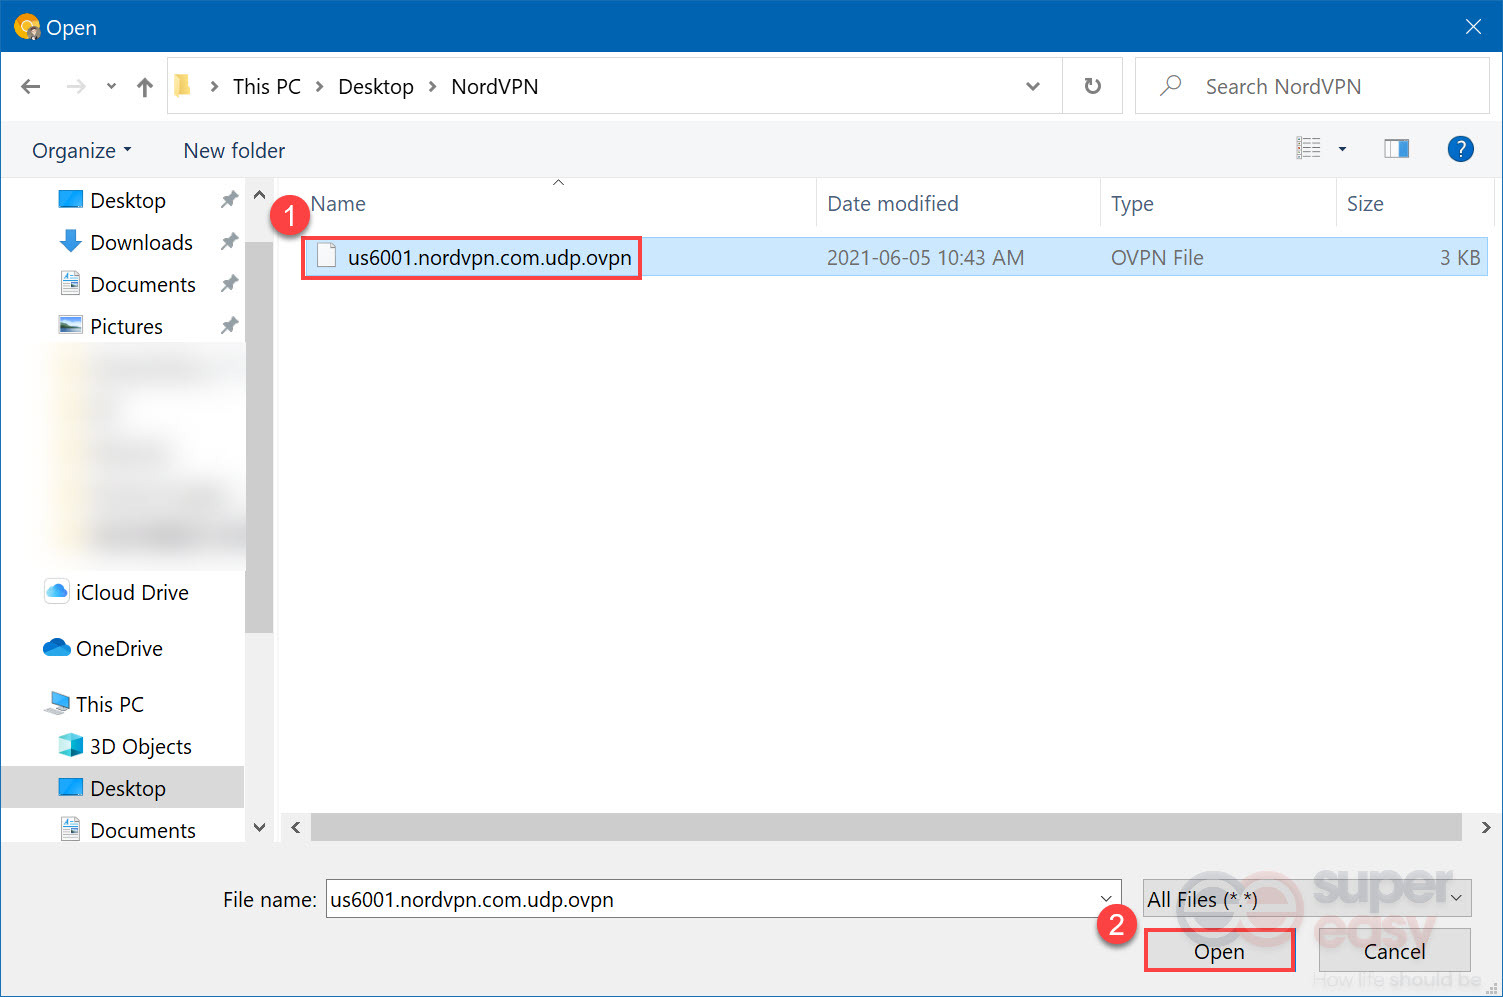
- Locate the OpenVPN configuration file you’ve just downloaded and click Open.
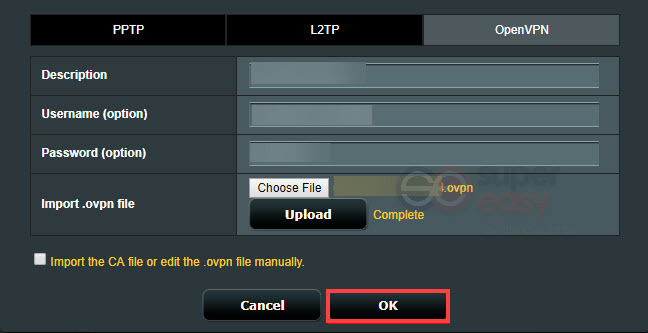
- Click Upload to import the configuration file. Just leave the box next to “Import CA file or edit the .ovpn file manually.” unchecked. Then click OK.
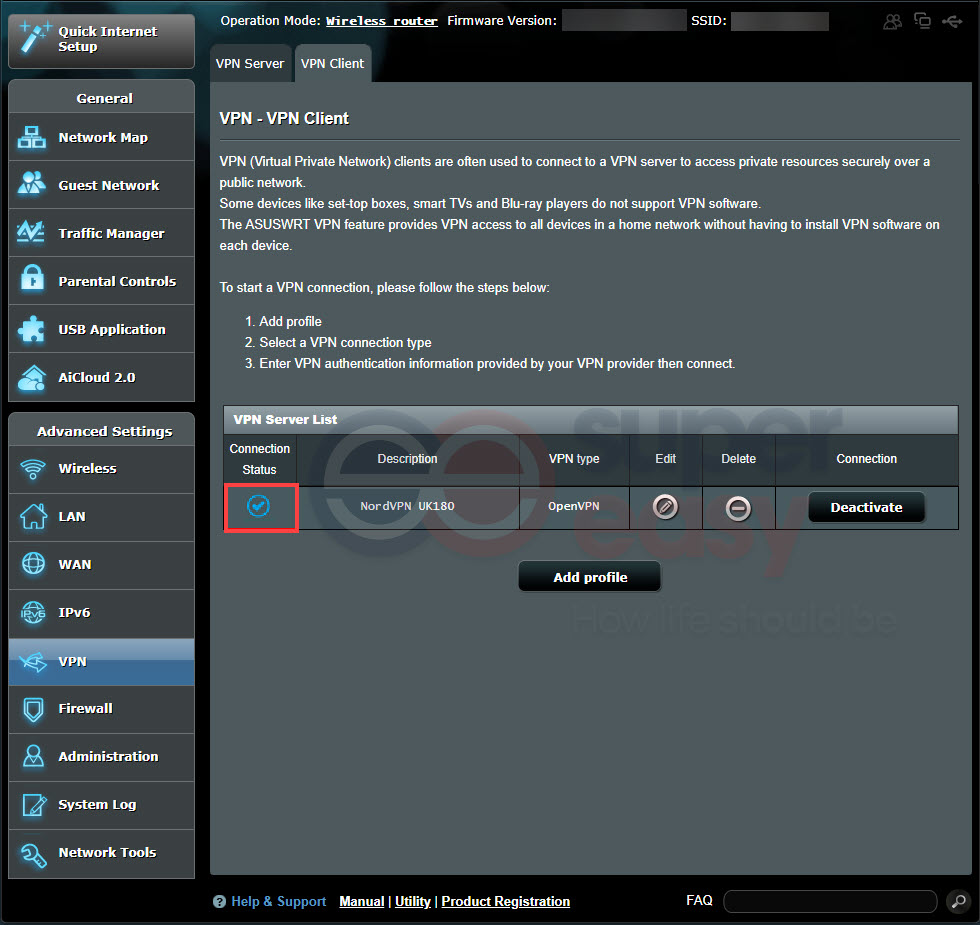
- Now under the VPN Client tab, you should be able to see the NordVPN connection you created. Click the Activate button to connect your router to NordVPN.
- Wait a few seconds and you’ll see a blue checkmark in the Connection Status column, indicating that you’re connected to NordVPN on your ASUS router!
Step 3: Test the VPN connection
Now, it’s time to test the VPN connection you set up on your router. You just need to connect your Nintendo Switch to your wireless router and see if the download speed increases when you download games from the Nintendo eShop in the region where the NordVPN server is located.
NordVPN-enabled router counts as only one device!
Hopefully, after reading this article, you’ve learned how to use VPN on your Nintendo Switch. If you have any questions or suggestions, please drop a line in the Comments section below. Happy gaming!
![[SOLVED] Twitch Lagging Issues (2024)](https://www.supereasy.com/wp-content/uploads/2020/09/twitch-lagging-768x512.jpg "[SOLVED] Twitch Lagging Issues (2024)")


")
")
")

 in 2024")
")