Ultimate guide: how to check Windows 10 crash logs

30 Revisions

Don’t worry if your Windows 10 computer often crashes or freezes. When your computer crashes, Windows 10 will generate a crash log to help you analyze and troubleshoot the causes of the crash. If you don’t know how to check crash logs in Windows 10, you’ve come to the right place!
In this article, you’ll learn how to check Windows 10 crash logs quickly and easily!
Method 1: View crash logs with Event Viewer
Event Viewer is the component of the Windows system that allows you to view the event logs on your machine. Event Viewer keeps a log of application and system messages, including information messages, errors, warnings, etc. With Event Viewer, you can narrow down the causes of the crashes on your PC.
Follow these steps:
Just follow the steps below and you should be able to view all the crash logs easily in Windows 10!
- Configure the advanced system settings of your Windows 10 operating system
- Open Event Viewer
- Create a custom view
- Export the crash logs
Step 1: Configure the advanced system settings of your Windows 10 operating system
To make full use of Event Viewer, you need to configure the advanced system settings of your Windows 10 OS. Follow the instructions below to make sure you have correctly configured the advanced system settings of your system.
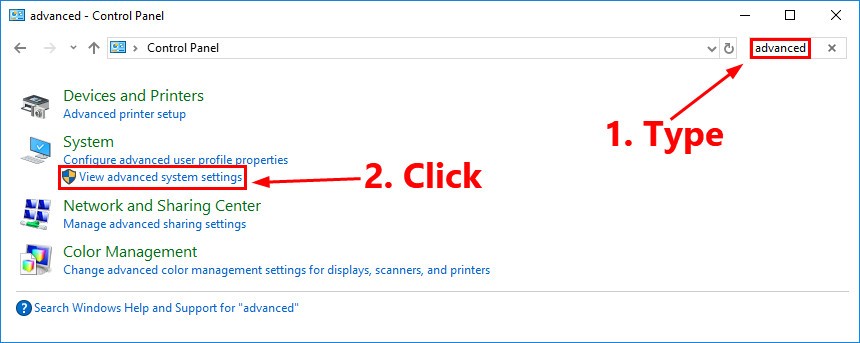
- On your keyboard, press the Windows logo key and R at the same time to open the Run dialog. Type control and then press Enter to open the Control Panel.

- Type advanced in the search box in the upper-right corner and then click View advanced system settings.
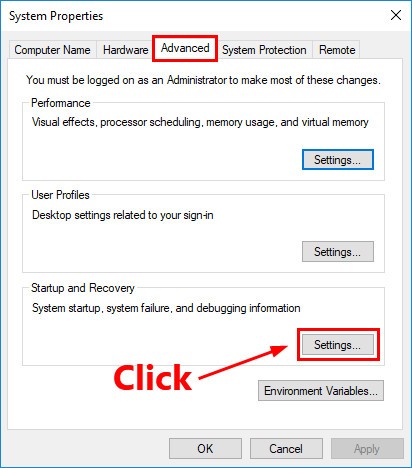
- Navigate to the Advanced tab and then click Settings… in the Startup and Recovery section.
- Configure the settings in the System failure section the same way you see on the screenshot below. Then click OK to save the changes.
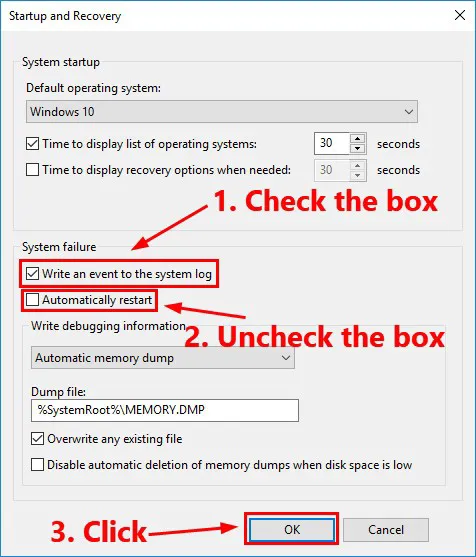
Note: The option Automatically restart has little to do with Event Viewer. By unchecking the box next to Automatically restart, you tell Windows 10 not to reboot and to save the crash dump file when there is a system failure. So you can see the BSOD (Blue Screen of Death) error message if your PC is running into a BSOD. If you check this box, you may not see the BSOD error message.
Now you’ve correctly configured the advanced system settings of your system.
Step 2: Open Event Viewer
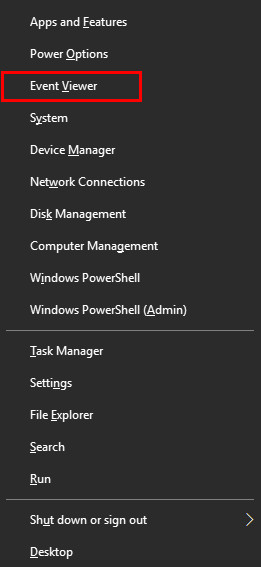
- On your keyboard, press the Windows logo key and X at the same time. Then select Event Viewer to open it.
- There are 2 methods to view the information about a certain event:
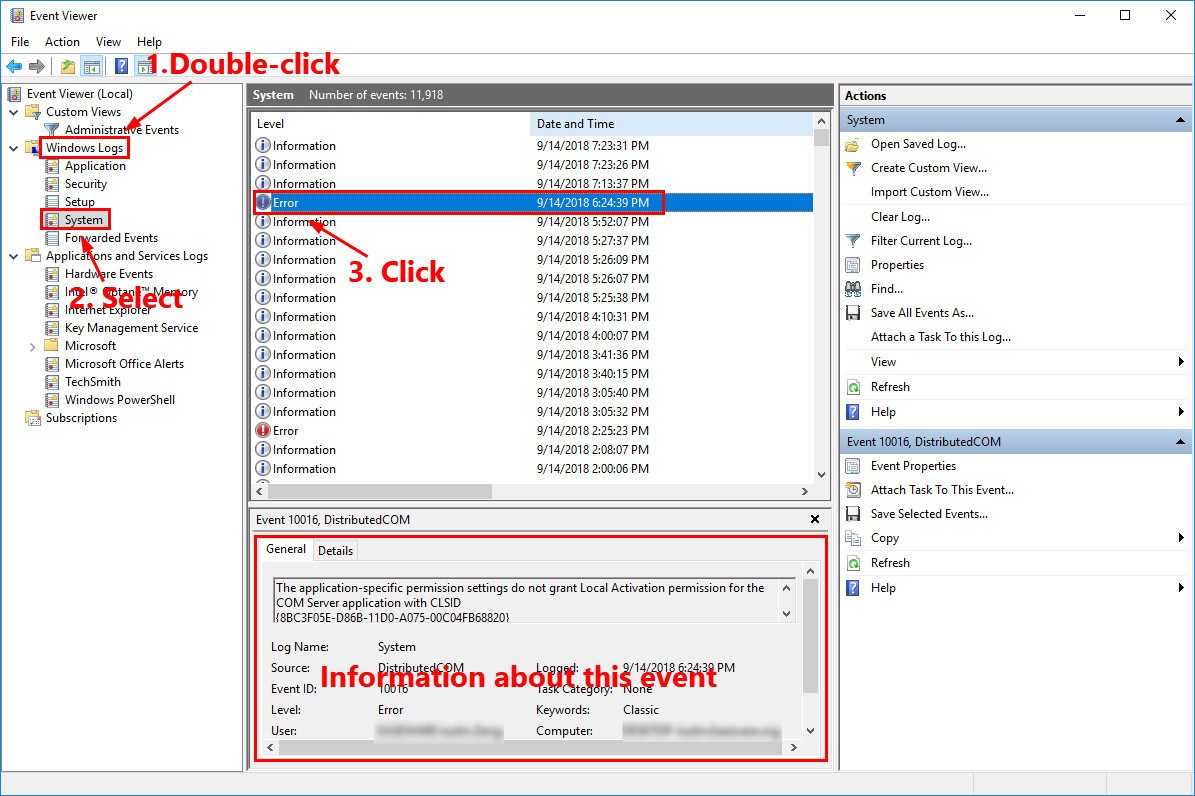
Start from the left panel to view events
- In the left panel, double-click a category to expand it.
- Select the category you’re interested in and the related information will show up in the middle part of the window.
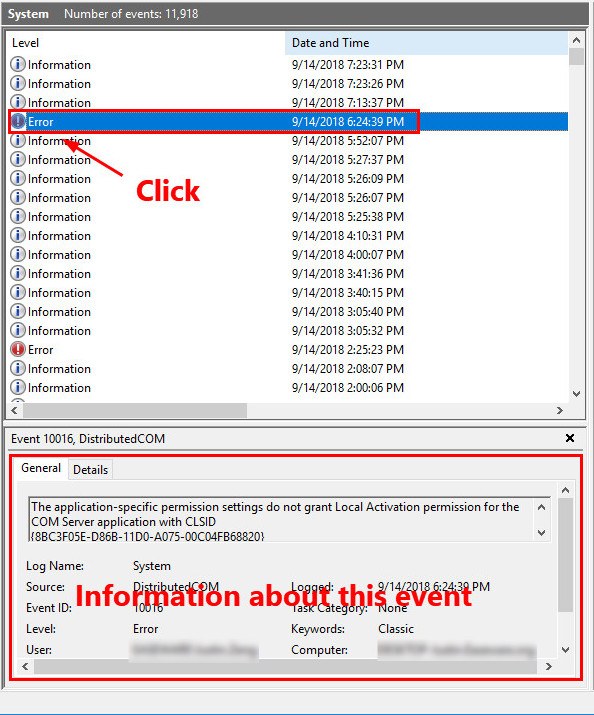
- Click one event in the list and the detailed information will show up in the bottom of the window.
Start from Summary of Administrative Events to view events
- In the left panel, Click Event Viewer (Local), then in the section of Summary of Administrative Events, click the plus button (+) in front of the Critical event type to expand it.
- Right-click the record of the critical event and select View All Instances of This Event.
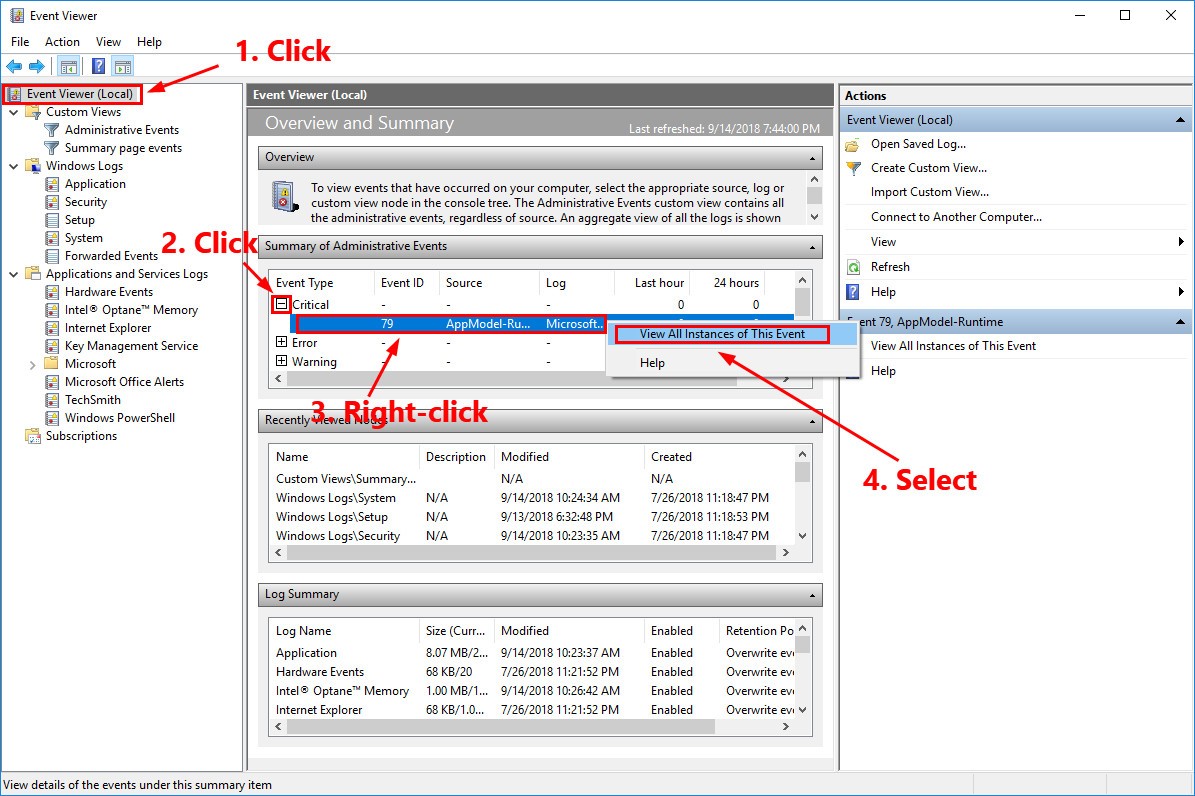
- Click one event in the list and the detailed information will show up in the bottom of the window.
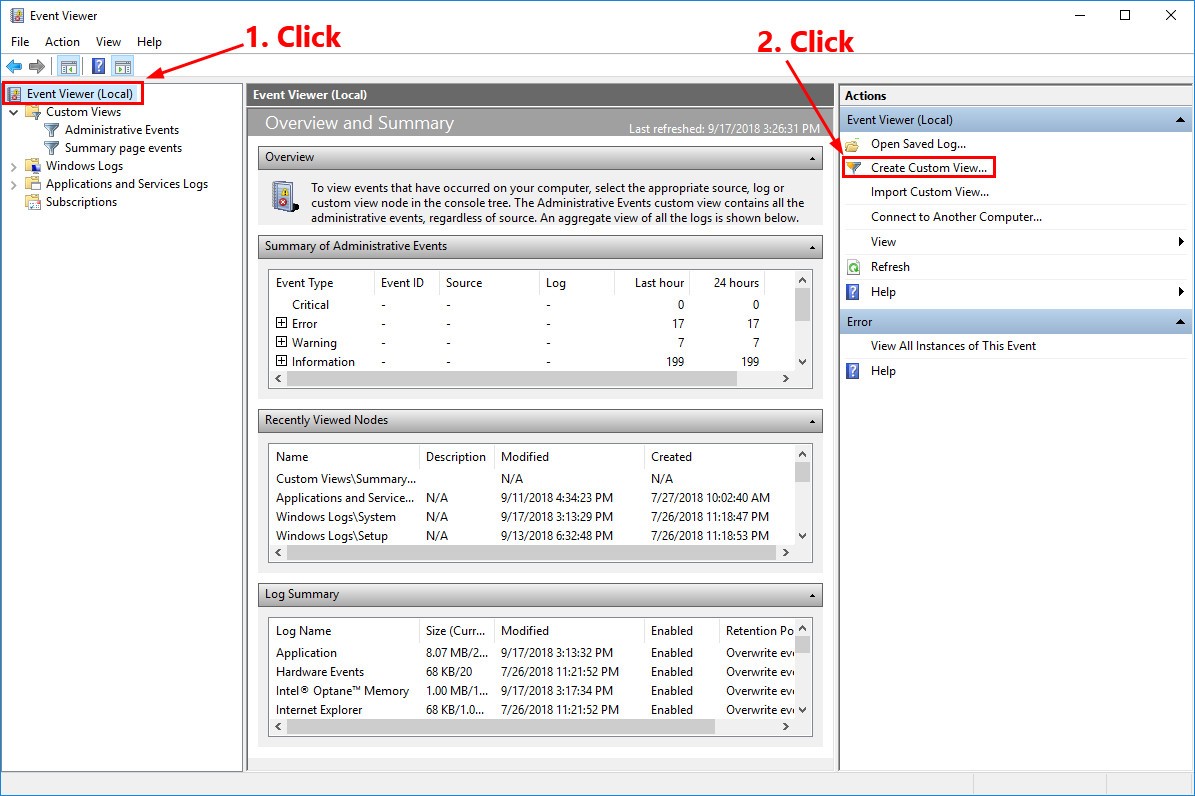
Step 3: Create a custom view
By creating a custom view, you can view the crash logs more quickly. Here is how to do it:
- In the left panel, click Event Viewer (Local) in the left panel. In the Actions section, click Create Custom View….
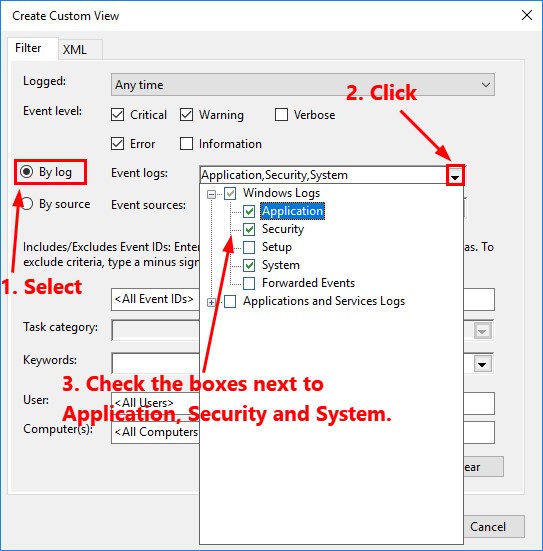
- In the pop-up window, under the Filter tab, click the downward arrow next to Logged to select a time range. Then check the boxes before Critical, Warning and Error to select the Event levels.

- Click the By log option button to create the custom view by log. Click the downward arrow next to Event logs to open the drop-down list, then select Application, Security and System.
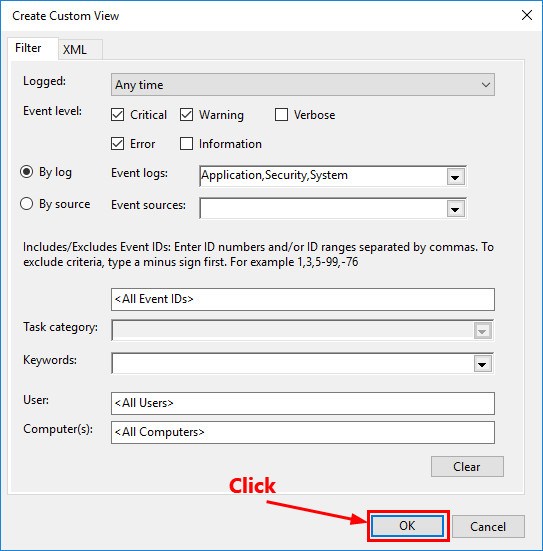
- Click OK to save the settings.
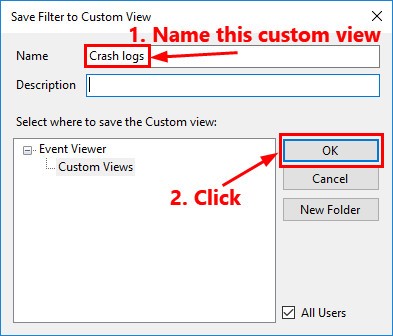
- In the pop-up window, name this custom view and then click OK to start to view the crash logs.
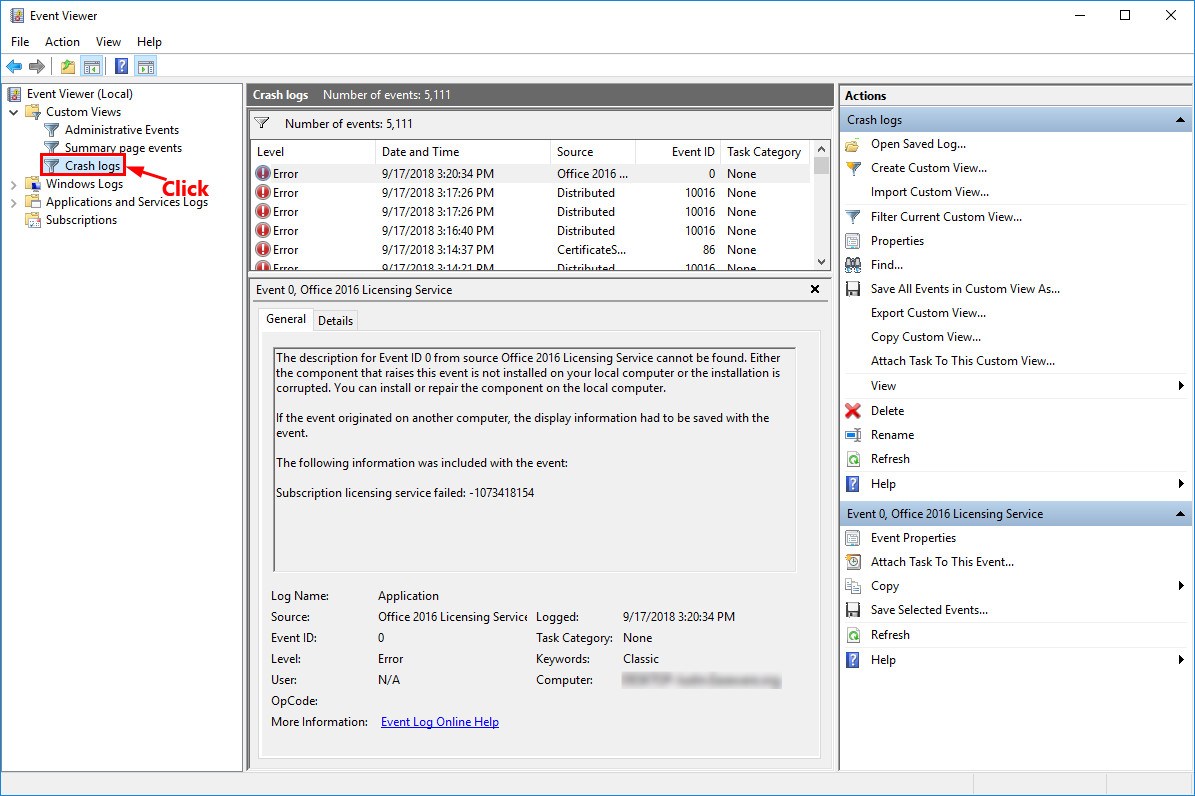
- Next time if you want to view this custom view, just double-click Custom Views in the left panel and then select Crash logs.
Step 4: Export the crash logs
You can also export the crash logs for diagnostics.
If you want to export certain events, here is how to do it:
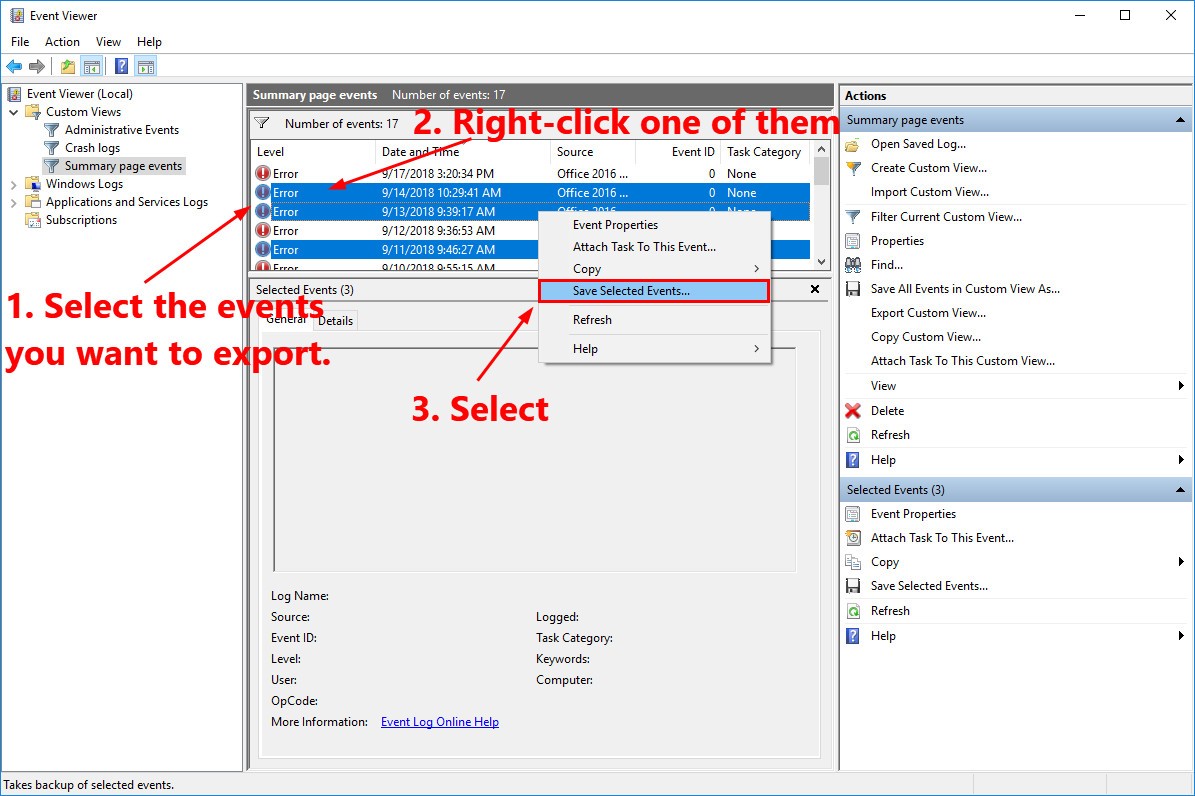
- Select the events you want to export. Right-click one of them and then select Save Selected Events….
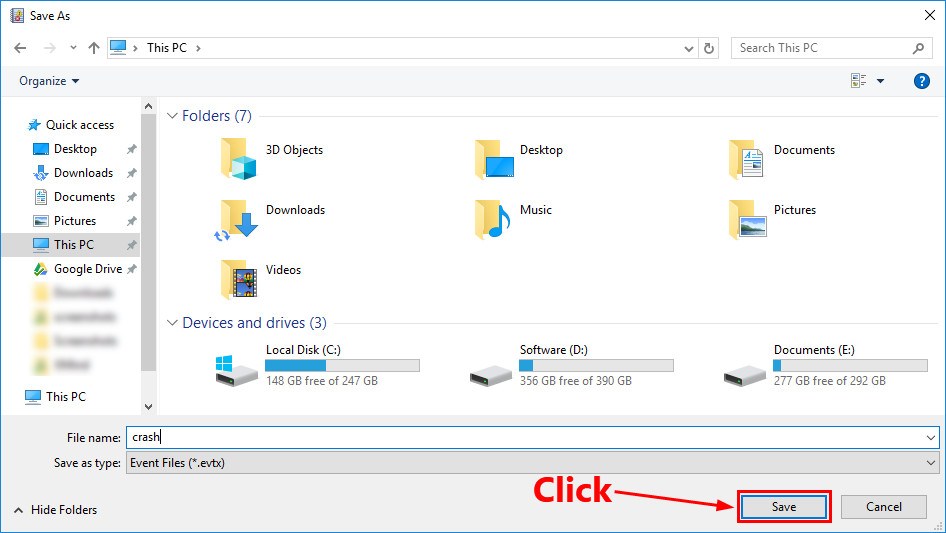
- Find a location to save this file. Name this file and then click Save.
If you want to export a custom view, here is how to do it:
- In the left panel, double-click Custom Views and then select the custom view you want to export.
- In the Actions section, click Export Custom View….

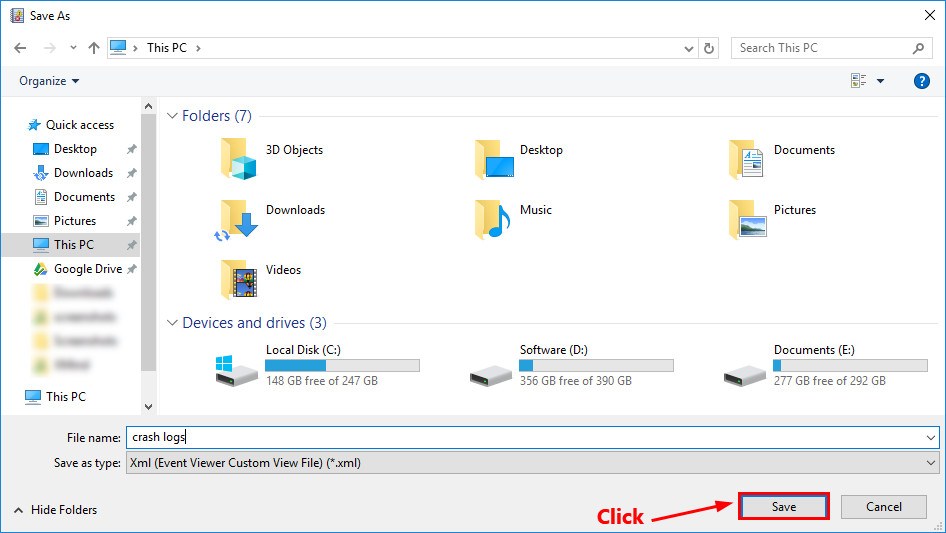
- Find a location to save this file. Name this file and then click Save.
That’s it! Now you’ve exported the crash log.
Method 2: View crash logs with Reliability Monitor
Reliability Monitor is another useful built-in troubleshooting tool in Windows 10. Reliability Monitor shows you your Windows 10 system stability history at a glance. In addition, it tracks critical events, warnings and informational events on your computer.
Follow the steps below to view crash logs with Reliability Monitor:
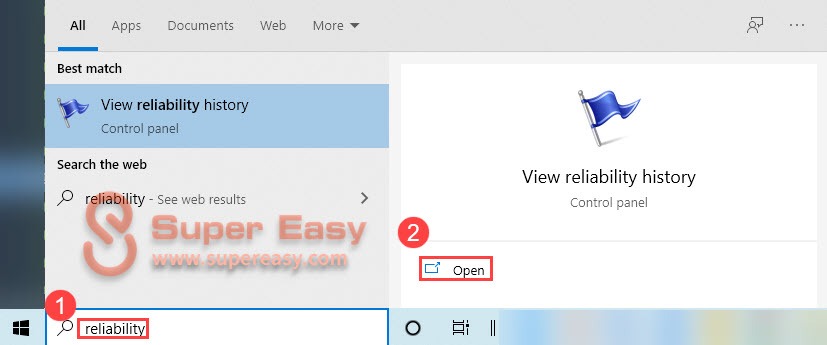
- On your keyboard, press the Windows logo key and type reliability. Then click Open under View reliability history. The Reliability Monitor window will pop up.
- In Reliability Monitor, you can review your computer’s reliability and problem history in days or weeks. The default reliability report is viewed by days.
As you can see, the report records application failures, Windows failures, miscellaneous failures, warnings and informational events. The view marks failures with a red cross icon, warnings with a yellow exclamation icon, and informational events with blue info icon. Select a day marked with icons to view the reliability details.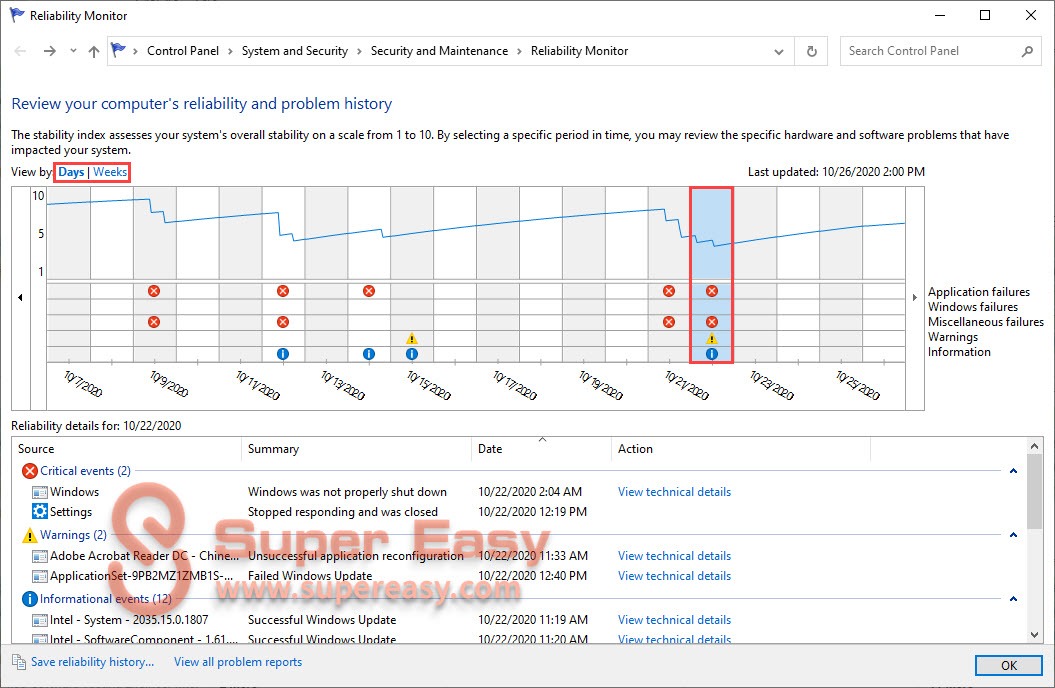
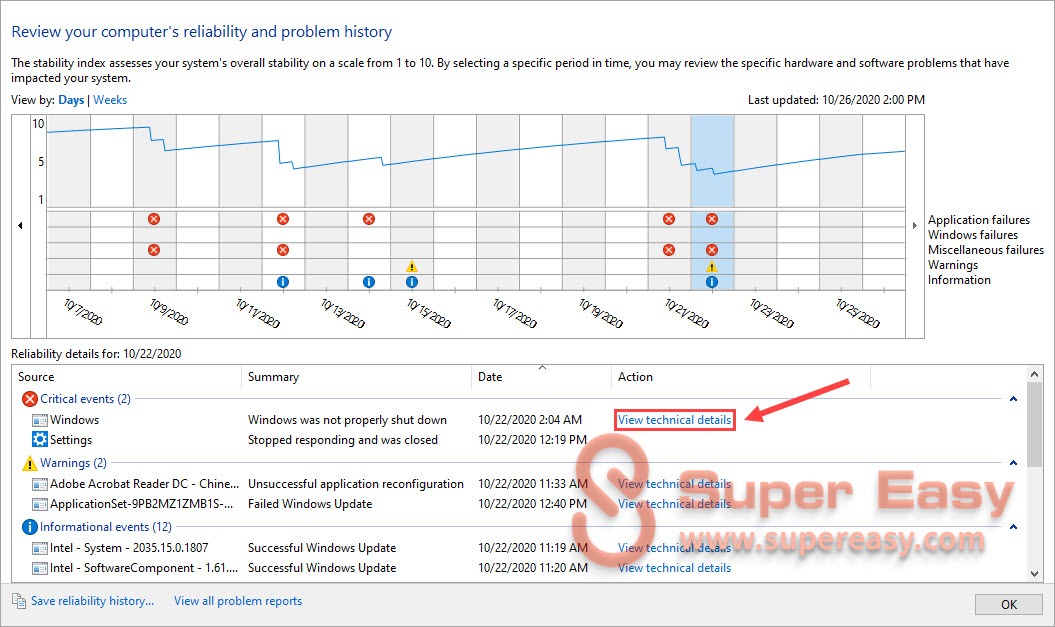
- To view the technical details of an event, just click View technical details next to that event. Click OK to exit the problem Details window.
- Click View all problem reports to view all crash logs. the Problem Reports window will pop up.
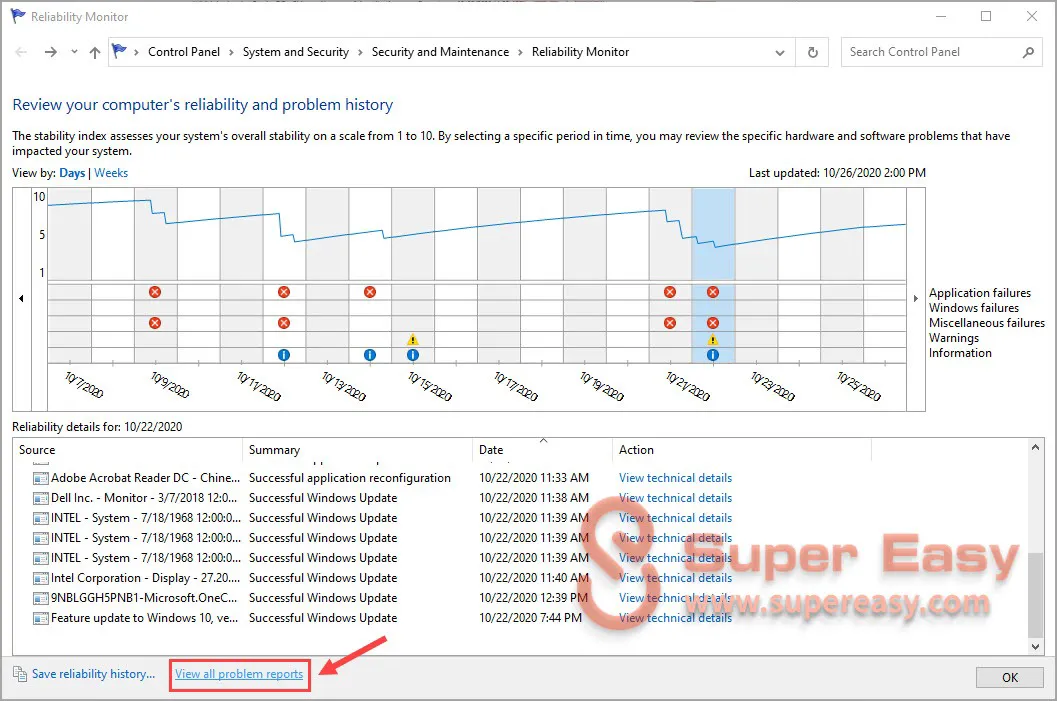
- Double-click a problem event to view the details.
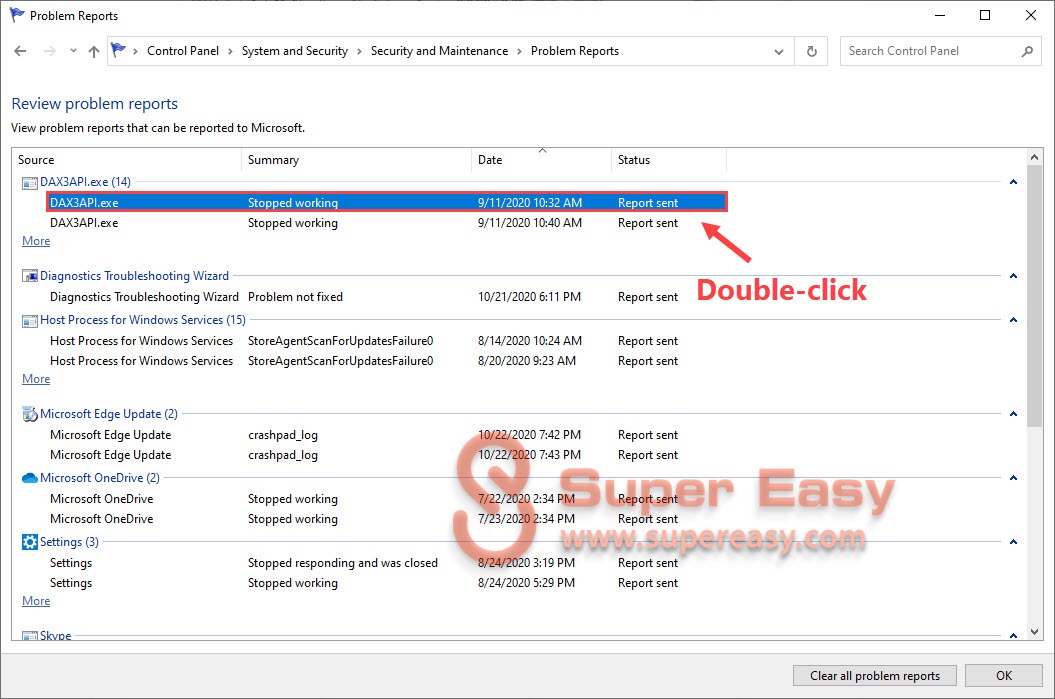
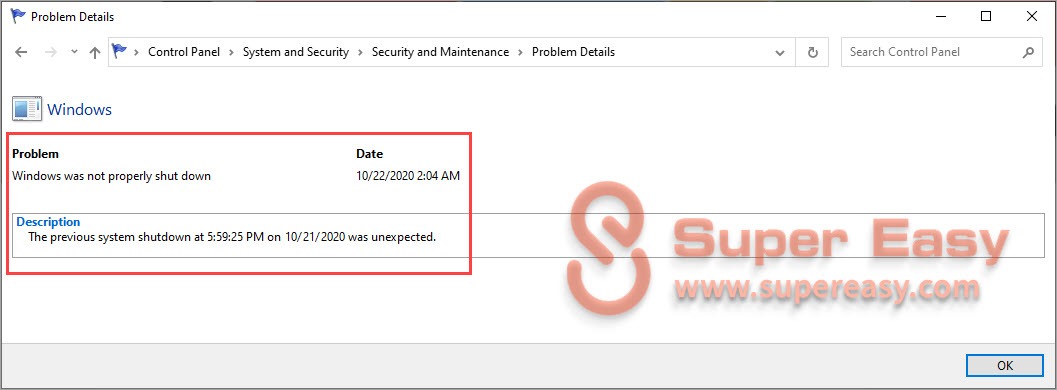
In the Problem Details window, you can view more detailed info about the problem description, signature and extra info.
That’s it! After knowing the detailed info about the crash, you now can analyze and troubleshoot the causes of the crash.
Hopefully, after reading this article, you’ve learned how to view Windows 10 crash logs! If you have any questions or suggestions on this topic, feel free to leave us a comment below. Thanks for reading!


![Windows10 Photos App Not Working [Solved]](https://www.supereasy.com/wp-content/uploads/2018/11/WINDOWS10-1-768x432.png "Windows10 Photos App Not Working [Solved]")


![How to Run CHKDSK in Windows 10 [3 Easy Ways]](https://www.supereasy.com/wp-content/uploads/2018/10/WINDOWS-10-768x626.png "How to Run CHKDSK in Windows 10 [3 Easy Ways]")
![How to back up Windows 10 [Easily]](https://www.supereasy.com/wp-content/uploads/2018/10/window-1231891-768x523.jpg "How to back up Windows 10 [Easily]")

")
")
")

 in 2024")
")