How to Use Windows Snipping Tool to Take Screenshots [With Pictures]

6 Revisions
![How to Use Windows Snipping Tool to Take Screenshots [With Pictures]](https://www.supereasy.com/wp-content/uploads/2019/07/snipping-tool.png "How to Use Windows Snipping Tool to Take Screenshots [With Pictures]")
To take a screenshot on Windows, you can use Snipping Tool. You can learn how to use snipping tool to take a screenshot in this article.
If you’d like to take a screenshot on your Windows PC, you don’t have to search for a third-party screenshot tool. You can just use the built-in screenshot tool in Windows. The tool is called Snipping Tools. With Snipping Tools, you can take screenshots easily and quickly.
Use Windows Snipping Tool to take a screenshot
To use Windows Snipping Tool to take a screenshot, you can follow these steps:
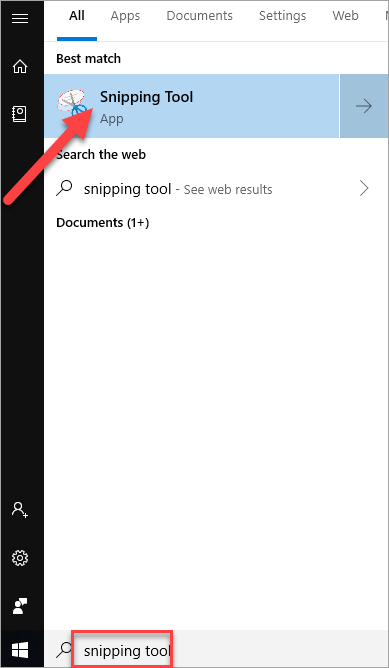
1) Click the Start button at the bottom left corner of your computer screen.
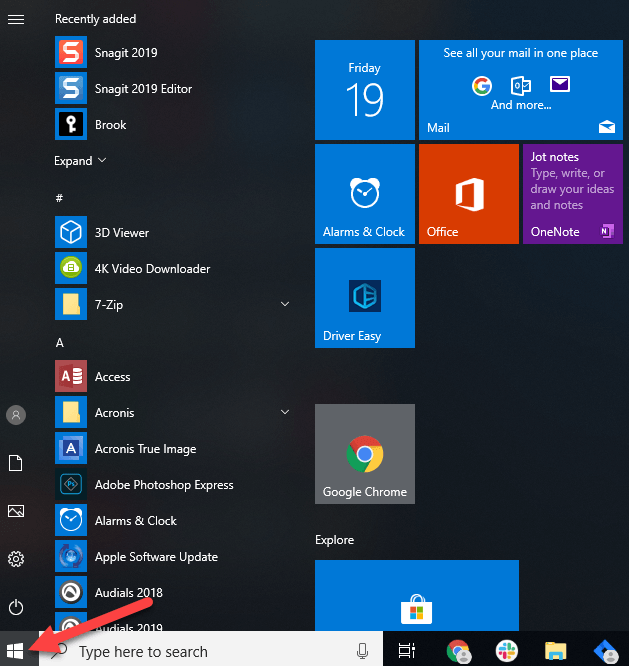
2) Type “snipping tool” in the search box on the taskbar, then select Snipping Tool from the list of results.
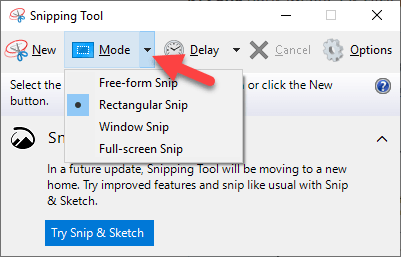
3) On Snipping Tool, select the mode you want to use to take screenshot.
There are four available modes you can choose from:
Free-form Snip: You can take a screenshot in any shape.
Rectangular Snip: You can take a screenshot in a rectangular shape.
Window Snip: You can take a screenshot of a whole window, for example, a dialog box.
Full-screen Snip: You can take a screenshot of the full computer screen.
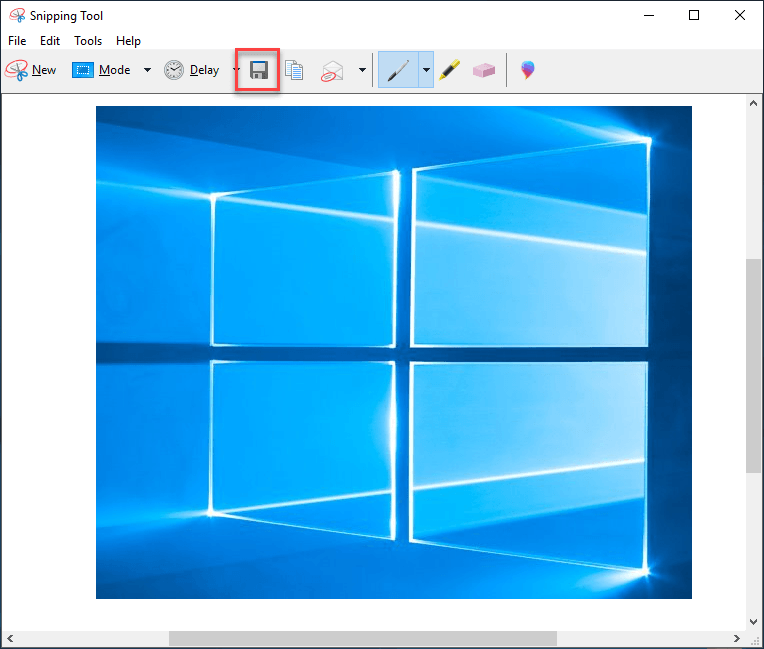
4) On Snipping Tool, click New.
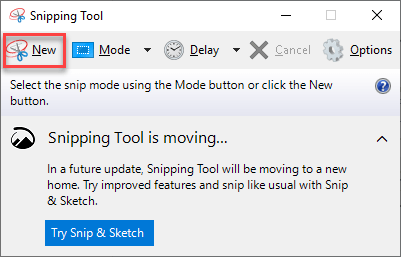
5) Click and drag the cursor around the object you want to take a screenshot, then release the mouse button.
6) On Snipping Tool, you can see the taken screenshot.
7) Click the Save Snip icon to save the screenshot.
For more info about Windows Snipping Tool, you can go to Use Snipping Tool to capture screenshots in Windows official website.
Bonus: Windows Snipping Tool alternatives
Windows Snipping Tool is a free good screenshot tool. But you can’t use it to add more effects on the screenshot due to its limited functions. So if you find Windows Snipping Tool impossible to meet your needs, you can consider using a third-party screenshot tool.
If you’re not sure what screenshot is trusted, we recommend you use Snagit. With a user-friendly interface, Snagit allows you to take a screenshot with a few clicks. Snagit is powerful with a lot of features. You can use it to add many ingredients on the screenshot, like text, arrows, shapes, etc. You can use it to add many effects on the screenshot, like border, filters, watermarks, etc. Snagit provides 15-day free trial. If you want to take a screenshot now, you can just use the free version.
Here’s how to use Snagit to take a screenshot:
1) Download and install Snagit.
2) Launch and sign in the program.
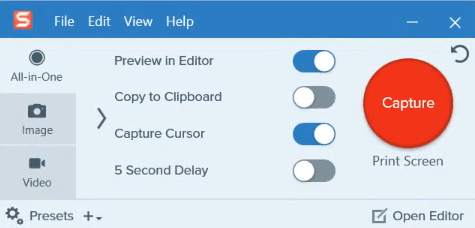
3) Click the Capture button.
4) Click and drag your cursor around the object that you want to take a screenshot, then release your mouse button.
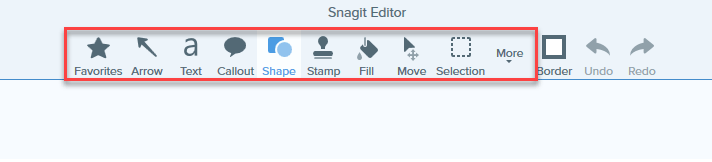
5) On Snagit Editor, you can see the taken screenshot.
6) You can edit the screenshot on the way you want. You can add shapes, text or effects on the screenshot.
7) On your keyboard, press Ctrl+S keys to save the screenshot.
Hopefully you find this article helpful. If you have any questions, ideas or suggestions, feel free to leave a comment below.

")
![How to recover data from hard drive? [Easy Data Recovery]](https://www.supereasy.com/wp-content/uploads/2018/04/IMG_3355-768x768.jpg "How to recover data from hard drive? [Easy Data Recovery]")


![How to screenshot on iPhone [with pictures]](https://www.supereasy.com/wp-content/uploads/2018/09/screenshot-on-iPhone-768x1150.jpg "How to screenshot on iPhone [with pictures]")
")
")
")

 in 2024")
")