How to Split Screen on Mac Easily

45 Revisions

It’s really easy to divide your Mac screen into two if you know the trick. By splitting your Mac screen, you can run two different apps at the same time.
With 2 steps, you can master this trick to make your work more easily and fun. This post also provides you how to Exit Split View.
Read on to find how!
Step 1: Check your Mac version
HOW: Click the apple icon on the top left corner and click About this Mac.
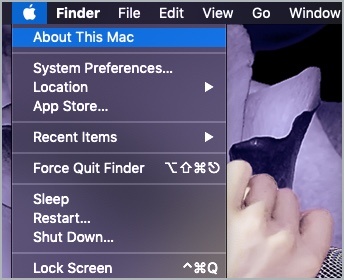
You’ll see your computer version.
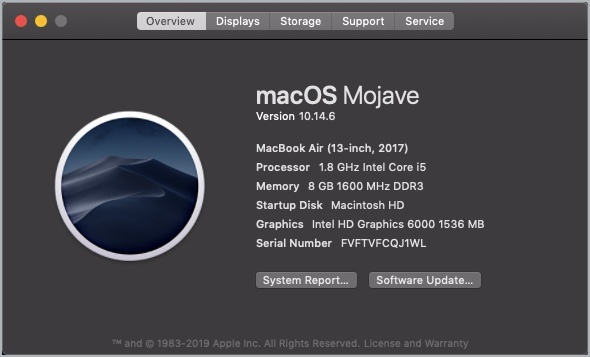
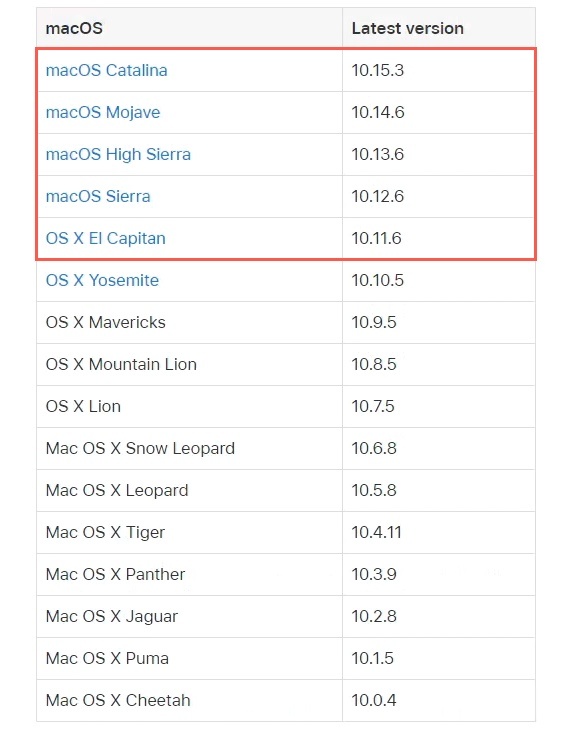
If your macOS is among the five macOS in the red frame, you can have Split View.
Move to the next step.
Step 2: Split your screen
For macOS Catalina
- Click and hold the green full-screen button in the upper-left corner of a window.
- Click Tile Window to Left of Screen or Tile Window to Right of Screen.
- Click a window on the other side of the screen to run both apps side by side.
For other macOS versions
- Hold the green full-screen button in the upper left corner of a window.

- The window will shrink and you can drag it to the left or right side of the screen.
- Release the button and you’ll see the screen split into two parts. You can click a window on the other screen to run both apps side by side.
Now you can work in Split View without distracted from other apps.
Step 3: Exit Split View
It’s very easy to exit Split View.
HOW:
- Move to the top of the screen. You’ll see the window buttons and menu.
- Move the cursor to the top screen and click the green full-screen button in either window. That window exits Split View.
- You can use Multi-Touch gestures such as swiping right with your four fingers on your touch-pad.
Hope this post meets your need. If you have any suggestions or questions, you’re welcome to leave comments below.
![[Fixed] Mac Sound Not Working Issue](https://www.supereasy.com/wp-content/uploads/2018/05/speed-up-mac-768x512.jpg "[Fixed] Mac Sound Not Working Issue")

![[FIXED] There was an error connecting to the Apple ID server](https://www.supereasy.com/wp-content/uploads/2018/07/Snap64.jpg "[FIXED] There was an error connecting to the Apple ID server")

![[SOLVED] How to Recover Data on Mac](https://www.supereasy.com/wp-content/uploads/2019/02/Mac-data-recovery-768x512.jpg "[SOLVED] How to Recover Data on Mac")

")
")
")

 in 2024")
")