How to Send a Secure and Encrypted Email in Outlook or Gmail (2024)

22 Revisions
")
If you’re using Gmail, Outlook, or any other email service providers for sending messages and attachments – be it for business purposes, for personal use, or some combination of the two, encryption is something important that you need to take into account.
Then what is encryption? Encryption is basically a way of scrambling data into unreadable content known as ciphertext in the event that it falls into the wrong hands. In order to send encrypted emails in Gmail or Outlook, you might need to be kinda tech-savvy as this would require some tech knowledge. But there is one method that makes it easy-peasy, which is to use Proton Mail, an encrypted email service. Read below and check how each works.
Table of contents
How to encrypt emails in Gmail
If you’re trying to send a secure and encrypted email with Gmail, you can take advantage of its advanced encryption with S/MIME, short for Secure/Multipurpose Internet Mail Extensions, a widely acepted protocol for sending digitally signed and encrypted messages. But the drawback is Both the sender and the recipient need to have a paid Gmail account, namely they need to use Google Workspace. If you’ve upgraded your plan, you can follow the steps below to send an encrypted email in Gmail.
- First, you need to enable hosted S/MIME. To do this, simply follow this step-by-step guide.
- Open the Google Admin console.
- Compose a new message as you normally would.
- When you add your recipients to the To field, look for the lock icon and click on it. Then click view details to change your S/MIME settings.
When a green lock icon shows up, that means information is now protected by S/MIME encryption and can only be decrypted with a private key.
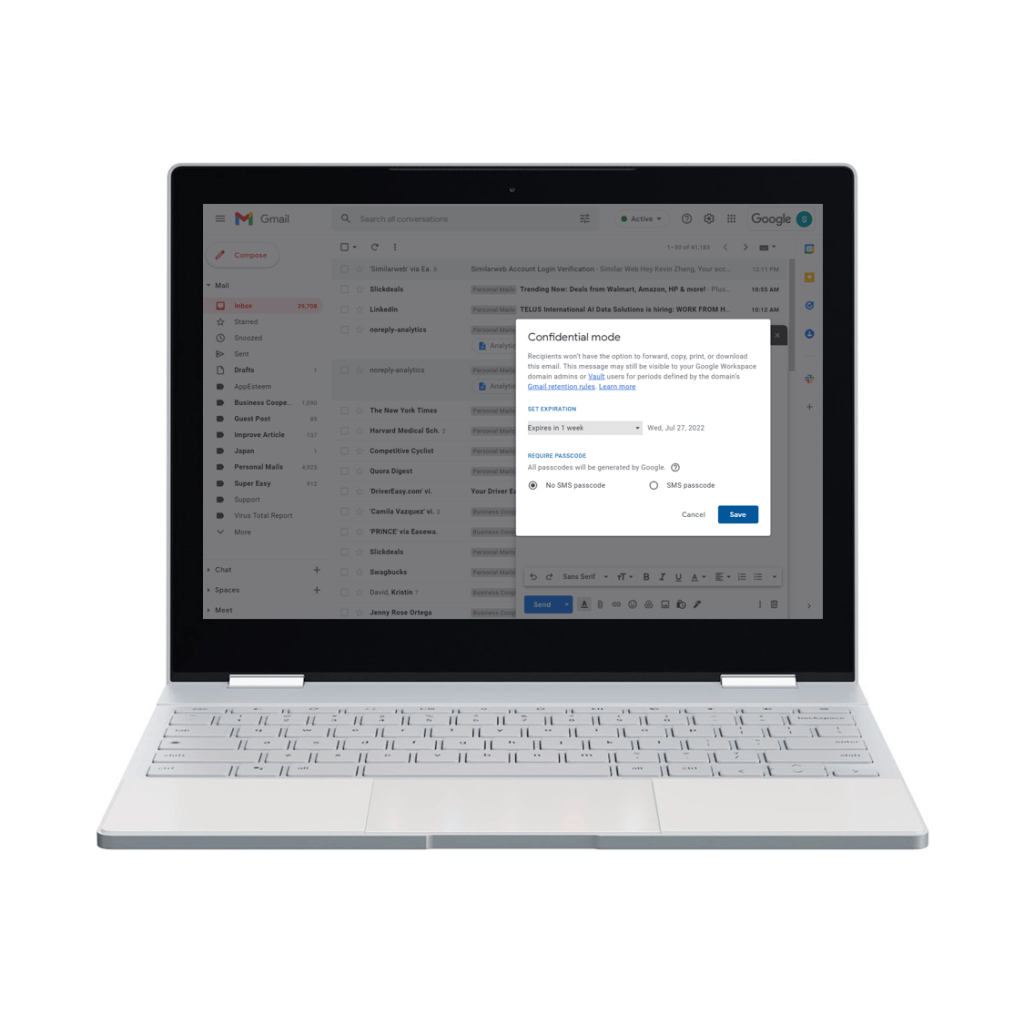
Question: Does Gmail confidential mode involve encryption?
As a Gmail account holder, you probably have come across Gmail’s confidential mode. Does it involve encryption? Unfortunately, no. It just lets you prevent someone from forwarding, copying, printing, and downloading anything you send. But it doesn’t mean much as anyone can still take a screenshot of the content.
How to send an encrypted email in Outlook
Compatible with the S/MIME protocol, Outlook also requires you to perform additional setup in order to send an encrypted email. Also both parties need to have enabled S/MIME otherwise the message will not be readable.
- Follow this detailed guide provided by Microsoft to set up to use S/MIME encryption.
- Once you’ve added the S/MIME certificate, go to the gear menu and click S/MIME settings.
- To encrypt or digitally sign all messages, you can either choose Encrypt contents and attachments for outgoing messages or Add digital signature to outgoing messages.
- Click on the three dots, which will allow you to encrypt the message.
Bonus Tips: Use an encrypted email service for free
To prevent anyone from snooping on your communications, the most trustworthy way is to use a secure encrypted email service like Proton Mail. It’s based in Switzerland, a country that is well known for its tough stance on data privacy.
Emails that are sent through Proton Mail won’t be accessible to both Proton Mail or any other email provider, as Proton Mail uses open-source encryption algorithms to empower you with privacy by default with end-to-end encryption. Only the sender and the recipient can read the messages, without risk of data breaches. In addition, you can create a no-cost starter account, no credit card required. A free account comes with 1 GB total storage and it allows users to send up to 150 messages per day.
If you and the email recipient both use Proton Mail, sending end-to-end encrypted emails can’t be easier. Just send emails using Proton Mail as you usually do with other email service providers. However, if your email recipient doesn’t use Proton Mail, you can take advantage of its Password-protected Emails feature to secure your email communications. Below are the steps you can take.
- Go to your Proton Mail.
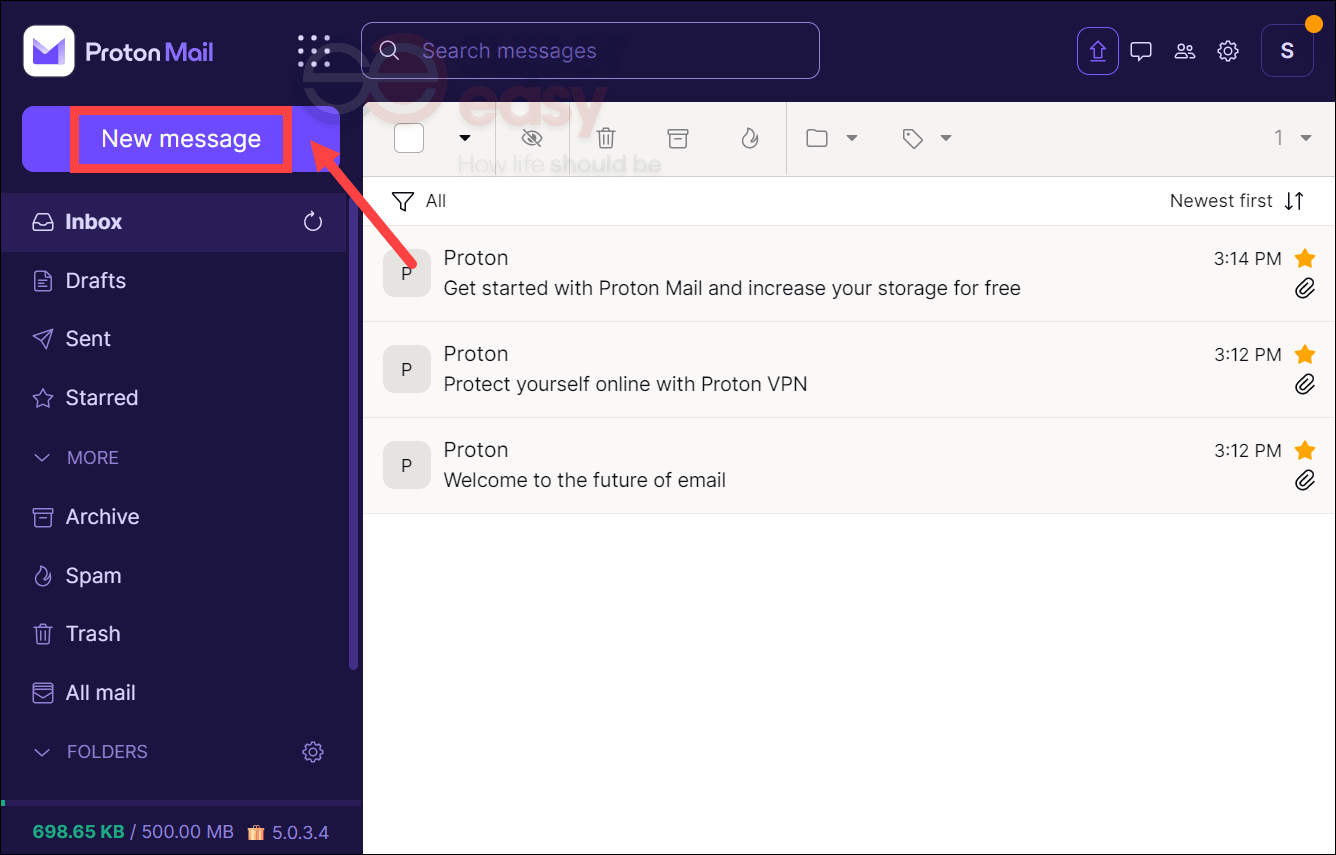
(It’s also available on the App Store and Google Play. ) - Compose a new email by clicking on New message located on the top-right and then editing your email details.
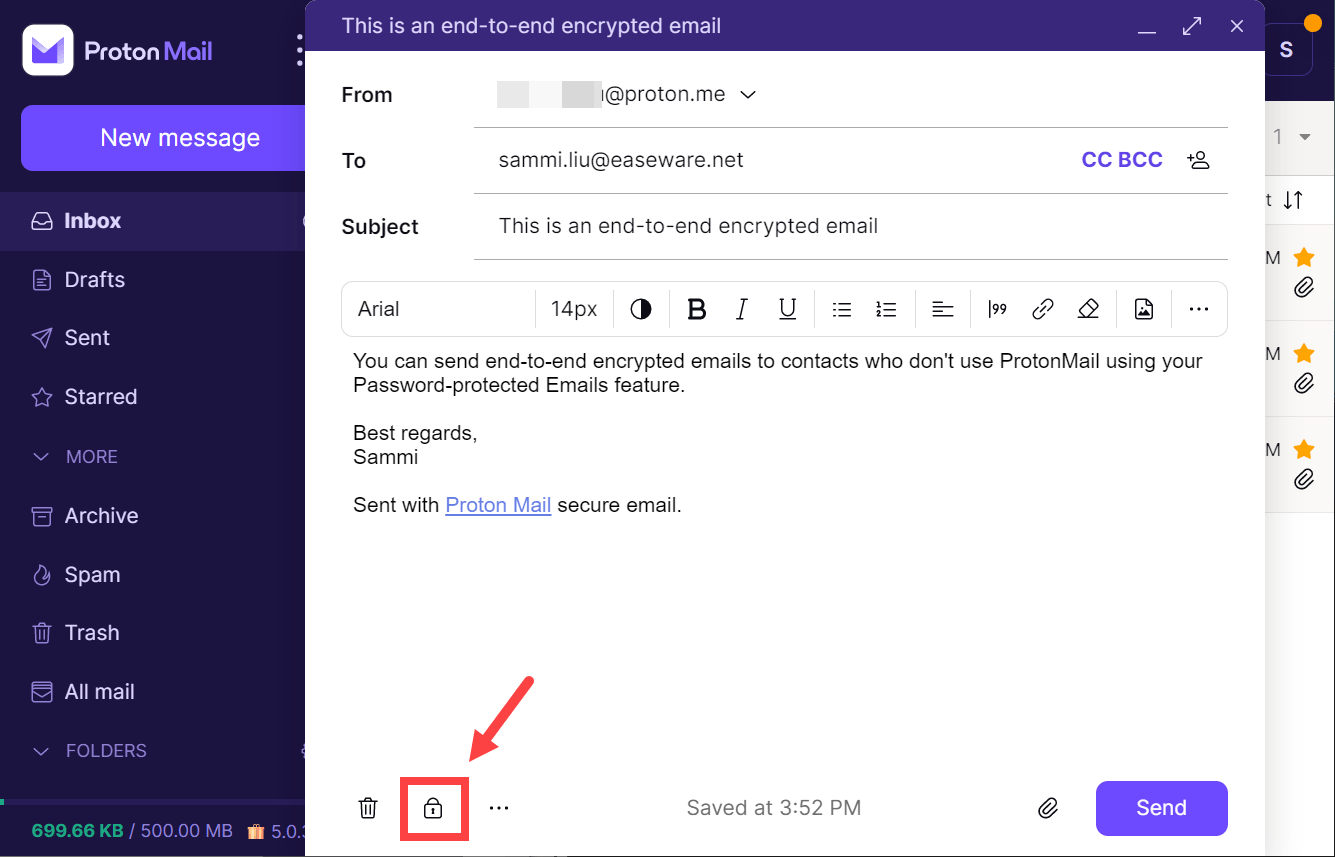
- Before clicking Send, however, click on the Encryption button (with the lock icon).
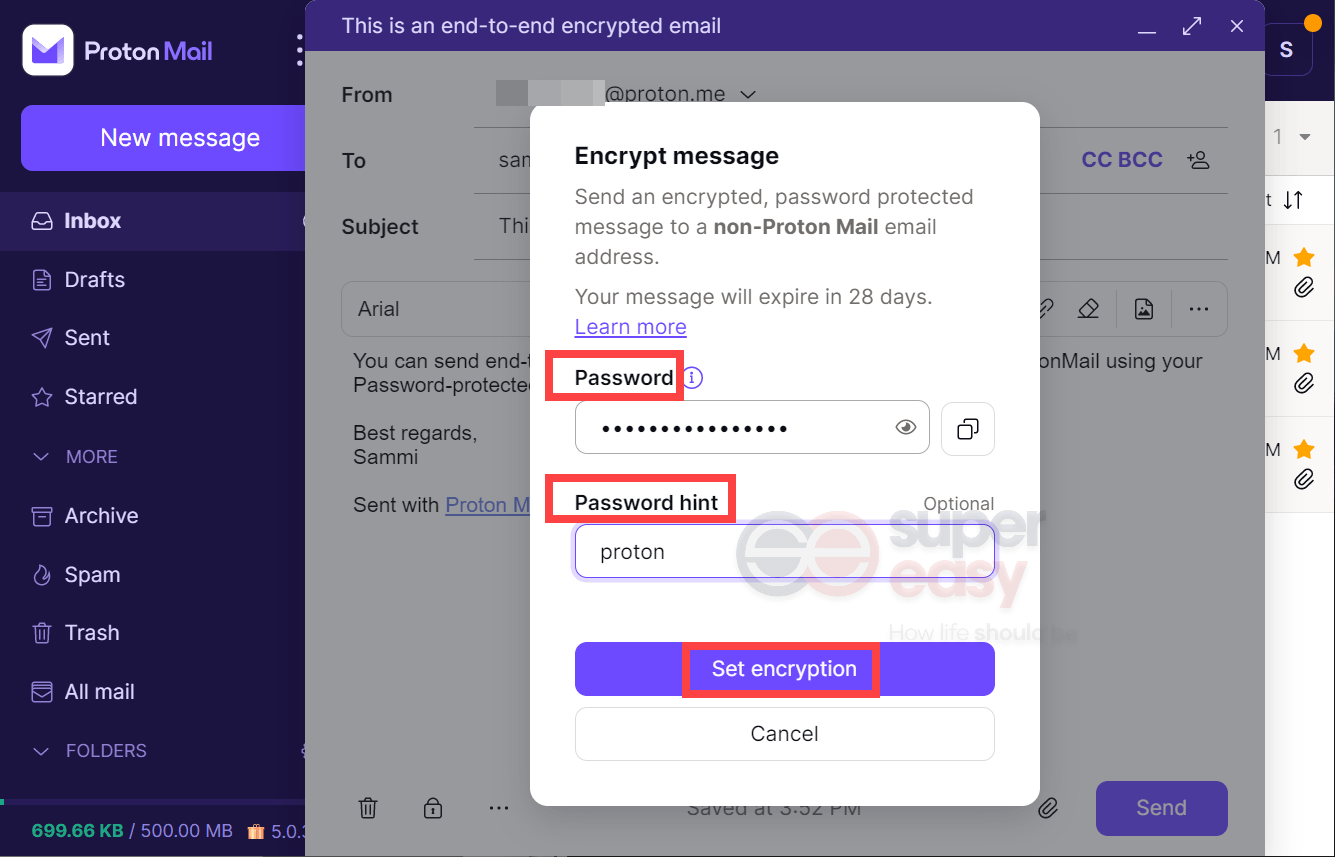
- Then you’ll be required to set a message password. Click Set encryption when you’re done.
- Go back to the main composer screen and you should be able to see a blue lock icon next to your recipient’s email address. The blue lock icon indicates that this email is now end-to-end encrypted and can only be decrypted by the intended recipient with the password that was set by the sender.
By default, a password-protected email will expire 28 days after it is sent. When it expires, the encrypted message and attachments within it will be deleted. If you want to customize the expiry date, just click on Edit as the screenshot shown below.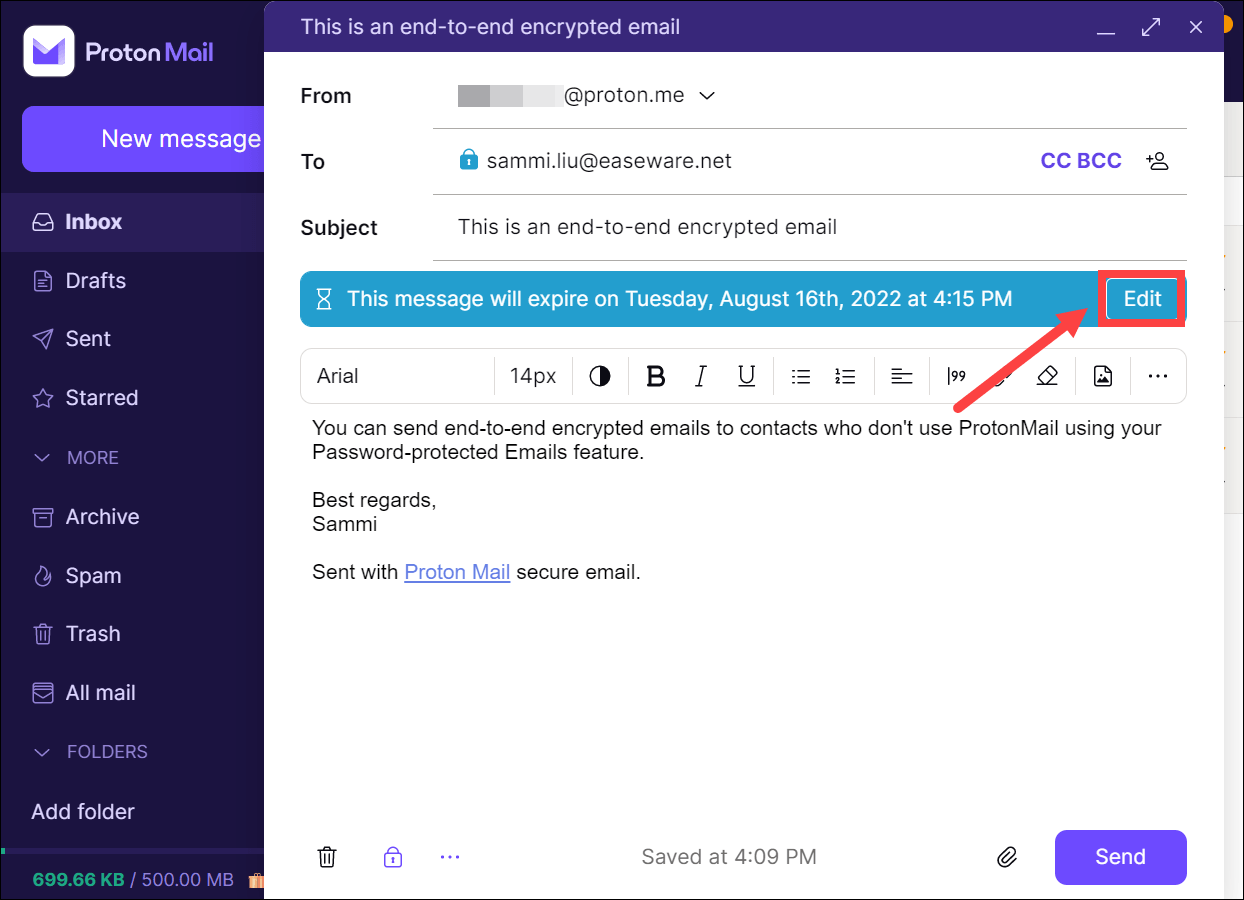
Select the amount of the time the email will exist before expiring from the drop-down. Then click Set.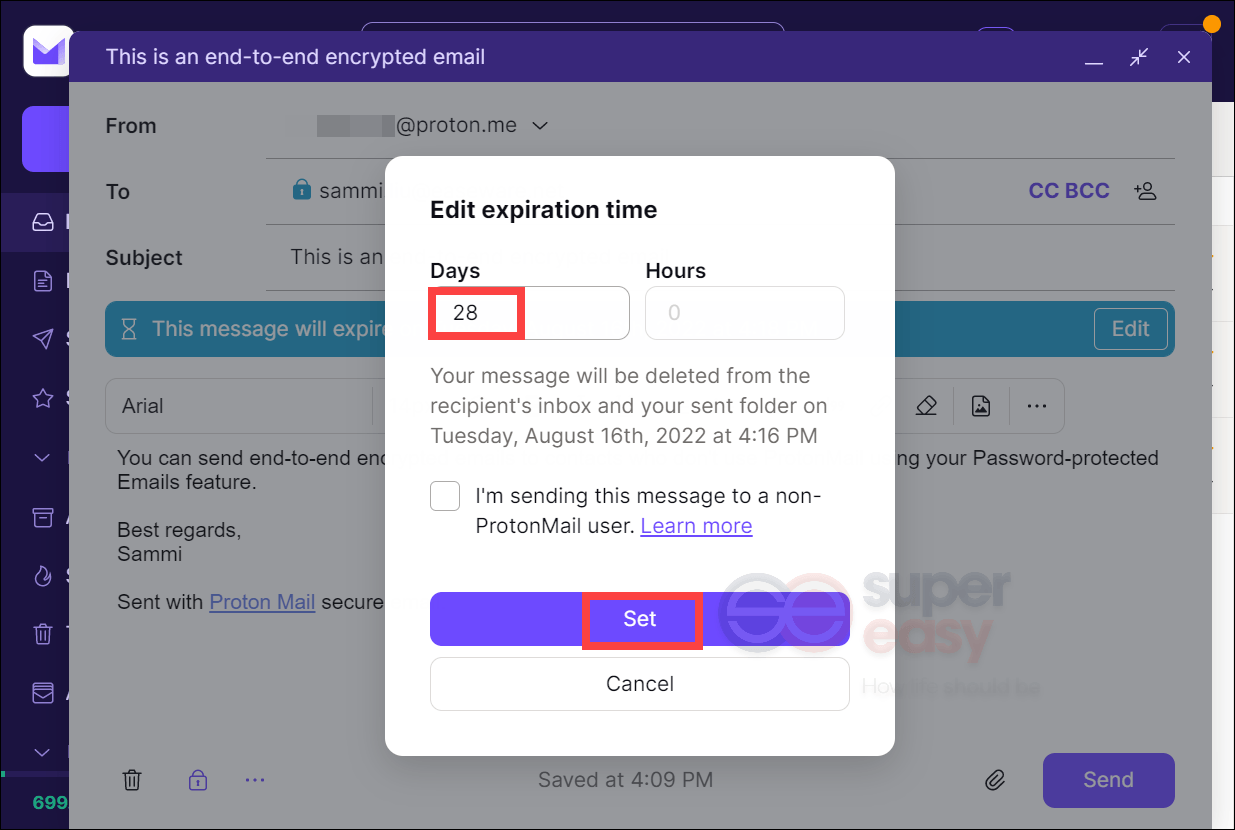
When you’re ready, click Send. - When the other person receives the email, all they have to do is click on the link provided and they’ll be taken to a secure environment where they need to use the password that you can share with them by some other means.

So this is the step-by-step walkthrough to protect your communications with encrypted email. If you have any ideas or questions, do not hesitate to write them down in the comment section below. We’ll try to get back in a timely manner.
")
")

")
![How to Keep Your Address Private [2024 Guide]](https://www.supereasy.com/wp-content/uploads/2022/11/address-768x512.jpg "How to Keep Your Address Private [2024 Guide]")
")
")
")
")

 in 2024")
")