How To Rip DVD On Mac Quickly & Easily

47 Revisions

DVD, once many people’s favorite way to enjoy movies and TV shows, has gradually lost its appeal due to the ready availability of streaming services, its vulnerability to damage, and inconveniences to haul around. So it’d be a good idea if you store a digital copy of them.
If you’ve got a collection of DVDs that you wish to rip onto Mac, you’re in the right place. In this article, we’re going to show you how to do it.
Is it legal to rip DVDs?

The legality of ripping a DVD varies from country to country. So be sure to check the copyright protection laws in your country to make an informed decision. In the US and the UK, for example, you’re allowed to make copies of uncopyrighted works or works of your own creation. It is illegal to reproduce or distribute copyrighted content, either for commercial or for personal use. Since it is very unlikely authorities would snoop on what you do offline, you would not face serious repercussions for copying copyright-protected DVDs for personal use, but you’re at your own risk for doing so.
How to rip a DVD to Mac
Whether it is to free up more space in your house, release your DVD collections so that you can watch them on the go, or back up your digital treasure, there are good reasons you want to digitalize your DVD. Below we provide you with two methods of ripping a DVD, just choose the one that is suitable for you.
1: Ripping an unprotected DVD
Apple has made it quite easy for you to rip unprotected contents to your Mac. If you have a DVD-ROM drive built-in on your Mac, you can follow the steps below to copy your DVD. Otherwise, you may need an external drive.
- Insert the DVD disk into your Mac PC’s CD drive.
- Click Application > Utilities.
- Under the External category, locate your DVD and click on it.
- Click the File drop-down menu > New Image > Image from “your DVD name” to bring up a window.
- In the Save As field, enter a name for the image file.
- In the Format menu, choose DVD/CD Master.
- Choose a location to save the image file.
- Hit Save. Immediately the DVD will start copying content to your Mac.
- When the process is finished, you can safely eject your DVD from the slot.
Congrats – you’ve successfully ripped your DVD to Mac.
2. Ripping a protected DVD content
DVD producers have made it difficult for their works to be reproduced by imposing copy protections. So if you’re looking to rip a copy-protected DVD, you’ll need to use a professional DVD ripper program. When choosing a DVD ripper program, ripping speeds, output quality, output format as well as the ability to copy encrypted content are all worth considering.

WinXDVD Ripper Platinum is an all-in-one program that provides lightning ripping speed, supports zero-loss video quality, is compatible with hundreds of other media formats, and most importantly, is capable of removing Disney X-project DRM, CSS keys, region codes, Sony ARccOS, and more to guarantee you a hassle-free DVD movie ripping experience.
Here is how to rip copyright-protected content to your Mac with WinxDVD Ripper Platinum.
- Insert the DVD disk into your Mac PC’s CD drive.
- Download WinxDVD Ripper Platinum for Mac.
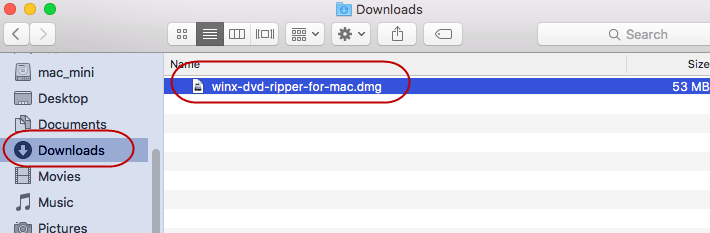
- Open the Downloafs folder and double-click on the downloaded file to install it.
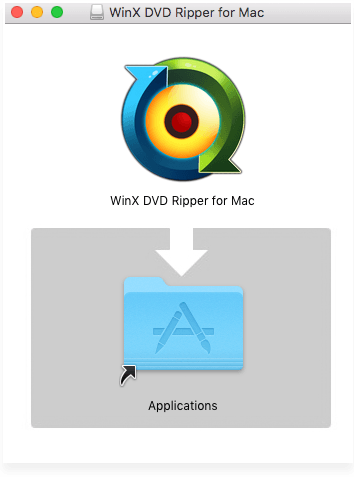
- Drag and drop WinX DVD Ripper for Mac into the Applications folder.
- Launch WinX DVD Ripper and click DVD Disc to import the DVD.
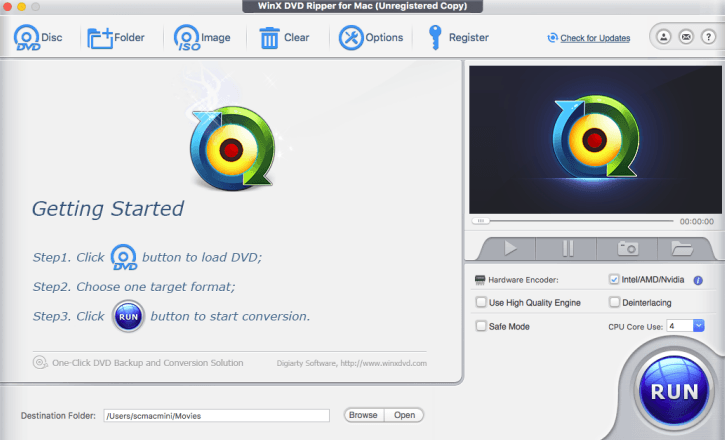
- On Output Profile panel, select your target video format or device.
- Hit the RUN button. Immediately the DVD will start copying content to your Mac.
- When the process is finished, you can safely eject your DVD from the slot.
Congrats – you’ve successfully ripped your DVD to Mac.


![[SOLVED] Netflix “Pardon the Interruption” Errors](https://www.supereasy.com/wp-content/uploads/2021/07/2021-07-30_10-47-35.jpg "[SOLVED] Netflix “Pardon the Interruption” Errors")

")
")
")

 in 2024")
")