How to Play Steam Games on Oculus Quest 2 | 2024 Detailed Guide

25 Revisions
You’ve just got a Quest 2, lightweight, comfortable, and powerful enough to run impressively detailed virtual experiences. While playing games on the Oculus store is pretty straightforward, playing the SteamVR titles seems to require some setups. If you’re looking for a detailed guide to play Steam games on your Quest 2, you’ve come to the right place. We’ll walk you through the whole process. Without further ado, let’s dive in.

Table of contents
Before going any further
Before starting the setup process, you’ll first need to make sure that your PC is VR Ready. Below we’ll walk you through two methods.
How to check if your PC is VR Ready
Method 1: Run SteamVR Performance Test
The easiest way to check it is running SteamVR Performance Test, which measures your system’s rendering power using a 2-minute sequence.
1) Launch your Steam app and go to the STORE.
2) In the search box, type performance test, then click the SteamVR Performance Test app from the list of results.
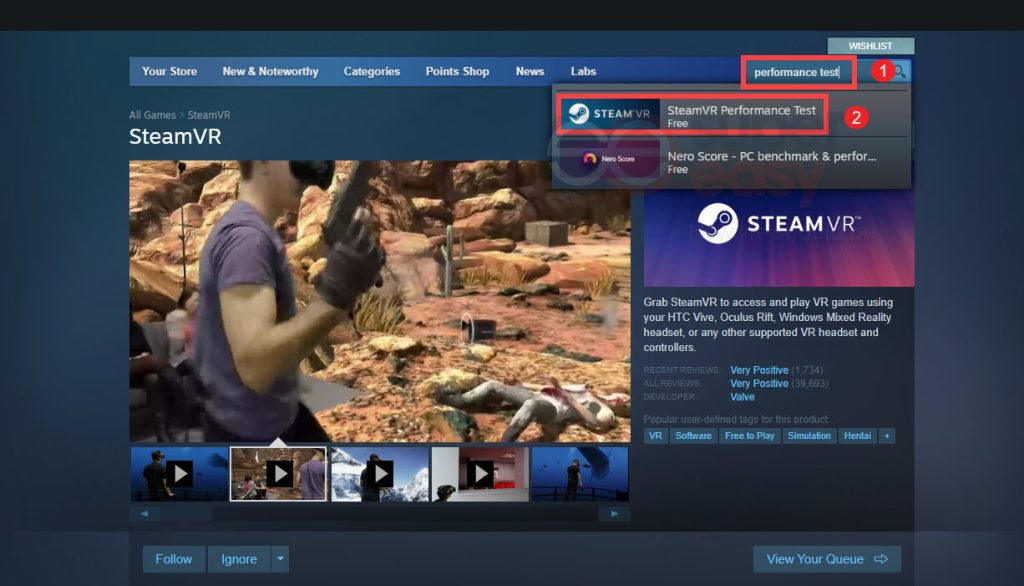
3) Then on the following SteamVR page click on the Play now button and follow the on-screen instructions to install it.

Once complete, run SteamVR Performance Test. This may take up to 2 minutes. Then it will show you a summary screen showing you how good your PC is.
If it’s all green, you’re good to go.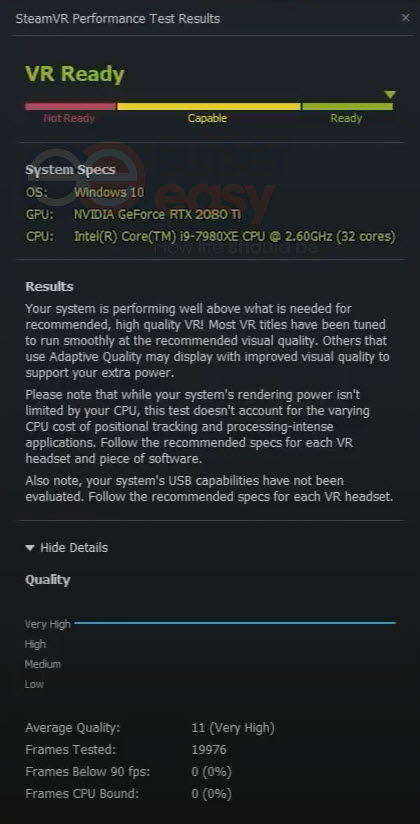
If anything pops up as red or yellow, then it’s probably a good idea to look at upgrading your PC before going any further.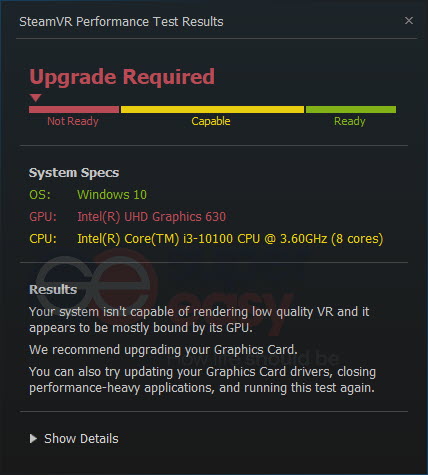
Method 2: Manually check if your PC is capable
The other way to see if your PC can handle VR titles is comparing your own specs with the compatibility requirements.
| Component | Recommended specs |
| Processor | Intel i5-4590/AMD Ryzen 5 1500X or greater |
| Graphics card | NVIDIA GTX 1050 Ti / AMD Radeon RX 470 or greater |
| Alternative Graphics Card | NVIDIA GTX 960 4 GB / AMD Radeon R9 290 or greater |
| Memory | 8 GB+ RAM |
| Operating system | Windows 10+ |
If you have no idea how to check your hardware specifications, follow the simple instructions below.
1) On your keyboard, press the Windows logo + R keys simultaneously to open the Run box.
2) Type in dxdiag and hit Enter.
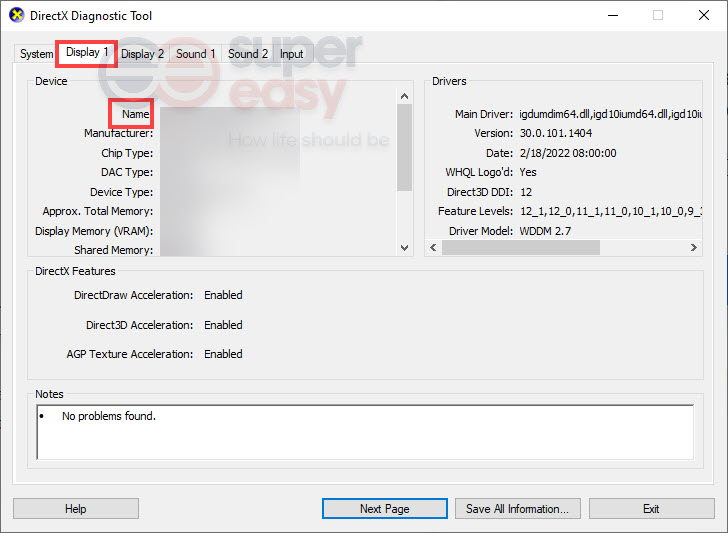
3) Under the System tab, you’ll see your Operating System, Processor, and Memory. 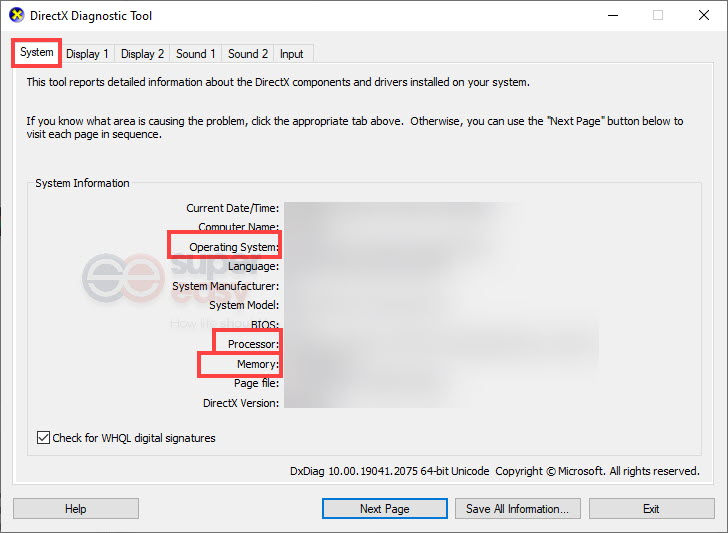
To check what graphics card you’re having, simply go to the Display tab.
Apps for setup and gameplay
After confirming that your PC meets the requirements, you’ll need to download and install two apps: SteamVR and the official Oculus PC app.
1. SteamVR
To access a library of Steam games with your Quest 2, you’ll need to have the SteamVR app, which is the ultimate tool for experiencing VR content. And downloading it is easy-peasy.
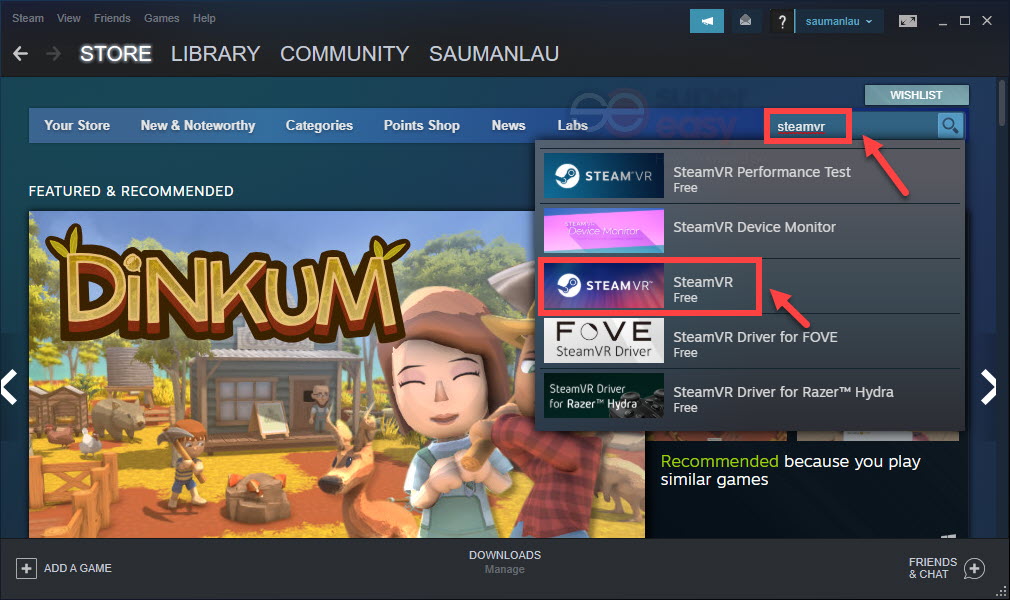
1) Launch Steam and go to the STORE. In the search box, type in steamvr. Then click on the SteamVR app in the search results pop-up list.
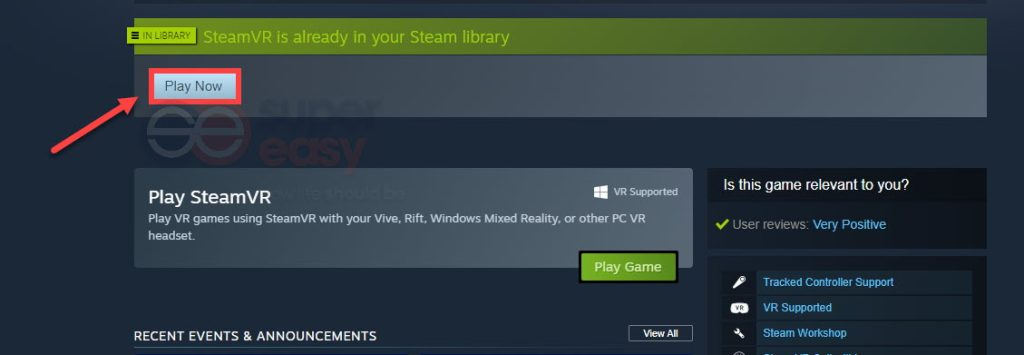
2) On the following SteamVR page, click on the Play Now button to install it.
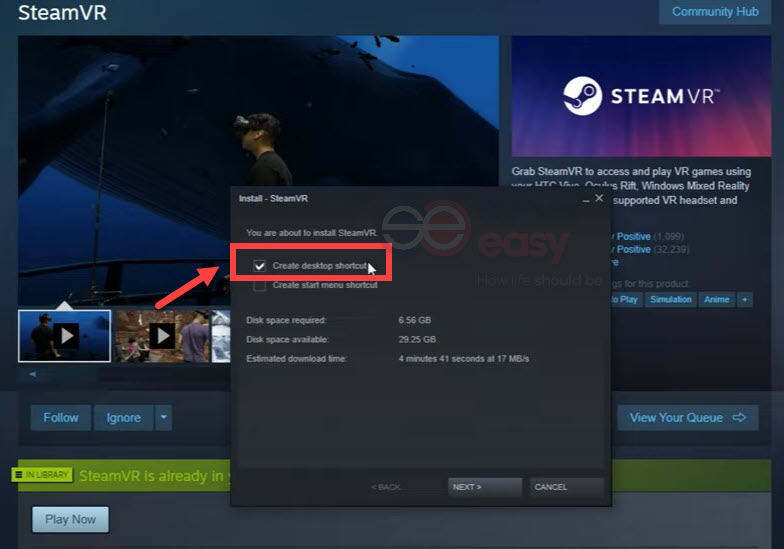
Make sure you check the box Create desktop shortcut as you’ll need that to launch SteamVR from your headset. Then click on NEXT to install it.
Once it’s finished, the SteamVR is all set up.
2. Oculus app
Next you’ll need to install the Oculus app.
1) Go to the app download page.
2) Find Quest 2. Under Air Link and Link Cable, click on the DOWNLOAD SOFTWARE button. This will download the installer to your browser’s default download location.

For most people, once it’s downloaded, it will appear at the bottom of your browser window. Simply left-click on the file to run it and follow the simple instructions to install the app.
The first time you run it, it will take you through a first-time setup process where you will need to log in with your Meta / Oculus account, or create one if you don’t have one already.
Now you’ve had SteamVR and the Oculus app, playing your first game is a few simple steps away!
Two methods to connect your Quest 2 to PC: with a cable & wirelessly
There are options to connect your Quest 2 to your PC: via Link or Air Link.
1. via Link (Cable)
Using a cable to connect your Quest 2 with a PC is quite easy. But you won’t be able to move around as freely, as you’ll be tethered to your computer. And in order to have an optimal and comfortable experience, you should have a high-quality USB cable that is at least 3 meters (10 feet) in length. You can get one directly from Oculus or you can purchase it from a third-party. Among the cables they’ve tested, the Anker cable is more likely to give users the utmost performance.
When you’re prepared, take the steps as follows to set up.
1) Turn on your Quest 2.
2) Launch the Oculus app.
3) Select Quest 2 and click Continue.

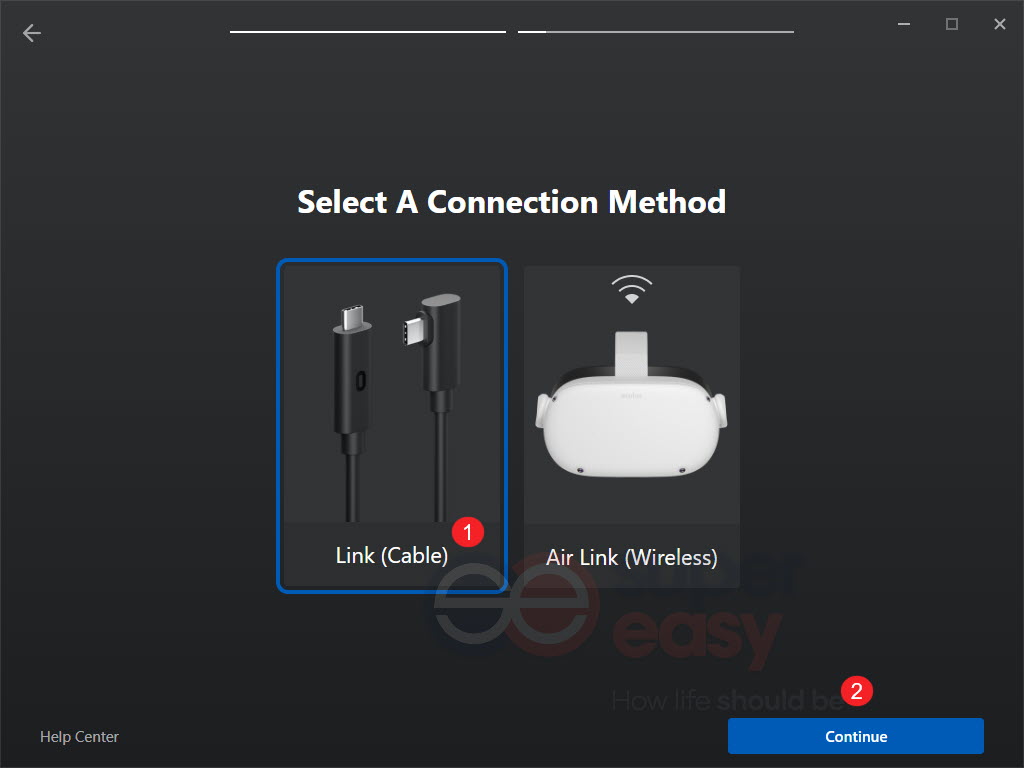
4) Select Link (Cable) as the connection method.
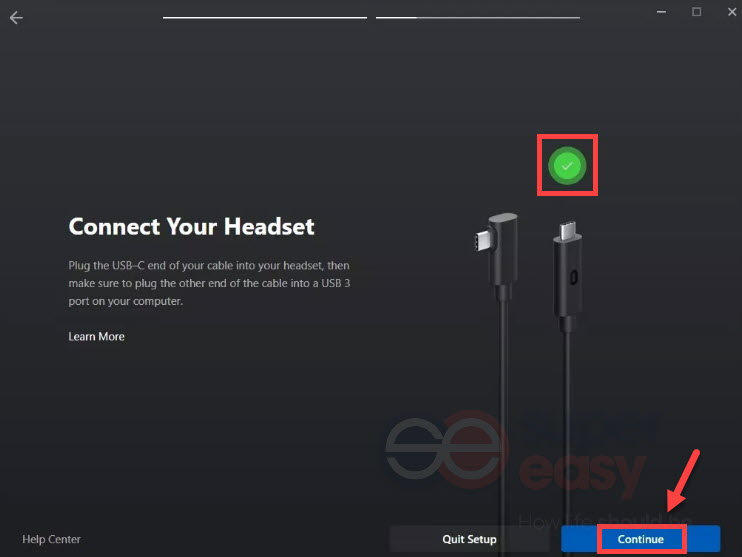
5) Now plug one end of the cable into your Quest 2 headset, and the other end into your PC.
When they’re connected successfully, there should be a Solid green circle with the white check mark. Now all you have to do is click Continue.
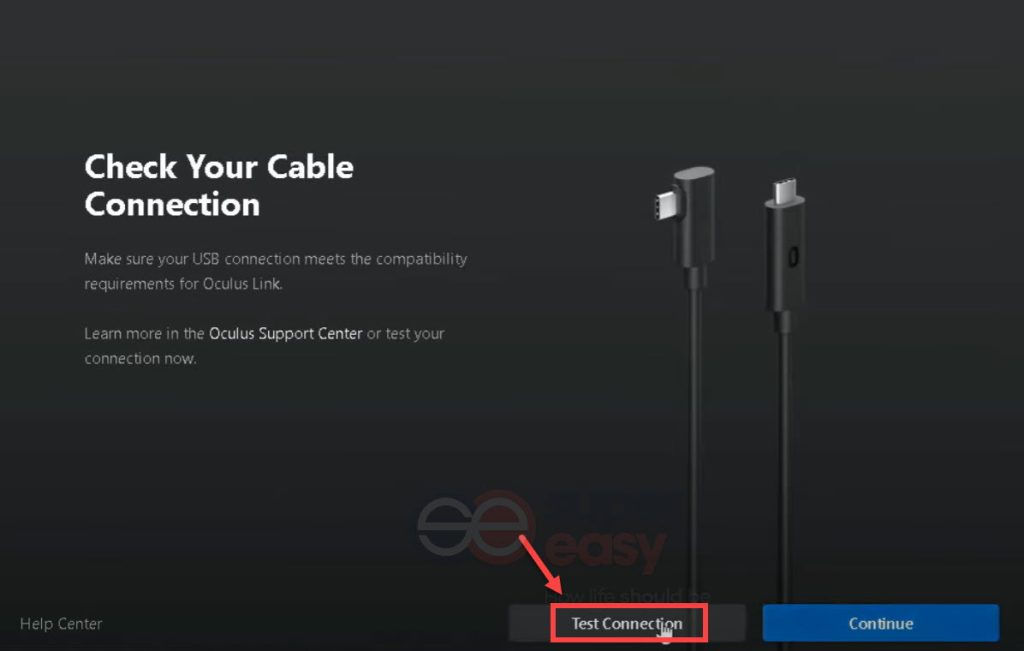
6) On the screen that appears, choose Test Connection, which is highly recommended as this can help you make sure that your cable works perfectly. After that, you’re good to go.
7) On your Quest 2, it will ask for access to data, simply click Allow.

8) Once you’ve enabled access to data, it’ll ask you to enable access to Oculus Link, simply click Enable.

9) Now look at the bottom of the screen. Click on Library.

10) Go to Apps. Then click Filter and toggle on Unknown Sources.

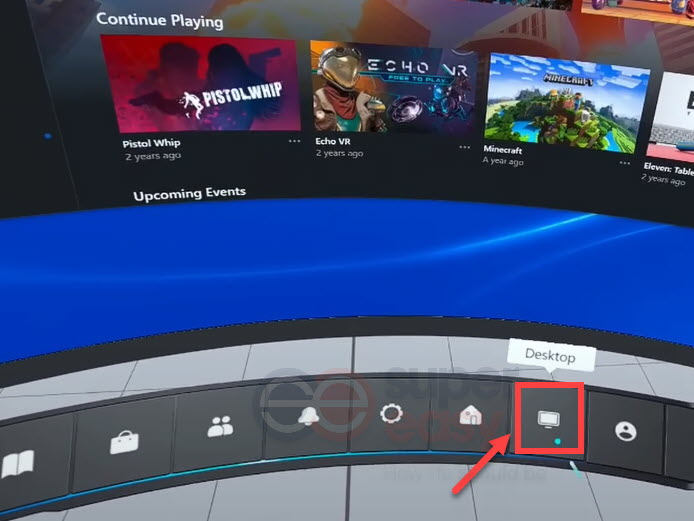
11) Go back to your main screen. From the bottom-right, click on Desktop. This will show you your PC screen.
12) Here you should find the SteamVR as a desktop shortcut on your desktop screen which was created when SteamVR was installed. While pointing at the SteamVR icon with your controller, hold down the trigger button for a second and then release the trigger. In the pop-up menu that is displayed, select Open and it will run SteamVR. 
Once SteamVR loads, which can take a while, you’ll be on a different home screen which is the Steam home screen that displays any games you’ve purchased on the Steam store. Just select the one you want to play.
2. via Air Link (wirelessly)
Oculus Air Link is a wirelessly way to play PC VR games on your Quest 2. Users with a strong Wi-Fi setup can choose to stream wirelessly through Air Link.
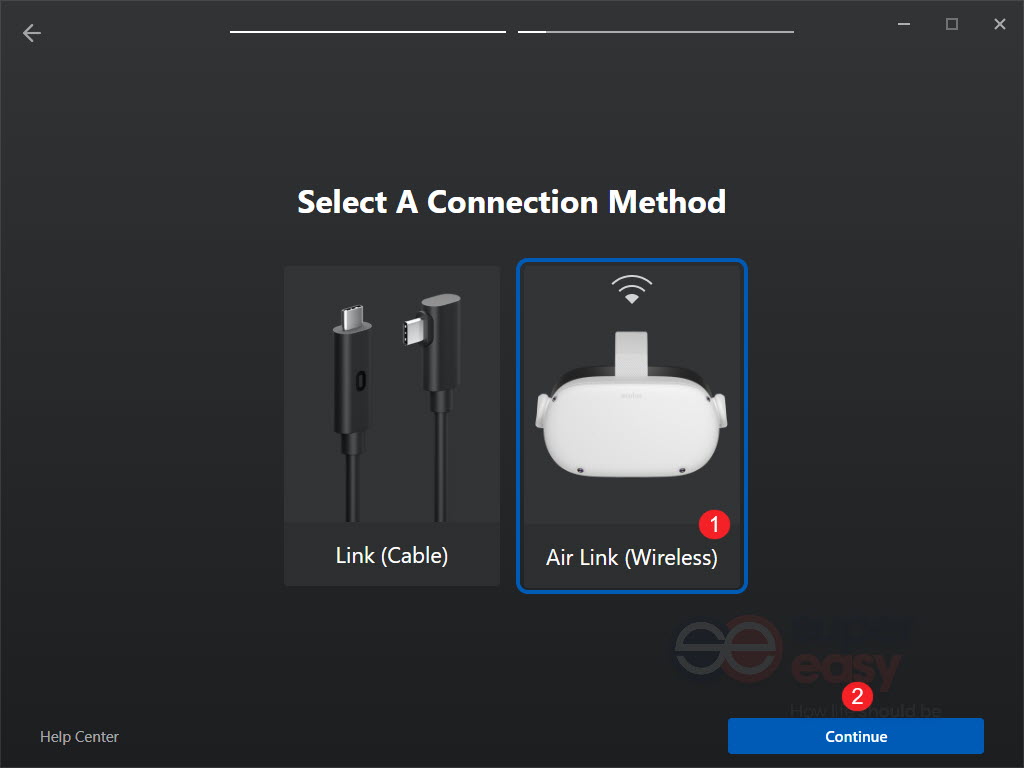
1) Run the Oculus app on your PC. Select Quest 2 and click Continue.
2) Select Air Link (Wireless) and click Continue.
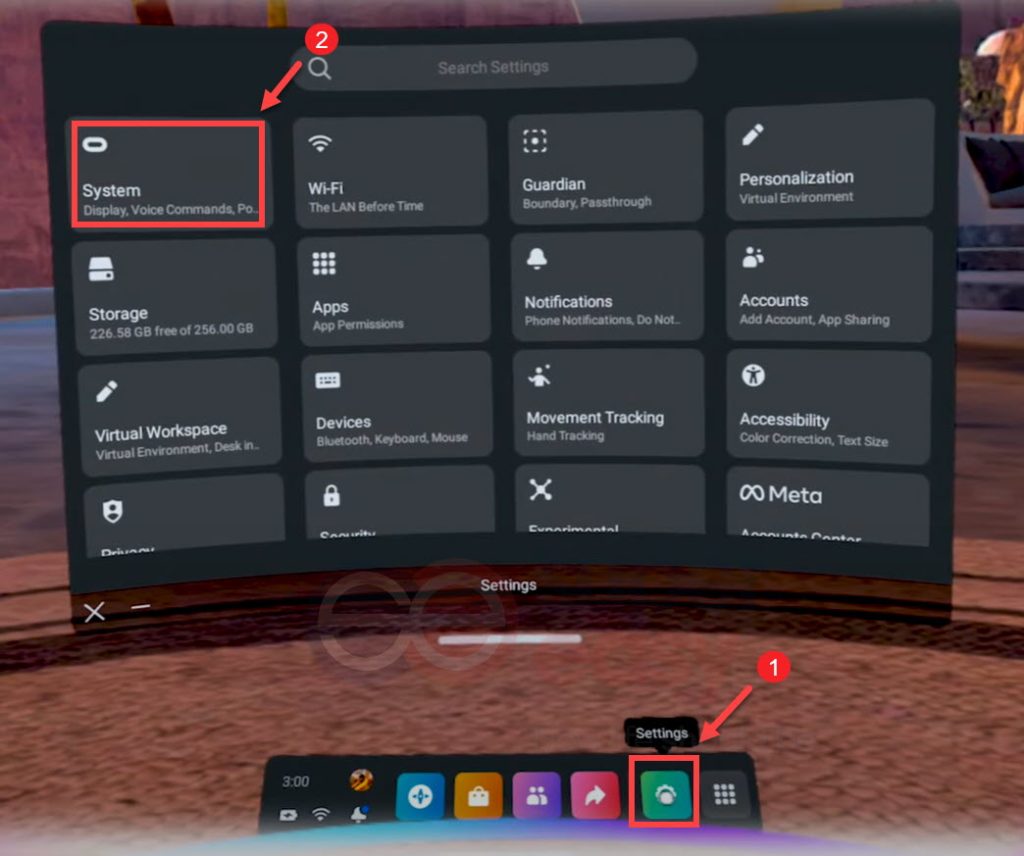
3) Put on the headset, open Settings. Then click on the System tab.
4) Now select Quest Link from the left navigation menu. And then toggle on Quest Link.
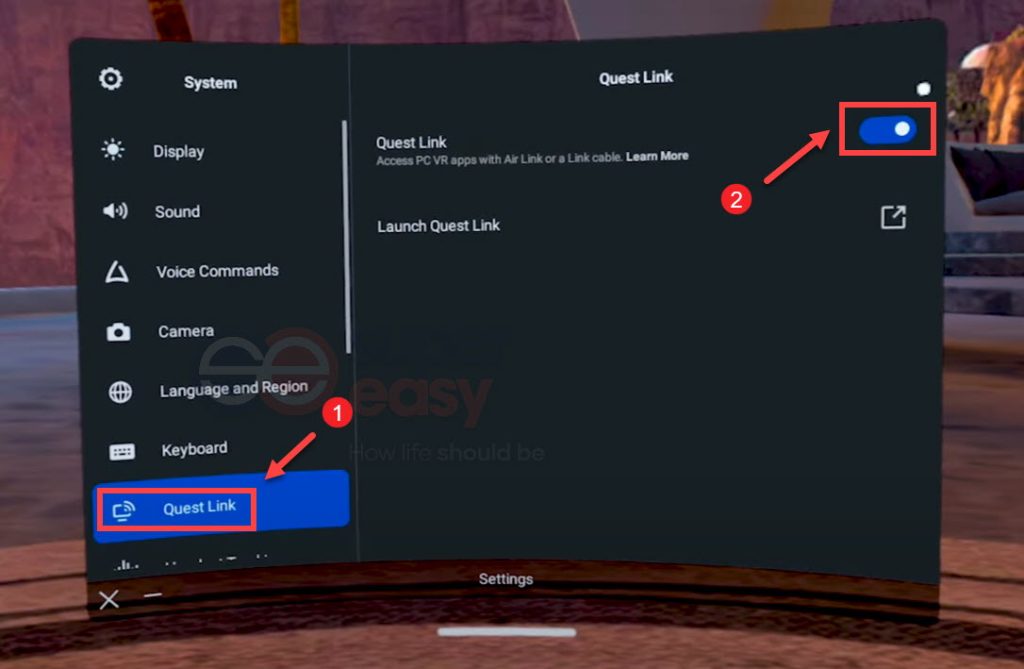
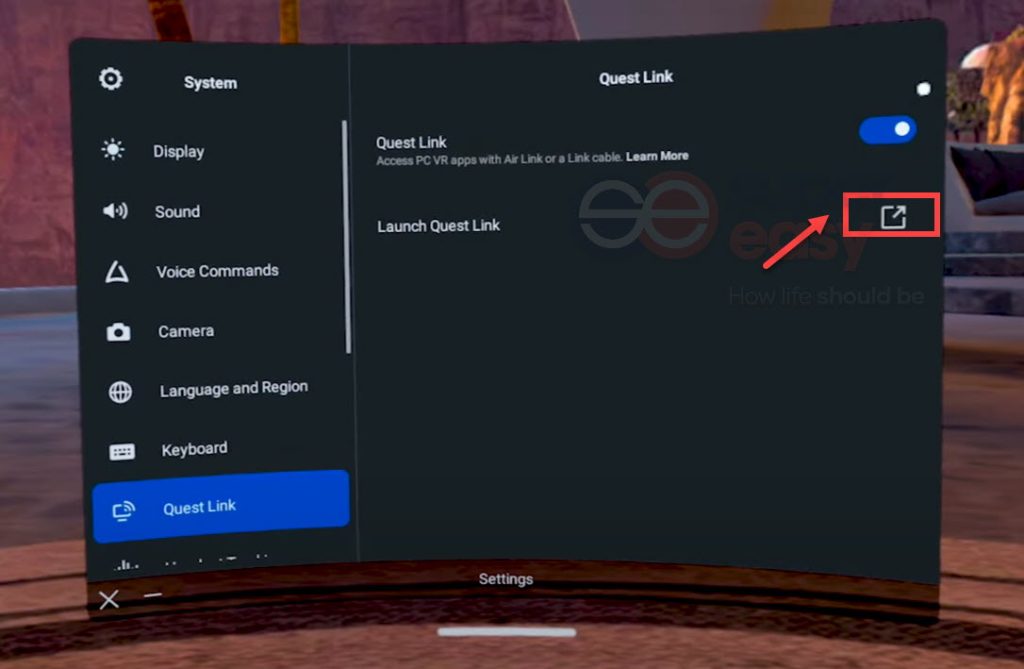
5) Click to Launch Quest Link.
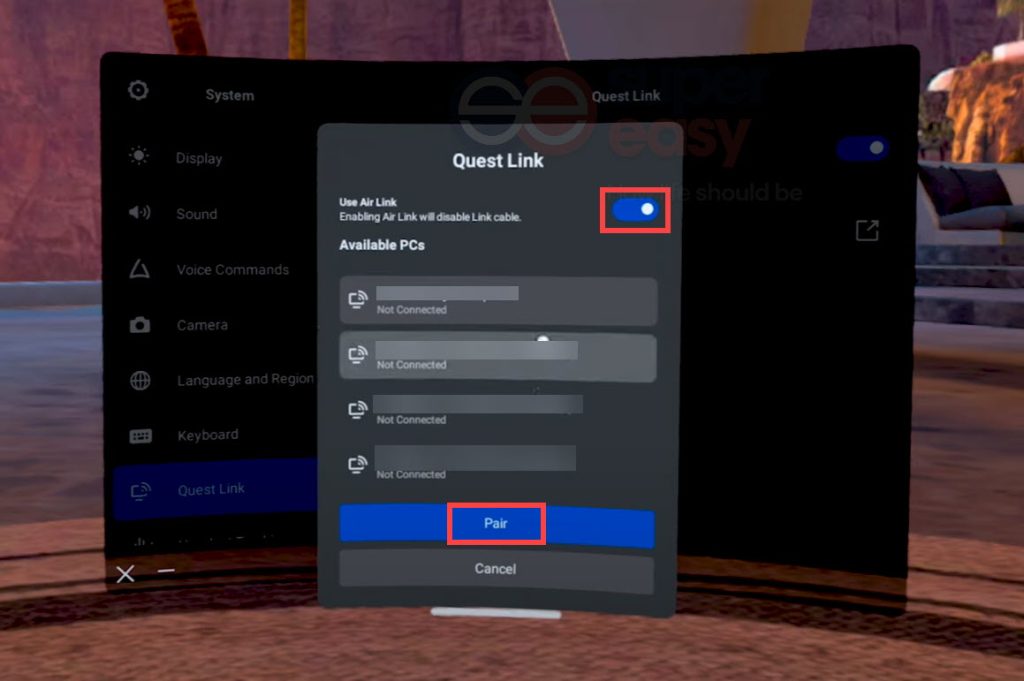
6) Toggle on Use Air Link. select your PC and click on Pair.
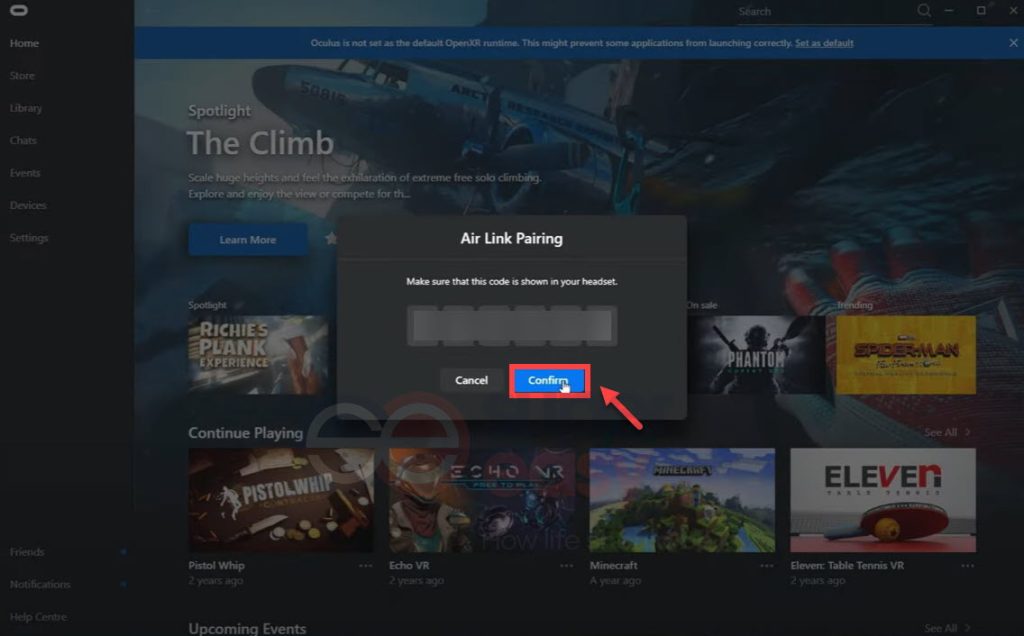
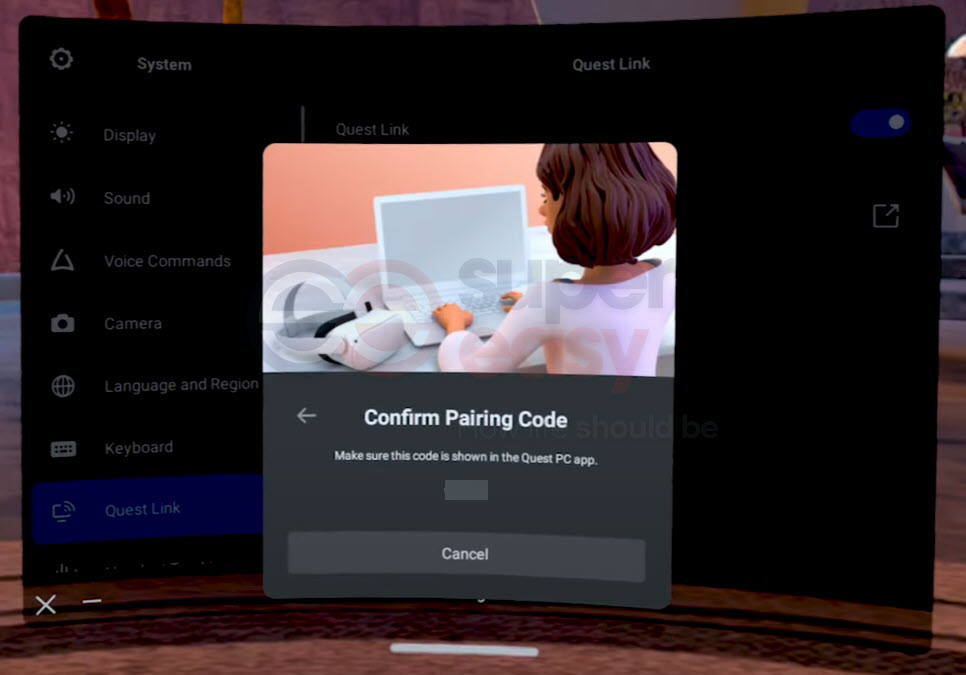
7) Then you’ll need to confirm a code on both your PC and the headset.
8) After you’ve confirmed it, click Launch.
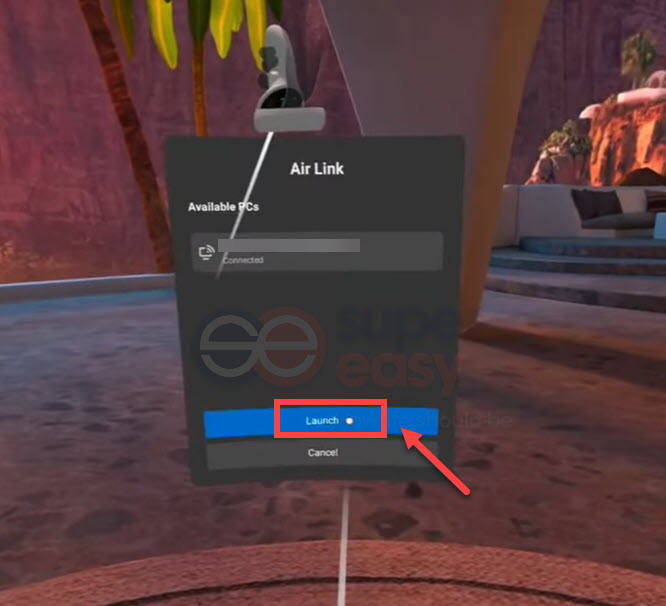
The next time you connect your headset you won’t need to go through that pairing process again. You would just be able to hit Launch straight away.
9) You will now be redirected to the Oculus PC VR home screen. To play Steam games, go back to the home screen. At the bottom right, select Desktop from the menu bar. This will show you your PC screen.
10) Here you should find the SteamVR as a desktop shortcut on your desktop screen which was created when SteamVR was installed. While pointing at the SteamVR icon with your controller, hold down the trigger button for a second and then release the trigger. In the pop-up menu that is displayed, select Open and it will run SteamVR.
You may get a message popping up in your Quest headset saying that you can’t run apps from unknown sources. This is because Meta regards the SteamVR app as an unknown source. Fortunately, this is easy to fix.
In the Oculus app on your PC, go into your Settings and go to the General tab. There is an Unknown Sources toggle. Try to toggle it on.
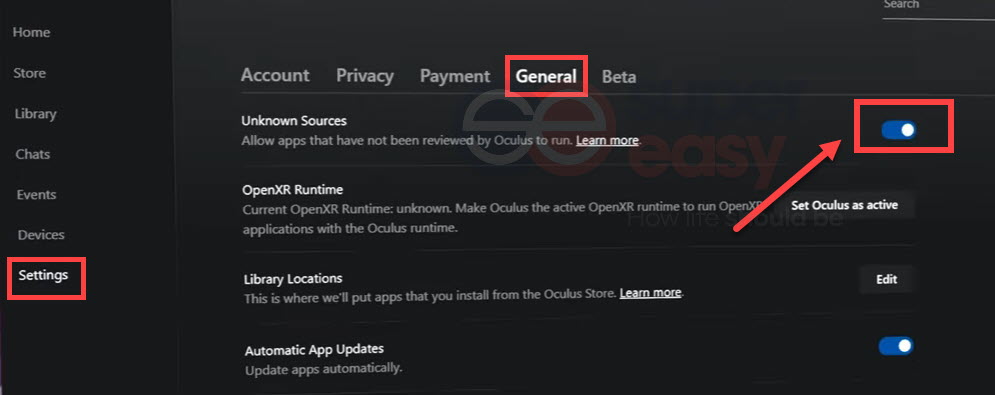
When it’s enabled, you will be able to run SteamVR without any issues!
Once SteamVR loads, which can take a while, you’ll be on a different home screen which is the Steam home screen that displays any games you’ve purchased on the Steam store. Just select the one you want to play.
Editor’s choice for USB-C cable and Wi-Fi router
As you choose to either connect your Quest 2 to a PC via a cable or Air Link, you should have good accessories for setups.
Cable with good results
For users who use a cable to connect, you may want to purchase the one that is versatile but more affordable from a third-party. While quality can vary, the Anker cable (10 feet preferably) has been tested internally with good results.

- Superspeed Transfer: transfer data up to 5Gbps
- Reversible Connector: user-friendly design to let you insert the connector the right way
- 5X More Durable: proven to be stronger than ther USB-C cables
Router for smoother streaming and more responsive gaming
For users who choose to connect the Quest 2 to a PC wirelessly via the Air Link, having a dedicated Wi-Fi router for Air Link gaming can improve your performance. You can also limit the number of devices on the network to allow more bandwidth for Air Link.
If you’re considering purchasing a brand new router, TP-Link Archer AX55 would be a great pick.

Archer AX55 Hot Buys
AX3000 Dual Band Gigabit Wi-Fi 6 Router
- Next-Gen Gigabit Wi-Fi 6 Speed: 2042 Mbps on 5 GHz and 574 Mbps on 2.4 GHz band
- Simultaneous transmission to more devices
- Ultra-low latency
- Expanded Wi-Fi coverage
- TP-Link HomeShield to enjoy advanced security features
- Improved battery life
- Compatible with Alexa
So that’s the step-by-step guide to play Steam games on your Quest 2, plus some tips on getting a cable or router for better connections. Hope this helps! If you encounter any issues or have better suggestions, do not hesitate to write them down in the comment section below.


")
")
")

 in 2024")
")