How to Format a USB on a Mac [SOLVED]

7 Revisions
![How to Format a USB on a Mac [SOLVED]](https://www.supereasy.com/wp-content/uploads/2018/12/Snap1-1.png "How to Format a USB on a Mac [SOLVED]")
Want to format the USB drives on your Mac computer? Don’t worry. This post is showing you how to format a USB on Max stepo-by-step. Check it out.
You are not able to use the brand-new USB drive on your Mac computer? Or, you just want to remove everything on your USB drive connected with your Mac computer? Don’t worry. We’re going to show you how to format a USB on a Mac for using USB without problem on Mac in this article. Read on and see how…
Part 1: What are the supported file system formats on my Mac computer?
File system is used to store and organize data on media, including your USB drives.
In Microsoft Windows system, there’re several types of File System, FAT32 is the mostly widely supported and popular one. USB drives formatted with FAT32 can be read and written by your Mac computer though, but it’s not optimal. Unless you’re going to use your USB drive on both your Windows computer and macOS computer, we suggest you format your USB drive as macOS’ native File System format.
If your Mac computer is running macOS High Sierra or later, there’re two options for you: Apple File System(APFS) and Mac OS Extend; If your Mac computer is running older macOS than High Serria, you can just only format the USB drive as Mac OS Extend.
Part 2: Which format should I use?
APFS is more reliable and faster than Mac OS Extend. So if you plan to plug your USB drive into a Mac running an older version of macOS, choose to format your USB as Mac OS Extend. In addition, Time Machine can’t currently back up to an APFS drive, so if you’re going to use your USB drive for Time Machine backups, also choose to format your USB as Mac OS Extend. Except these two situations, we recommend formatting your USB as APFS for higher speed and reliability.
There’re different formats of APFS and Mac OS Extend.
Here’s the difference between them:
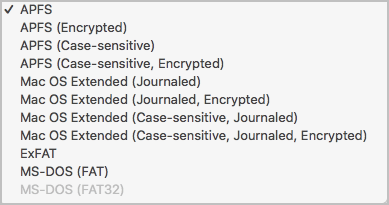
APFS: Uses the APFS format, recommended for macOS 10.13 or later.
APFS (Encrypted): Uses the APFS format and encrypts the partition of your USB drive.
APFS (Case-Sensitive): Uses the APFS format and is case-sensitive to file and folder names. For example, you can simultaneously have a folder “SUPEREASY” and another folder named “supereasy” in your USB drive formatted as this type.
APFS (Case-Sensitive, Encrypted): Uses the APFS format, is case-sensitive to file and folders names, and encrypts the partition.
Mac OS Extended (Journaled): Uses the Mac format (Journaled HFS+) to protect the integrity of the hierarchica file system.
Mac OS Extended (Journaled, Encrypted): Uses the Mac format, requires a password, and encrypts the partition.
Mac OS Extended (Case-sensitive, Journaled): Uses the Mac format and is case-sensitive to file and folder names. For example, you can simultaneously have a folder “SUPEREASY” and another folder named “supereasy” in your USB drive formatted as this type.
Mac OS Extended (Case-sensitive, Journaled, Encrypted): Uses the Mac format, is case-sensitive to file and folder names, requires a password, and encrypts the partition.
Besides, there’re two more formats for you to choose:
MS-DOS (FAT): Use for Windows volumes that are 32 GB or less.
ExFAT: Use for Windows volumes that are over 32 GB.
If you plan to use your USB drive across both Windows and Mac system, you mat need to format your drive as one of MS-DOS (FAT) and ExFAT.
Part 3: How do I format a USB on a Mac?
Although there’s no a feature like quick-format of Windows system in Mac, but you can use the built-in feature called Disk Utility to format your USB drive quickly.
Here’s how you can do that:
- Plug the USB drive into your Mac computer.
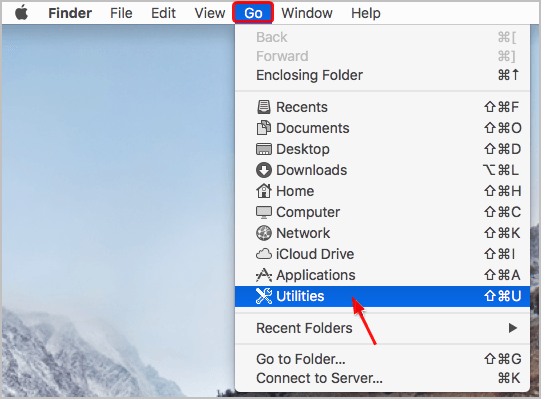
- On your desktop, click Go and select Utilities.
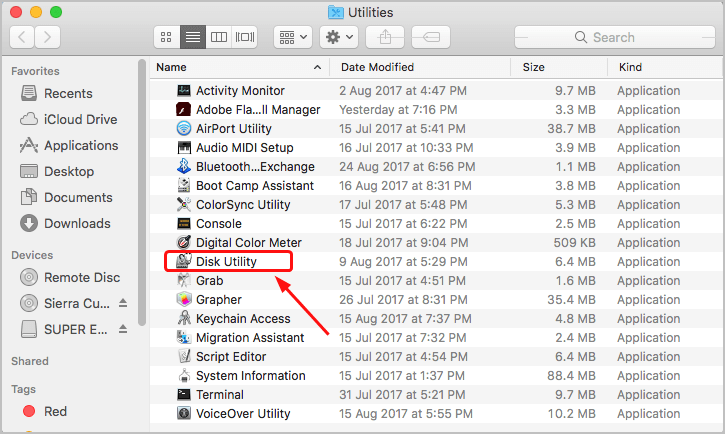
- Double-click Disk Utility.
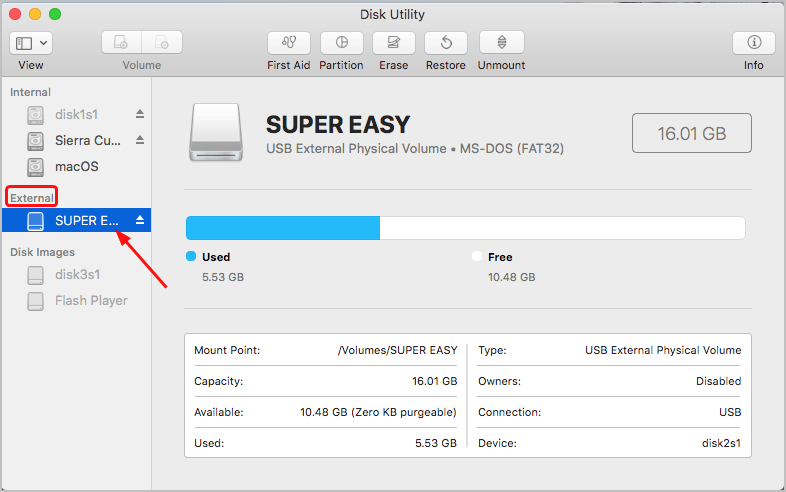
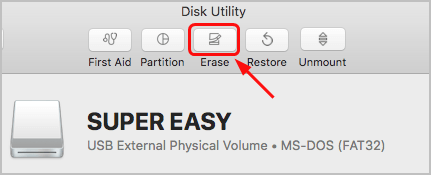
- Click your USB drive which you’re going to format under the External section in the sidebar.
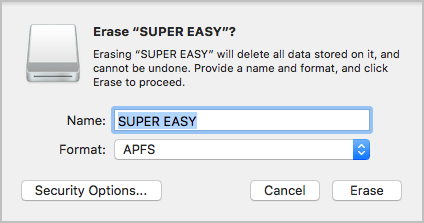
- Click the Erase icon.
- Name your USB drive and click the drop-down menu of Format to select the format which you want format your USB drive to. Then click Erase.
Important: This process will remove all the data on your USB drive, please backup any important files before you go.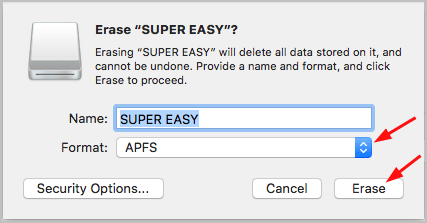
Tada! Now your USB should be formatted on your Mac computer. Feel free to comment below for any question.


![[FIXED] There was an error connecting to the Apple ID server](https://www.supereasy.com/wp-content/uploads/2018/07/Snap64.jpg "[FIXED] There was an error connecting to the Apple ID server")
![How to Fix Mac White Screen Issue [Super Easy]](https://www.supereasy.com/wp-content/uploads/2020/02/thomas-q-3xQ65cknLPk-unsplash-768x432.jpg "How to Fix Mac White Screen Issue [Super Easy]")

")
")
")

 in 2024")
")