How to Fix HTML5 Video Not Found (2024)

10 Revisions
")
HTML5 is a new type of video element that is designed for playing videos on web browsers. But some users may receive the message HTML5 video not found during your streaming. There are several possible causes:
- Outdated web browser
- Overloaded cookies and cache
- Unsupported codec files in your browser
- Corrupt embedded video file
If you’re also faced with this vexing issue, no worries! Below we’ve gathered some fixes. But before diving into the troubleshooting steps below, try a quick browser restart. If your problem persists, try these methods:
- Update your Chrome browser
- Clear cache & cookies in Chrome
- Disable Hardware Acceleration
- Open Chrome in Safe Mode
Method 1: Update your Chrome browser
The first troubleshooting step you should take is to make sure you’re using the latest version of Chrome. Keeping Chrome up to date would allow you to take advantage of the latest features and fixes. To update your browser, follow the steps below.
- In the top right corner of Chrome, click on the three dots. Then select Help > About Google Chrome.
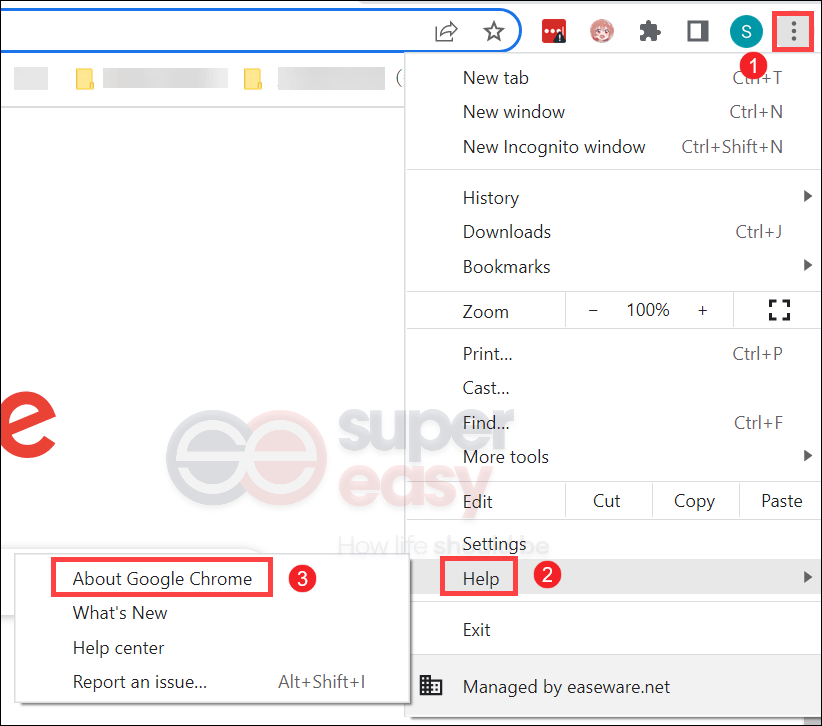
- You’ll be prompted with the UAC window, simply click Yes. Then Chrome will be forced to manually check for an update.
- Once the update is installed, it will show you a message saying “Chrome is up to date”. Then restart your browser.

If this works for you, you can turn on auto updates for Google Chrome so that you can always have the latest security features and fixes. To do this, follow the instructions below.
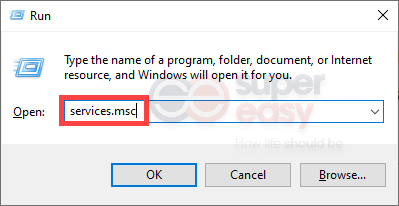
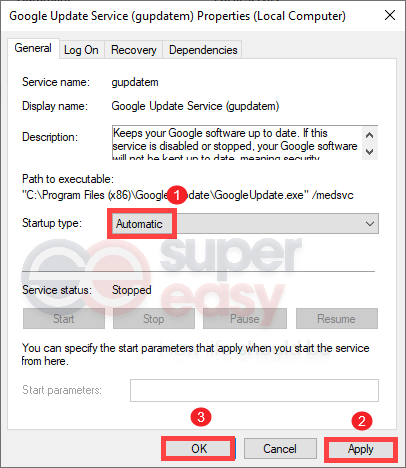
- On your keyboard, press the Windows logo + R keys simultaneously to open the Run box.
- Type services.msc and hit Enter.
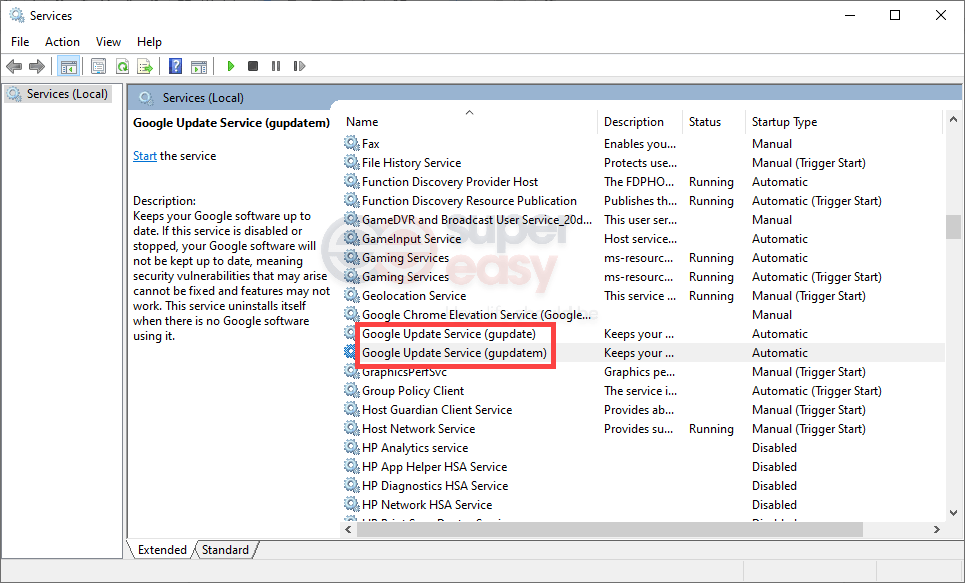
- Double-click Google Update Service (gupdate) and Google Update Service (gupdatem) respectively.
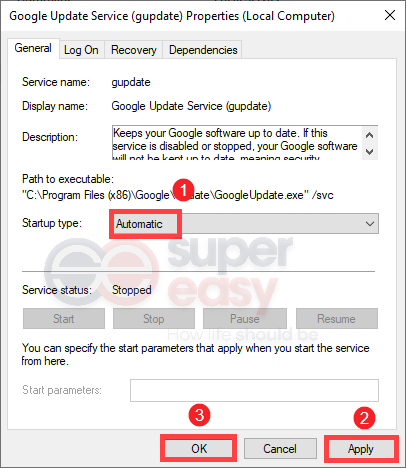
- Select Automatic for the Startup type. Then click Apply > OK.
Method 2: Clear cache & cookies in Chrome
Cookies are small packets of data, browsing data included, that are saved as text files on the web browser of your computer to make your online experience easier. While a cache stores data from websites, such as images to help them open faster if you access them again. Even though they are relatively small in size, they will accumulate over time and are more likely to cause certain problems, like formatting issues on sites. To prevent this from happening, you’re supposed to delete them on a regular basis.
- In Chrome, press the Ctrl + Shift + Delete keys simultaneously.
- Click Clear data.
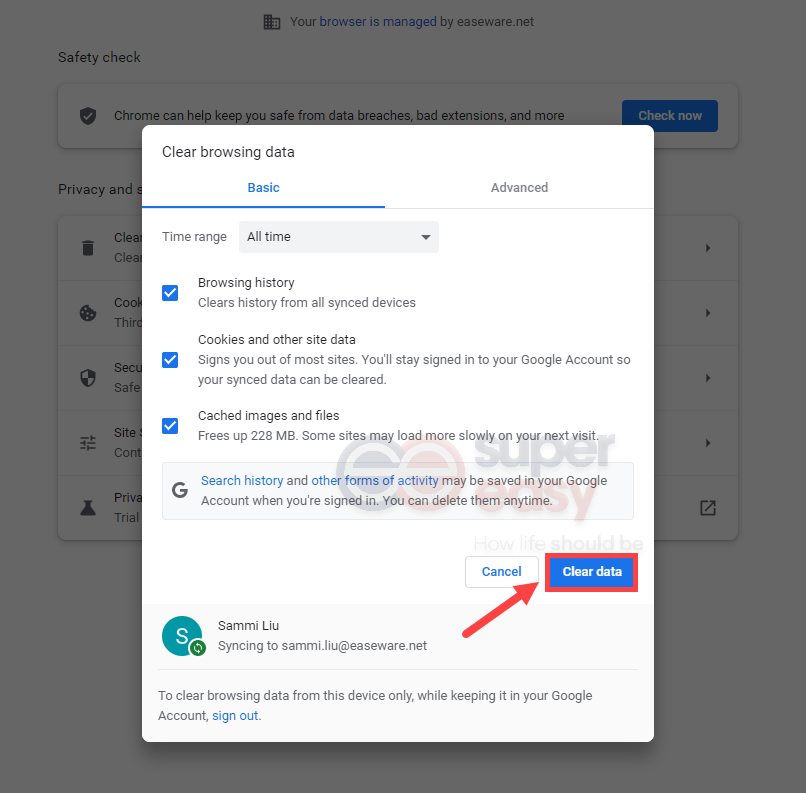
Then go back to your webpage and press F5 and you should be able to watch your videos without any interruptions.
If this doesn’t do the trick, try the next method below.
Method 3: Disable Hardware Acceleration
Hardware acceleration is enabled by default in Google Chrome. When it’s enabled, Chrome is allowed to use more of your device’s hardware to improve the overall performance of it. However, sometimes it causes issues. To check if that’s your case, try to turn it off.
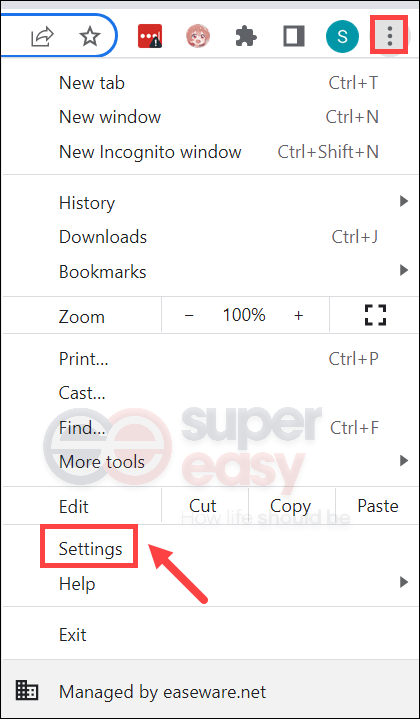
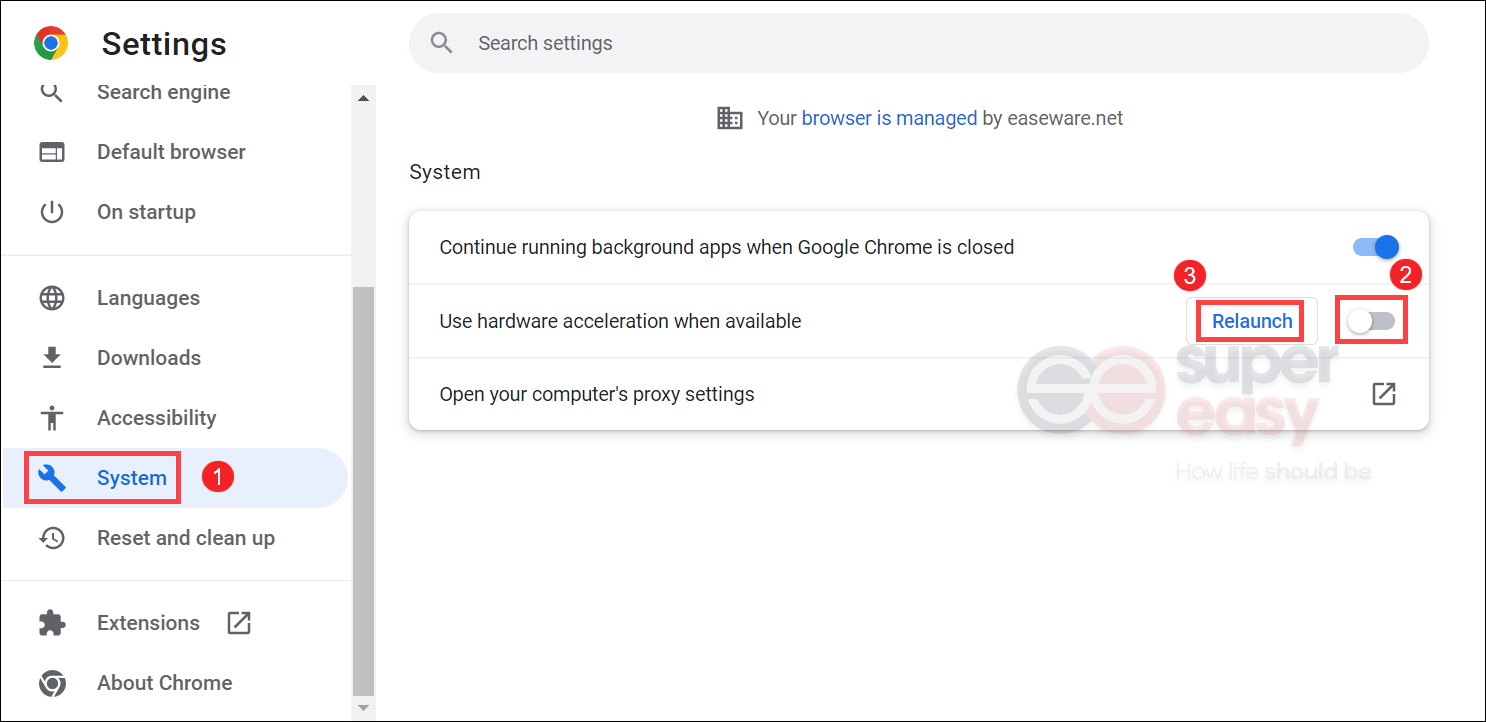
- In the top right corner of Chrome, click on the three dots. Then select Settings.
- In the left navigation panel, select System. Then toggle off Use hardware acceleration when available. After making these changes, click Relaunch. Then reload your webpage and check if this method helps.
Method 4: Open Chrome in Safe Mode
Google Chrome Safe Mode, or incognito mode, enables the stripped-down version of the Chrome browser, without any extensions running in the background. This can ensure that your browser works faster and more smoothly and thus fix the issue you’re having. To open Chrome in Safe Mode, take the steps below.
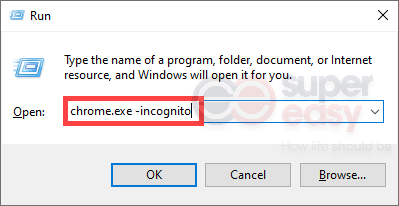
- Close your browser. Then press the Windows logo + R keys simultaneously on your keyboard to open the Run box.
- Type chrome.exe -incognito and press Enter. Google Chrome will now be launched in incognito mode, an equivalent of Safe Mode in Chrome.
Bonus Tips: How to repair corrupt videos
If you save your video files in your hard drive, SD card, or USB flash drive, you may run into an issue of them not playing or being prompted with an error. This indicates that your videos are corrupted. In this situation, you can use a professional video repair software to fix corrupt or damaged videos. Below we introduce a secure, user-friendly, and effective software to repair your videos – iMyFone UltraRepair.
This software is incredibly easy to use and with just a few clicks, you should be able to get your damaged or blurry videos back. Below are the simple steps you can take.
- Download and install iMyFone UltraRepair.
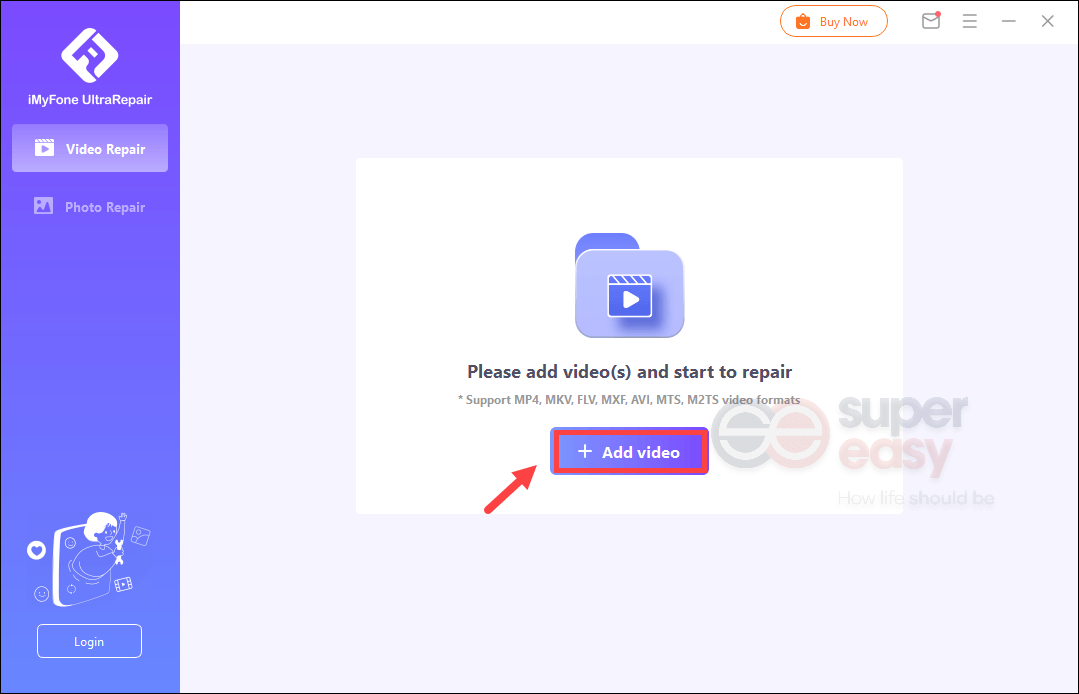
- Launch the program. Select Video Repair from the left and then click on the + Add video option to upload your problematic video file.
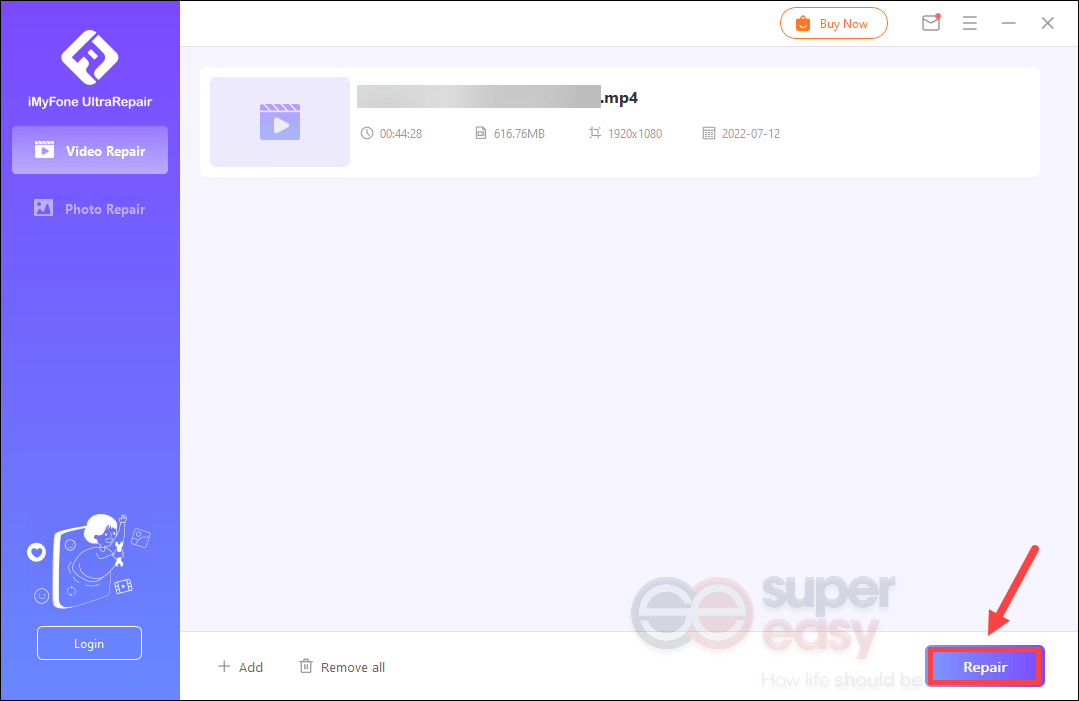
- Once you’ve successfully uploaded the video, click on the Repair button on the bottom-right corner of the screen.
The repair is available with the paid version that comes with 30-day money-back guarantee and full technical support. If you click Repair, you’ll need to select a subscription plan of your preference.


![How to Download 4K Video [The Easy Way]](https://www.supereasy.com/wp-content/uploads/2019/04/download-video.jpg "How to Download 4K Video [The Easy Way]")
")


")
")
")

 in 2024")
")