How to copy photos from iPhone to PC [SOLVED]

16 Revisions
![How to copy photos from iPhone to PC [SOLVED]](https://www.supereasy.com/wp-content/uploads/2018/11/phone-690134-768x512.jpg "How to copy photos from iPhone to PC [SOLVED]")
Don’t know how to copy photos from your iPhone to your PC? It’s very, very easy! After reading this article, you should be able to do it on your own easily! You can transfer the photos on your iPhone to your PC using iCloud Photos or Windows Photos app!
Don’t know how to copy photos from your iPhone to your PC? Don’t worry! You’ve come to the right place. It’s very, very easy! After reading this article, you should be able to do it on your own easily and quickly!
Try these methods
- Use iCloud Photos to sync the photos on your iPhone to your PC automatically
- Use Windows Photos app to transfer the photos from your iPhone to your PC
Method 1: Use iCloud Photos to sync the photos on your iPhone to your PC automatically
With iCloud Photos, you can access all of your photos and videos from your iOS devices on iCloud.com and your PC. What’s more, your latest shots will be automatically added to iCloud Photos. And every changes you made on your iPhone will always be kept up to date across all you devices.
You can follow the instructions below to sync the photos on your iPhone to your PC using iCloud Photos.
Step 1: Turn on iCloud Photos on your iPhone
- Unlock your iPhone. Go to Settings and sign in to your iPhone with your Apple ID. When you sign in, iCloud is turned on automatically.
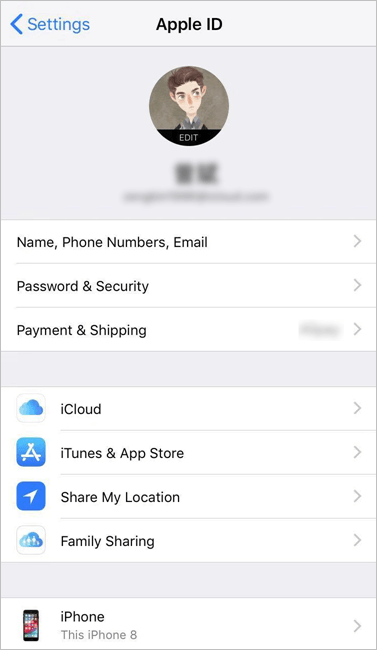
- Make sure your iPhone is connected to Wi-Fi.
- Follow the steps below to turn on iCloud Photos on your iPhone.
- Go to Settings > [Your Name] > iCloud > Photos.
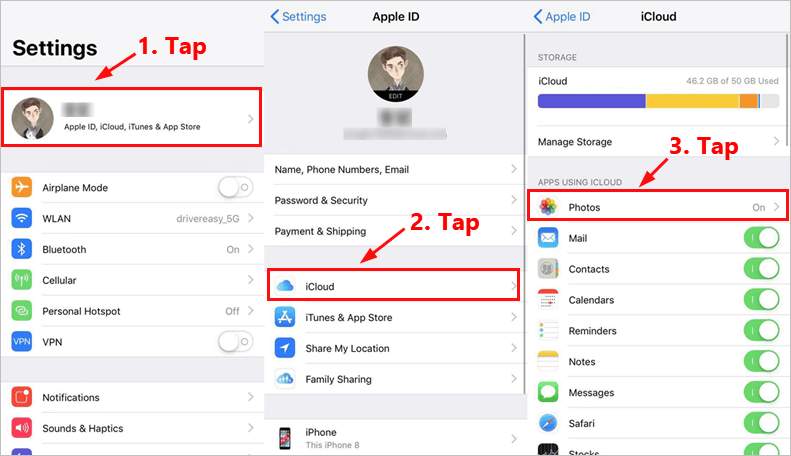
- Turn on the toggle next to iCloud Photos.
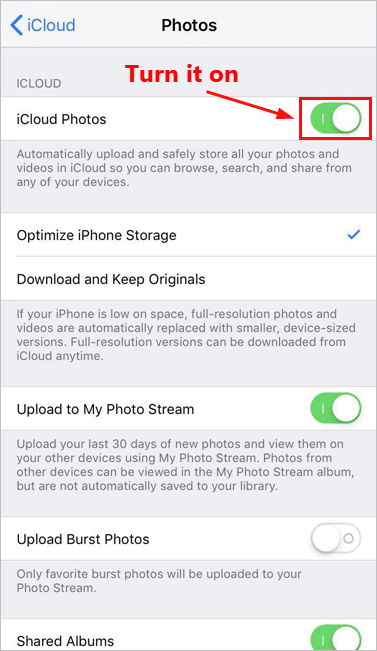
Note: After you turn on iCloud Photos on your iPhone, you’ll see the message “Photos and Videos Synced from iTunes will be Removed” if you’ve already synced photos to your iPhone from iTunes. The photos and videos that you synced from your PC will stay on your PC, but they will be deleted from your iPhone after you turn on iCloud Photos on your iPhone.
- Go to Settings > [Your Name] > iCloud > Photos.
Step 2: Set up iCloud Photos on your PC
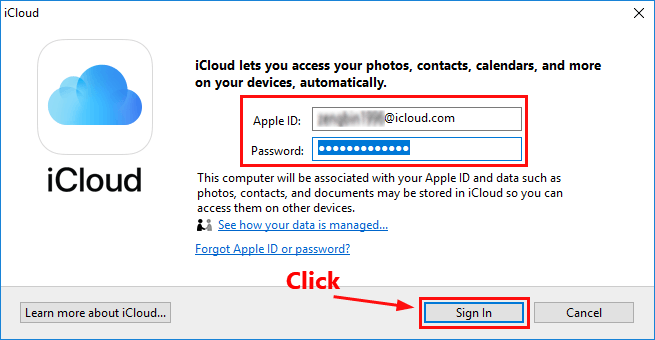
- Click here to download iCloud for Windows. Click the download button to download. Then double-click the downloaded file and follow the on-screen instructions to install it on your PC.

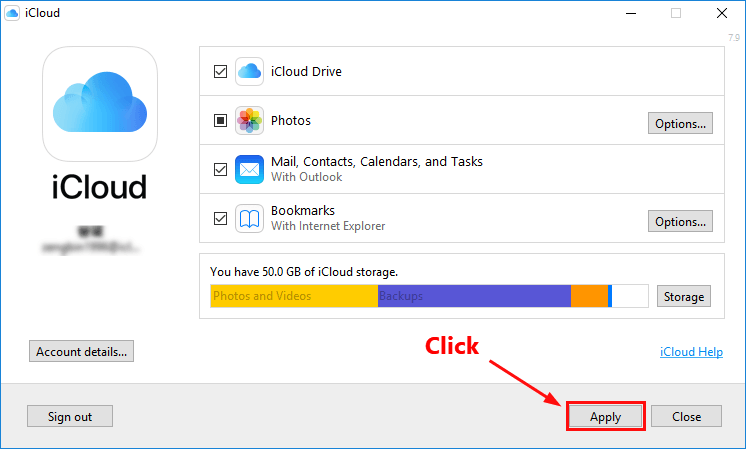
- Open iCloud for Windows. Use the same Apple ID to sign in to your PC.
- Click Options… next to Photos.

- Check the box next to iCloud Photo Library. You can also customize the location of your upload and download folders by clicking the Change… button. Click Done to save the changes.
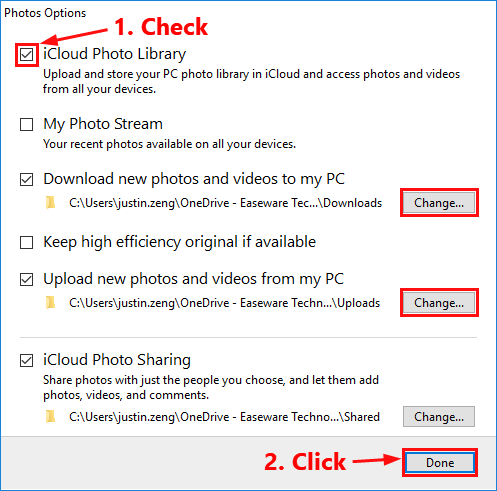
Note: My Photo Stream is turned off automatically when you turn on iCloud Photos on your PC. - Click Apply to apply these changes.
Note: Any new photos and videos you add to your library will automatically download to your PC after you turn on iCloud Photos on all of your devices .
Step 3: Download photos from iCloud to your PC
You can download your collections by year from iCloud to your PC. Here is how to do it:
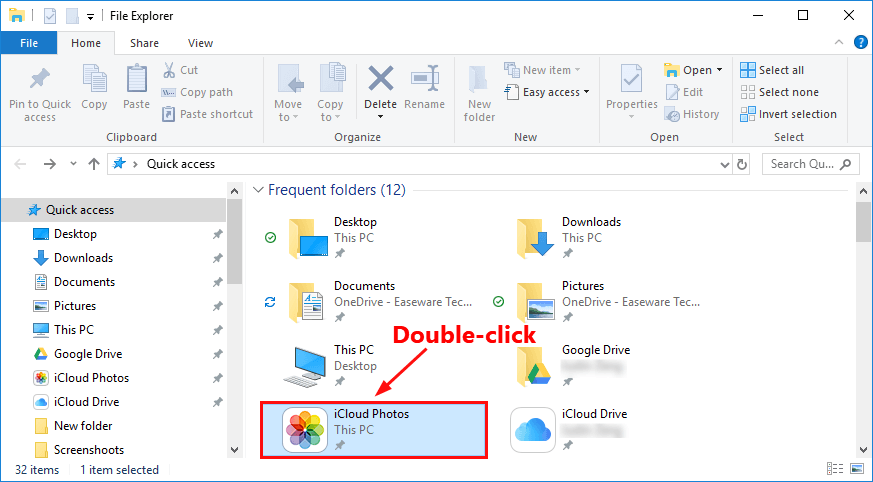
- On your keyboard, press the Windows logo key and E at the same time to open File Explorer.
- Double-click iCloud Photos to open it.
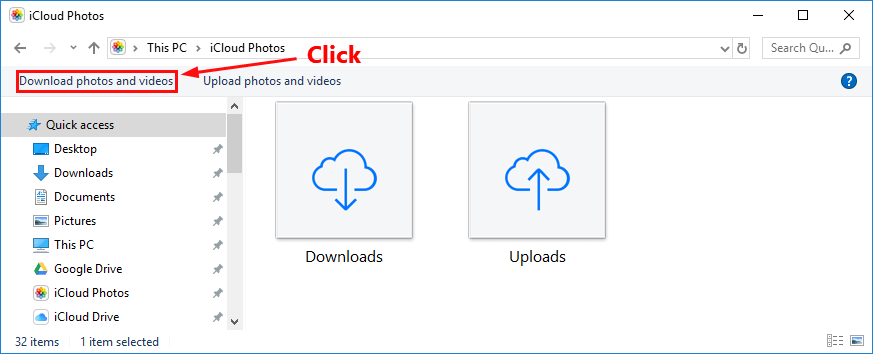
- Click Download photos and videos.
Note: If there are too many photos and videos on your iCloud Photos, you will see the message below after you click Download photos and videos. Just give iCloud Photos some time to prepare your photo and video library.
- Check the box next to a year and click the Download button to download all the photos and videos of that year to your PC.

Method 2: Use Windows Photos app to transfer the photos from your iPhone to your PC
You can also transfer the photos on your iPhone to your PC using the Photos app on your Windows PC. Here is how to do it:
Note: If you’ve turned on iCloud Photos on your iPhone, the photos and videos that exist on iCloud won’t be imported to your PC using Windows Photos app, since those items might not on your iPhone. Windows Photos app can only import the photos and videos that exist on your iPhone. For those photos that are on iCloud, you can refer to Method 1.
- Connect your iPhone to your PC with a Lightening cable.
- Unlock your iPhone. When you see the Trust this device notification, tap Accept.
- On your PC, press the Windows logo key and type photos. In the list of search result, click Photos to open the Photos app.
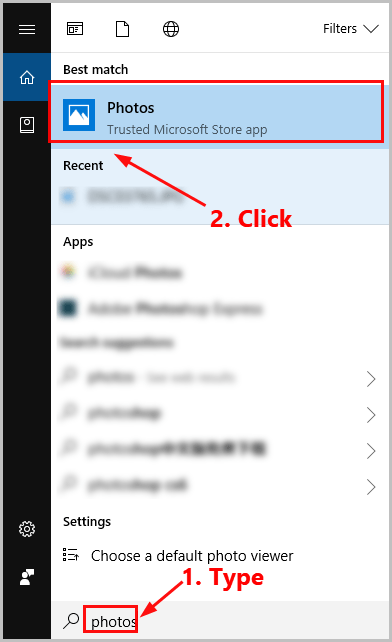
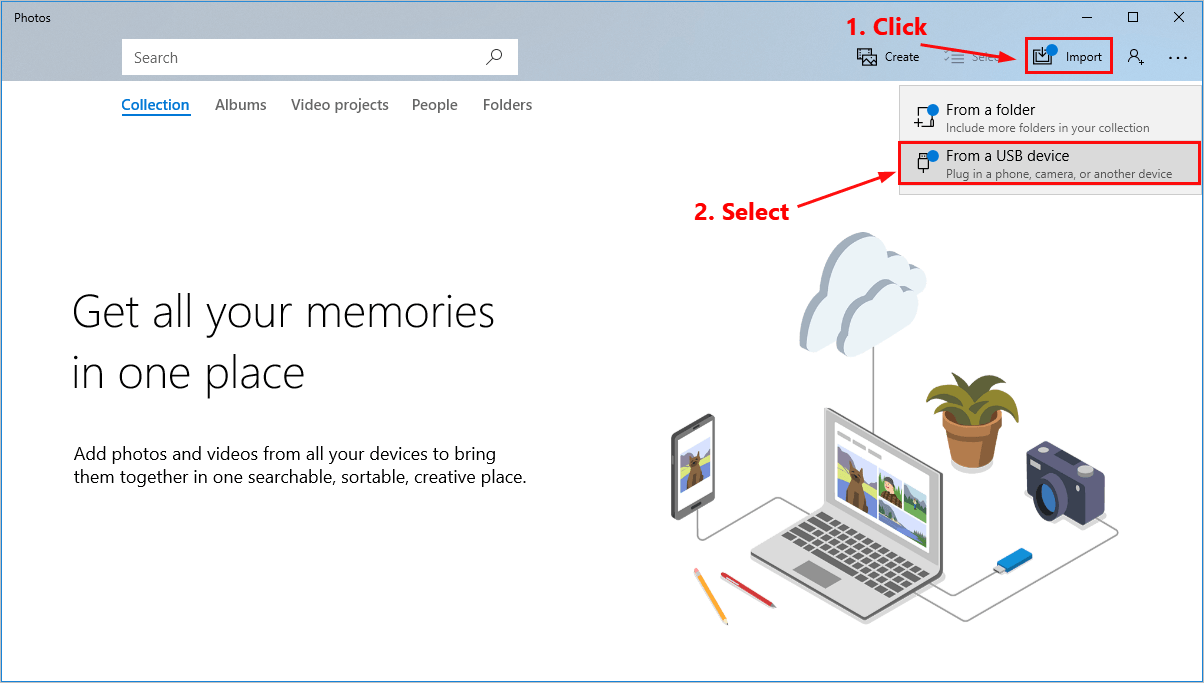
- Click Import on the upper-right corner. Then select From a USB device. Then Windows photos app will find all the photos and videos on your iPhone.
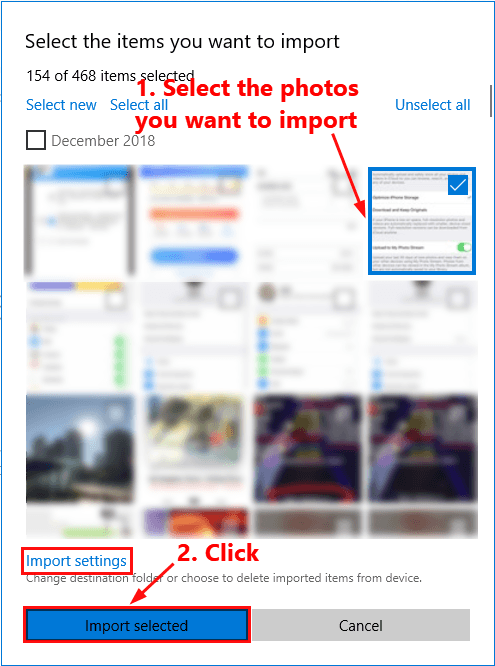
- Select the photos you want to import and click Import selected to import them to your PC. If you want to change the import destination, click Import settings.
- You can view those imported photos in the Photos app.

It’s very, very easy, isn’t it? If you have any questions or suggestions, please leave your comment below.


![How to Erase an iPhone [2 Ways]](https://www.supereasy.com/wp-content/uploads/2018/06/smartphone-1957741_1920-768x473.jpg "How to Erase an iPhone [2 Ways]")


![[SOLVED] FaceTime Not Working on iPhone/iPad/iPad touch](https://www.supereasy.com/wp-content/uploads/2019/04/image-250.png "[SOLVED] FaceTime Not Working on iPhone/iPad/iPad touch")

")
")
")

 in 2024")
")