How to Fix “The specified network name is no longer available” Error

12 Revisions

The specified network name is no longer available can be easily fixed. The steps here apply to Windows 10, 7 & 8.1.
When trying to access the shared resources, if you run into error “The specified network name is no longer available“, don’t worry. Here are four solutions for you try to fix it. You may not have to try them all. Just work your way down the list until you find the one that works for you.
- Disable any antivirus software temporarily
- Enable SMB 1.0
- Enable services Computer Browser, Server & Workstation
- Map the network drive using IP address
Solution 1: Disable any antivirus software temporarily
Antivirus software may block you from accessing the shared resources. Symantec Endpoint Protection was known to have a bug causing “The specified network name is no longer available” error before. (For more information about this, please click here.) To see if that’s the problem for you, temporarily disable your antivirus and check if the problem persists. (Consult your antivirus documentation for instructions on disabling it.)
If this resolves the problem, contact the vendor of your antivirus software and ask them for advice, or install a different antivirus solution.
IMPORTANT: Be extra careful about what sites you visit, what emails you open and what files you download when your antivirus is disabled.
Solution 2: Enable SMB 1.0
If the device you’re trying to access supports SMB 1.0 (Server Message Block), but the system doesn’t support SMB 1.0, you would encounter error “The specified network name is no longer available“. On computer running Windows 10, SMB 1.0 is probably the cause, as SMB 1.0 is no installed by default in Windows 10 latest version. SMB is used to provide shared access to files, printers and serial ports.
To see if that’s the problem for you, just enable SMB 1.0 and check to see if the problem persists:
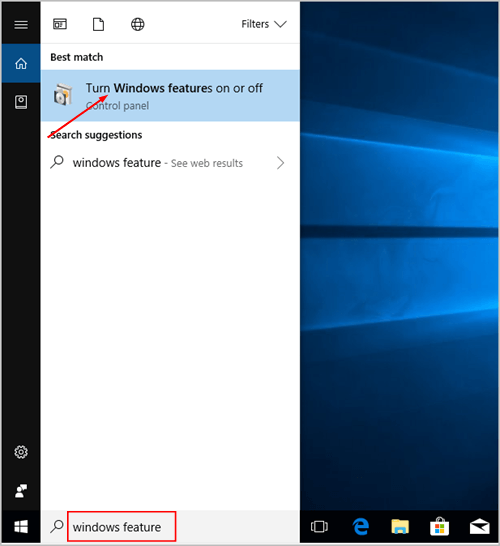
1) Type windows feature into the search box, then click Turn Windows features on or off.
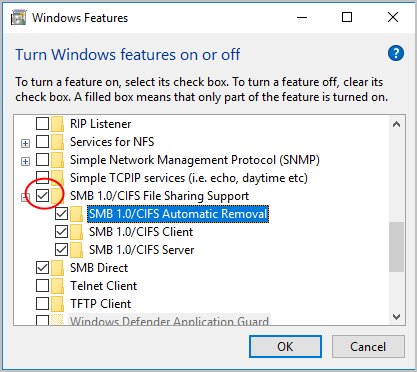
2) Scroll down to SMB 1.0/CIFS File Sharing Support. Check the box next to it then click OK.
3) When prompted Windows completed the requested changes, Click Restart Now.
4) After your PC reboots, check to see if the problem persists.
Solution 3: Enable services Computer Browser, Server & Workstation
To access shared resources successfully, ensure the Computer Browser, Server & Workstation services are running.
Before moving on, you may want to take a look at what these three services are used for in Windows below.
Computer Browser: Maintains an updated list of computers on the network and supplies this list to computers designated as browsers. If this service is stopped, this list will not be updated or maintained. If this service is disabled, any services that explicitly depend on it will fail to start.
Server: Supports file, print, and named-pipe sharing over the network for this computer. If this service is stopped, these functions will be unavailable. If this service is disabled, any services that explicitly depend on it will fail to start.
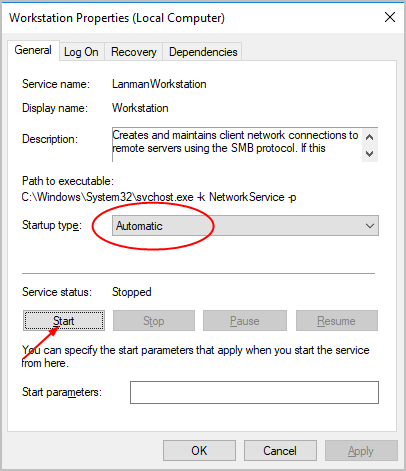
Workstation: Creates and maintains client network connections to remote servers using the SMB protocol. If this service is stopped, these connections will be unavailable. If this service is disabled, any services that explicitly depend on it will fail to start
Follow these steps configure the service to run automatically.
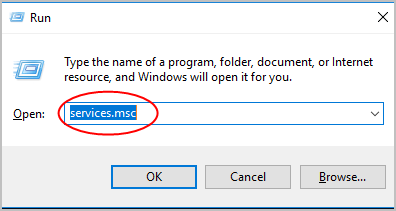
1) On your keyboard, press the Win+R (Windows logo key and R key) at the same time. This will invoke the run box.
2) Type services.msc and click OK.
3) Double click Computer Browser. Under the General tab, select the Startup type to Automatic, and click Start. Then click OK.

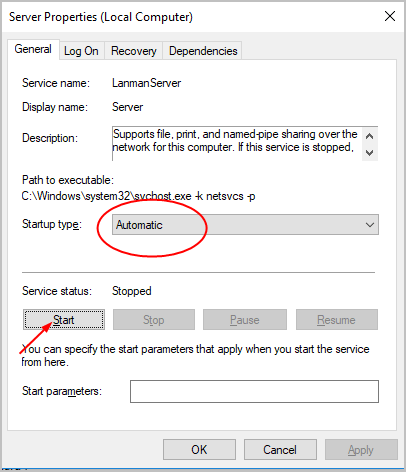
4) Double click Server. Under the General tab, select the Startup type to Automatic, and click Start. Then click OK.
5) Double click Workstation. Under the General tab, select the Startup type to Automatic, and click Start. Then click OK.
6) Restart your computer and check to see if the problem persists.
Solution 4: Map the network drive using IP address
If the above methods don’t work for you, try to map the drive using the IP address instead of the computer’s name. Follow steps below:
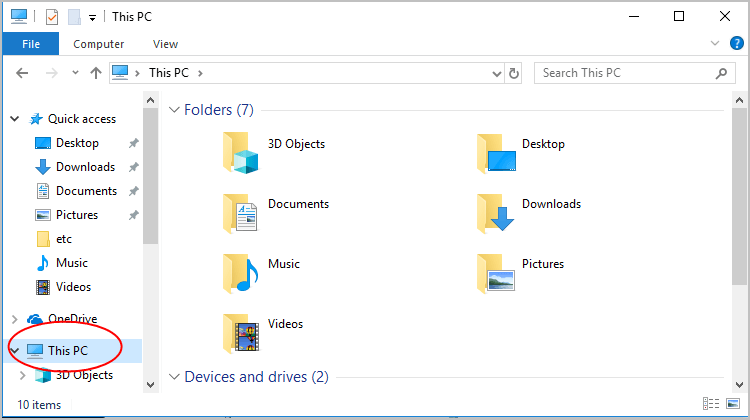
1) Open File Explorer and access This PC.
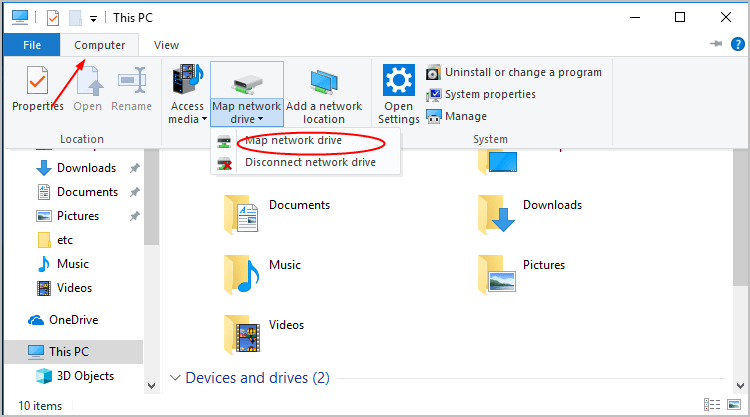
2) Click Computer then click Map Network Drive.
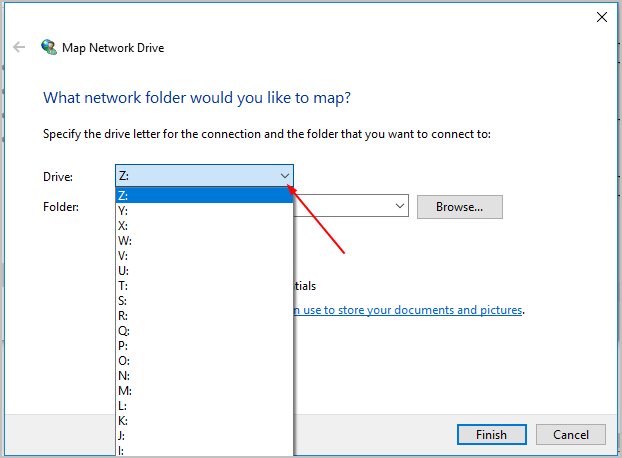
3) In the Drive section, select a drive letter from the drop down menu.
4) In the Folder section, enter the address of the shared folder you wish to access. The address would be like: \\IP address\share folder.
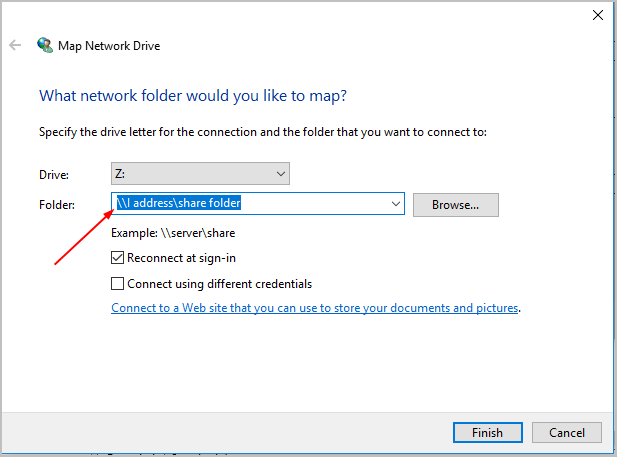
5) Click Finish and check to see if the problem persists.
Hopefully the solutions above help you resolve the error. If you have any questions or ideas, please feel free to leave your comments.


![There was a problem downloading the software for the iPhone [SOLVED]](https://www.supereasy.com/wp-content/uploads/2018/09/img_5baf46fe2d81a.png "There was a problem downloading the software for the iPhone [SOLVED]")
![OneDrive Not Syncing [Solved]](https://www.supereasy.com/wp-content/uploads/2018/09/Snap20.png "OneDrive Not Syncing [Solved]")

")
")
")

 in 2024")
")