Clear DNS Cache in Your Windows 10/8/7 or Mac OS EASILY!

23 Revisions

If your computer is experiencing any of the following:
- Internet connection issues (Internet keeps disconnecting/dropping out, connection timed out error, 504 gateway timeout error, page slow or not loading);
- DNS issues (like DNS Server is not responding)
etc, chances are you might have to flush your DNS cache to get everything back on track again. Jump here to clear your DNS cache.
What I might want to know about DNS
DNS (Domain Name System) cache is a temporary database that keeps tracks of a specific website’s DNS information upon a user’s first visit so that the information can be conveniently reused for future reference. But sometimes the DNS information of the website might have changed, hence different kinds of Internet connection and corrupted DNS issues.
So we might have to erase the DNS cache to remove any invalid records so that our computer can find the latest DNS information for the website.
Clear your DNS cache
Note: The screenshots below are from Windows 10, but the steps also work in Windows 8 & 7.
1) On your keyboard, press the Windows logo key  and type cmd. Then right click on Command Prompt and click Run as administrator.
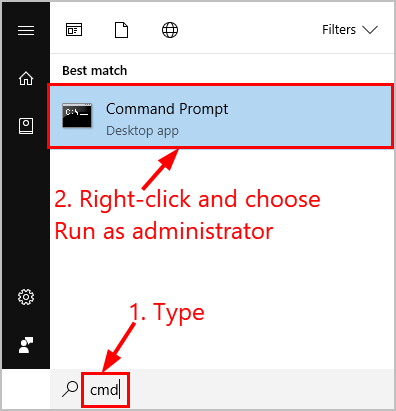
Click Yes when prompted to confirm.
2) Copy & paste ipconfig /flushdns into the window and press Enter.
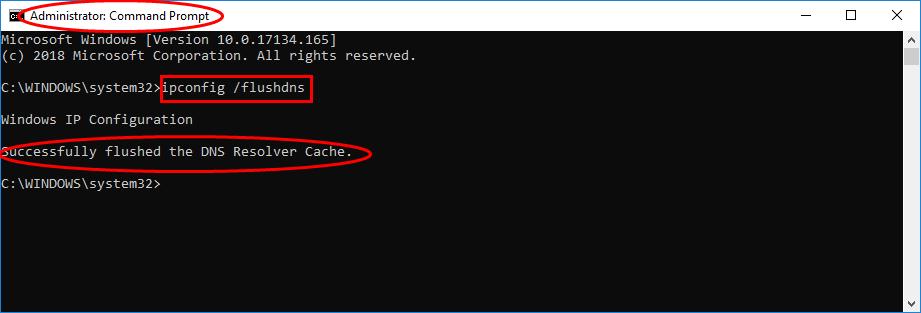
You’ll receive the message Successfully flushed the DNS Resolver Cache indicating a successful DNS flush.
1) Open Terminal on your Mac PC.
2) Choose your Mac OS from the table below, then copy & paste the corresponding command lines into the Terminal window and press Enter after each:
| Choose your Mac OS | Command Lines (minus the semicolon;) | |
| High Sierra (10.13) and later | macbook$ sudo killall -HUP mDNSResponder; sudo killall mDNSResponderHelper;sudo dscacheutil -flushcache | |
| El Capitan(10.11), Sierra(10.12) | macbook$ sudo killall -HUP mDNSResponder | |
| Yosemite (10.10)
| 10.10.4 + | macbook$ sudo dscacheutil -flushcache; sudo killall -HUP mDNSResponder |
| 10.10.1, 10.10.2, 10.10.3
| macbook$ sudo discoveryutil udnsflushcaches | |
3) Now congrats! Your DNS cache has been erased.
That’s it – everything you need to know about DNS and how to flush your DNS cache on your Windows 10/8/7 & Mac OS. Hope this helps and feel free to share your questions or ideas with us in the comment section below. 🙂


![[SOLVED] Error Code 0xc0000185 | Boot Configuration Data Error](https://www.supereasy.com/wp-content/uploads/2021/11/laptop-g9328c03a3_640.jpg "[SOLVED] Error Code 0xc0000185 | Boot Configuration Data Error")
![Recover Videos In Windows [Very High Success Rate]](https://www.supereasy.com/wp-content/uploads/2019/02/videos-768x390.jpg "Recover Videos In Windows [Very High Success Rate]")


")
")
")

 in 2024")
")